Do you draft blog posts on a desktop computer or laptop? If so, did you know you can now add photos to your post directly from your mobile phone? No more having to download photos to your computer or laptop.
Now you can add images and photos directly from your phone to a WordPress post.
Here’s how to do it:
Ensure you have the Jetpack app on your phone. If not, download it from the app store.
Insert an ‘Image‘ or ‘Gallery‘ Block on your post/page.
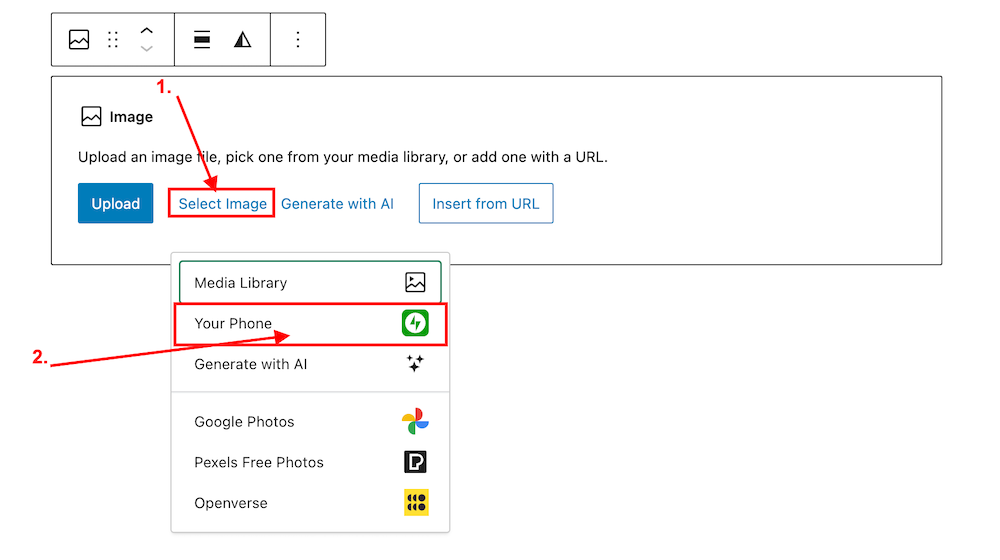
Click ‘Select Image.‘
From the dropdown menu, select ‘Your Phone.’ A message will pop up on your phone with a QR code.
Click ‘Select Image’ and ‘Your Phone.’
Scan the QR code.
4. Use your phone’s camera to scan the QR code. This will automatically open the Jetpack app on your phone and then your photo library.
5. Choose the image(s) you want to use: From there, simply click the image or images you wish to add to your post/page.
6. Click ‘Add‘ (top right corner): Watch your image(s) automatically appear in your desktop/laptop editor. Here’s one I added directly from my phone.
Can I adjust the size of images in the Jetpack app?
Yes. This is important to do to prevent images from taking up too much storage space in your blog’s media library. By default, the “Optimise Images” option is turned on. You can set the ‘Max Image Upload Size‘ so the original file is resized automatically when you upload it.
You can toggle ‘Optimize Images‘ off (not recommended) or adjust the ‘Max Image Upload Size‘. The default is 2000 x 2000px.
As you can see from the above image, I’ve set the maximum image upload size to 1000 x 1000px. I recommend not going any higher than this.
Is there anything to remember when uploading images directly from your phone?
Yes. If you add copyright information to images and photos on your computer or laptop (something I recommend you do), remember to add copyright information to your images and photos on your phone before you add them to your blog posts.
WordPress has managed to do it once more! It’s relocated a setting I frequently use, seemingly without informing anyone about it.
Turning comments off is simple to do. But WordPress has moved the settings!
During a recent post-drafting session, I attempted to disable comments on a post. I encountered difficulty locating the ‘Discussion‘ setting, which is the usual place for enabling or disabling comments on individual posts.
Why turn comments off?
I consistently close comments whenever I share another blogger’s post or a guest post I’ve written on another blog. This strategy ensures that new comments appear on the original post, consolidating the discussion in one place rather than being split between two posts. Kinda makes sense, doesn’t it?
Some bloggers also choose to close comments on older posts as a proactive measure. This practice became popular when WordPress faced a significant spam issue. Specific posts received hundreds of spam comments daily, making it challenging for bloggers to sift through the spam in their WordPress folders to find authentic comments that can sometimes end up there.
The installation of the updated Askimet anti-spam software in 2023 has led to a significant improvement in the spam situation. Thanks to Askimet’s enhanced functionality, the previously prevalent issue of hundreds of visible spam comments daily has been effectively curtailed to just a few a week. Consequently, there is no longer a necessity to close comments on these posts.
Where has the ‘Discussion’ setting gone?
The ‘Discussion’ setting used to be located at the bottom of the settings box of a post.
The ‘Discussion’ setting used to sit under ‘Tags.’
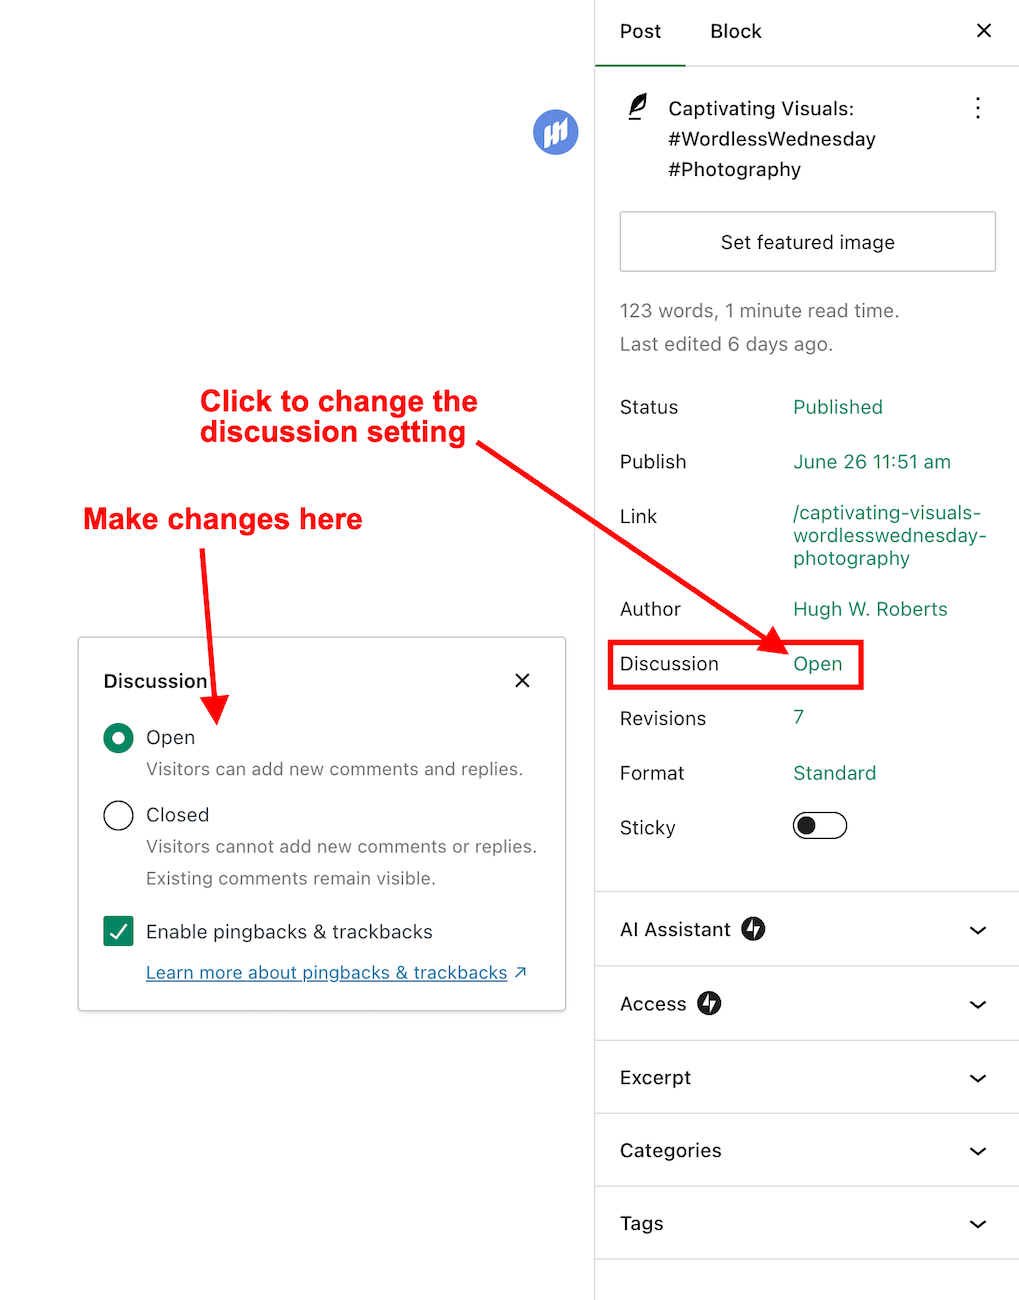
Now, the discussion setting has been conveniently relocated to a more prominent position at the top of the post settings panel rather than at the bottom. This new placement, coupled with the clear indication of whether comments on a post are open or closed, significantly enhances the ease and user-friendliness of managing comments and pingbacks.
Changing the discussion setting is straightforward. Click on ‘open‘ or ‘closed‘ to make the change.
The ‘Discussion’ setting is now further up the ‘draft post’ section of a post.
This simple, user-friendly system also allows you to control comments, pingbacks, and trackbacks.
This is where to turn on or switch off pingbacks on your WordPress posts.
Pingbacks and trackbacks are methods for alerting other blogs that you have linked to them. However, they only work when the blog you’re linking to has enabled pingbacks and trackbacks and you do not link to a blog’s home page. My post, ‘The Power Of Pingbacks: How To Create One‘, has more details.
Do you disable comments on posts? If so, which posts? Do you have any questions about the ‘Discussion’ setting on WordPress? Please leave them in the comments box.
Layout, content, settings, and format might differ on self-hosted blogs.
Click the buttons below to follow Hugh on Social Media
Imagine having a blog where nobody wants to engage. It’s a thought that’s hard to fathom. After all, what’s the point of writing and publishing blog posts if there’s no one to interact with?
How do you engage with your readers and other bloggers?
As bloggers, we can spark curiosity and questions in our readers, even when publishing informative posts. And that’s where the actual engagement begins. It’s our responsibility to set the stage for meaningful interactions. One way to do this is by asking open-ended questions at the end of your posts or inviting readers to share their thoughts or experiences related to the post’s topic. It can encourage more in-depth and meaningful discussions.
Those bloggers who blog to make money will only care a little about the interaction. For them, making a living out of blogging is more important. Good for them if they are successful, but take your readers seriously, especially if they want to engage with you. Consider removing the comments section from your blog if you’re going to refrain from engaging or responding to questions.
What’s the right way to engage with readers? Is there a right way?
I’ve always craved engagement, but over the ten years I’ve been blogging, the type of engagement I crave has changed.
I’ve become more of a ‘discussion’ blogger. By that, I mean a blogger who likes to discuss the subject of a post rather than just leaving a comment that only confirms I visited. It’s about sparking a conversation, sharing different perspectives, and learning from each other. This type of engagement is more valuable than a simple ‘I agree’ comment, as it adds depth and richness to the post’s content.
Over the past year, I’ve made a conscious effort to reduce the number of non-engaging comments on my blog, a decision I’m proud of. I’ve aimed to break free from the cycle of leaving comments solely to prove a visit or just for the sake of doing so.
This shift has decreased the overall number of comments I get but has made me feel like a more thoughtful and influential blogger. It’s not about the number of comments but the quality of the interactions. This change has helped my personal growth in writing and blogging.
Should we always try to engage? No!
Of course, just because I don’t leave a comment on a blog post does not mean I’ve not read it. Likewise, I know many people read my posts but want to avoid engaging. There’s nothing wrong with that. These silent readers are still part of the blogging community; their support is as important as active engagement. So, let’s recognise their presence and continue to create content that resonates with them.
If you’re new to blogging, leaving an engaging comment every once in a while is far more beneficial than leaving short, non-engaging comments on every post you read in an attempt to get noticed.
Are you approving spam comments without realising it?
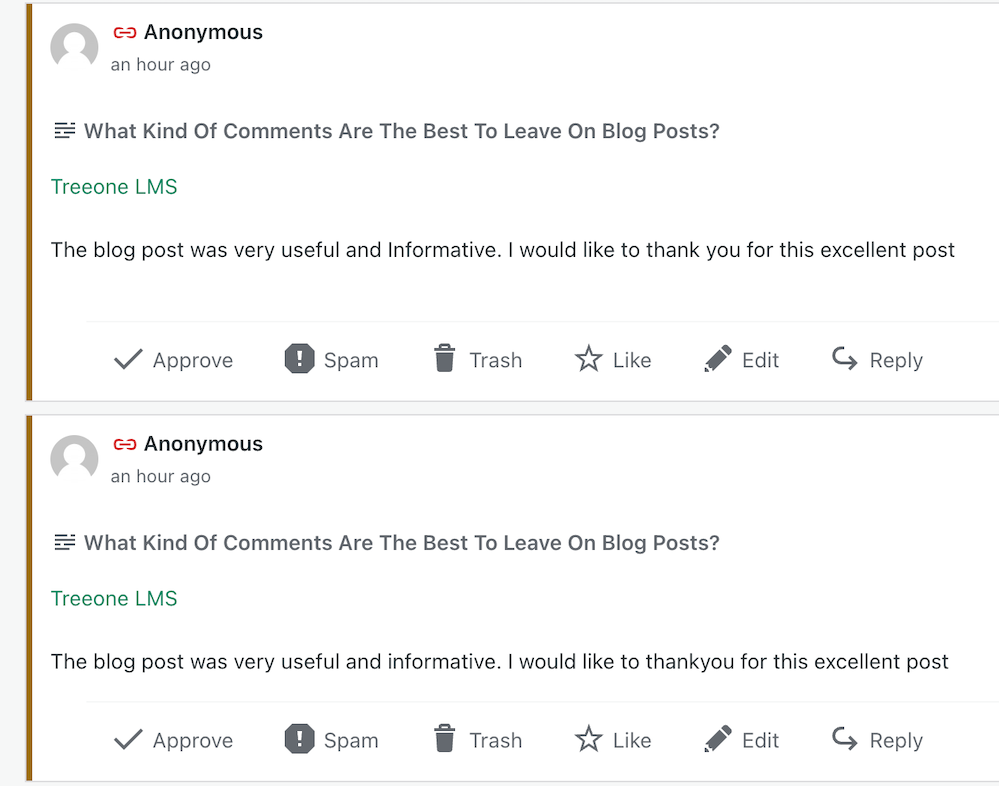
Imagine my concern when I came across this comments section on a recently read post.
Never approve these types of comments
I was appalled to see these comments and could not understand why they’d been approved. Given that the blog’s posts would probably be full of these types of comments, I also decided not to follow it.
Spam comments not only detract from the quality of a blog but also discourage meaningful interactions. Let’s keep the blogging community free from such spam and focus on producing meaningful engagement. Your thoughts and ideas are too valuable to be drowned out by spam.
Other examples of spam comments.
Some may look genuine, but they’re not. Spammers and spambots are getting cleverer at fooling us into approving their comments, so beware.
Thank you
I want to express my deep appreciation to all of you who support and interact with me here. Your engagement is not just a number on a screen but a vibrant testament to the joys and value of blogging. I especially want to acknowledge those who actively interact with me, as your contributions are the lifeblood of my blog.
Remember, it’s not just about the numbers but the profound connections we build through interactions. For instance, when a reader shares a personal experience related to a blog post or when we engage in a thoughtful debate about a controversial topic, these are the types of interactions that genuinely enrich the blogging community.
Let’s wrap it up.
This post delves into the importance of engaging with readers and other bloggers, offering insightful strategies to spark meaningful interactions.
Avoid leaving short, non-engaging comments on all the posts you read. Instead, leave a thoughtful comment every now and again.
Don’t leave a comment just to leave a comment or prove you’ve visited.
Never feel obligated to comment because they always comment on your posts.
There’s nothing wrong with not wanting to engage. Some readers are more comfortable reading a post without saying anything.
Take your readers seriously by responding to or acknowledging their comments.
Never approve spam comments. Mark them as spam and delete them.
Consider closing comments off if you do not want to engage with your readers or respond to any questions.
If you crave engagement, ask open-ended questions at the end of your posts or invite readers to share details of their experiences with the subject you’ve discussed in the post.
Do you enjoy engaging with your readers and other bloggers? What type of commenter are you? How do you deal with spam comments and the spammers? Share your knowledge and ideas in the comments section.
Click the buttons below to follow Hugh on Social Media
Categorising and tagging blog posts are some of the most potent ways for bloggers to get their posts noticed. However, some bloggers don’t bother with either, meaning they’re losing the potential for new readers and followers. Are you one of them?
But what are categories and tags, and how do they work?
Do you categorise and add tags to all your blog posts?
What are blogging categories?
Blogging categories act like groups where blog posts that have a connection with each other are stored.
For example, if you’re a travel blogger, you could have The United Kingdom categoryand list the sub-categories Scotland, Wales, England, and Northern Ireland.
Categories are important because they make finding specific blog posts more straightforward for visitors to your blog (especially first-time visitors).
Every blog post should have at least one category.
Unfortunately, if you don’t categorise blog posts, they will be uncategorised, which is no help to anyone.
Imagine going into a shop to find a particular book about dinosaurs and finding that none of the books has been categorised. You’d leave and go to another shop that helps customers by categorising its books to find what you’re looking for much easier.
I never return to blogs that do not categorise posts.
How to add a category to your WordPress blog post
This tutorial uses an Apple iMac desktop computer and the WordPress ‘Default’ dashboard.
While drafting a blog post, you’ll see a toolbar in the settings area on the right-hand side of the page. This is where you can add categories.
Every blog post should have at least one category.
If a blog post doesn’t fit into one of your existing categories, click ‘Add New Category‘ and create a new one.
Remember to do some housekeeping regularly for the categories on your blog. For example, delete categories that are no longer being used or update categories by giving them a new name if something works better.
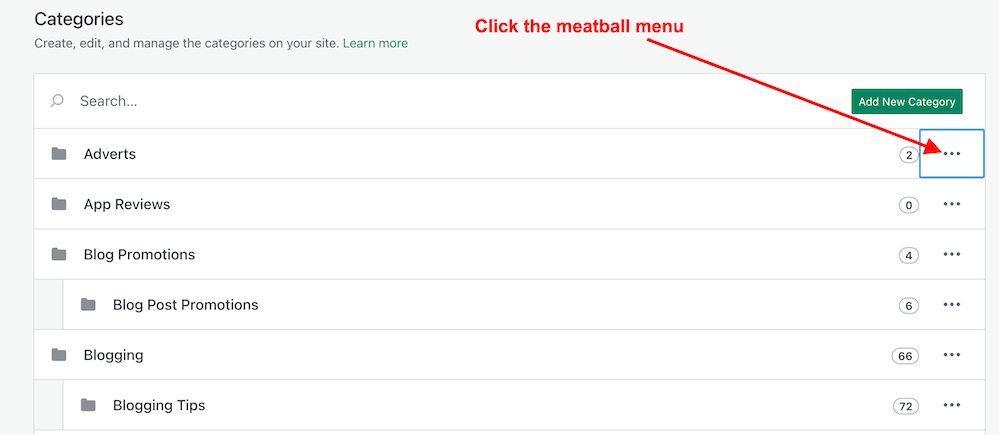
How to edit the categories on your blog.
On your blog’s dashboard, click on Posts to open a submenu, and click on Categories.
Click Posts and Categories.
To edit a category, click the three verticle dots (meatball menu) next to the category you want to edit.
Click the meatball menu to edit a category.
The meatball menu displays four options: edit, delete, view posts, and set as a default.
Edit – Edit the name or description of the category.
Delete – Delete the category.
View posts – View a list of all your posts under the category.
Set as default – Useful when most posts fall under a particular category.
Remember to click the ‘Update‘ button to save any changes you make.
The number next to each category tells you how many posts are under that category. I recommend deleting any categories that are not being used.
Any sub-categories will show under each category.
Tip: Setting your default category to ‘Uncatorigised‘ allows you to search for any blog posts you may have forgotten to categorise.
What are tags?
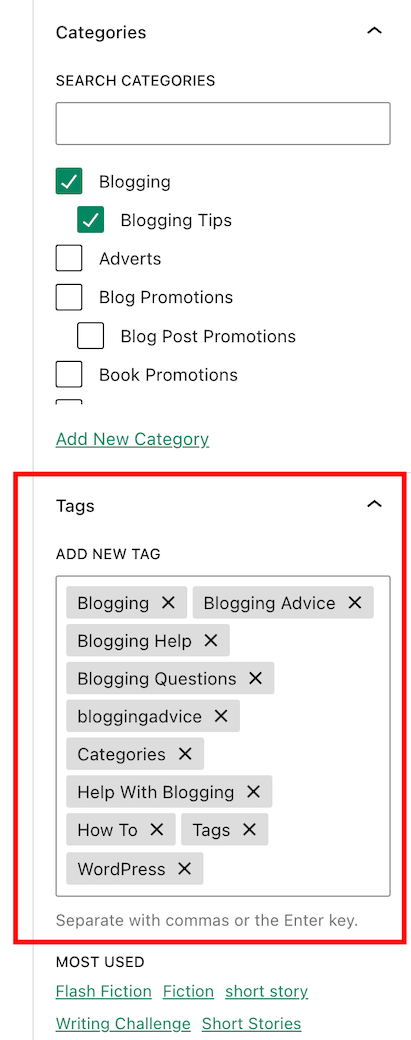
Tags are popular keywords that can be added to a blog post. For example, some of the tag words I’ve added to this post are –
blogging
bloggingtips
categories
tags
WordPress
HowTo
Each tag should be separated with a comma or by pushing ‘Enter’ on your keyboard.
Tags containing more than one word (such as ‘Blogging tips’) act as one tag word, but you must add them without any space between the words, i.e., ‘ blogging tips’ becomes ‘bloggingtips.’
Generally, tags do not need to connect with each other, but when used correctly, they can generate a lot of extra traffic to a blog post.
Like categories, tags can be added to blog posts in the settings area toolbar on the right side of a draft post.
Always add keywords (Tags) to your blog posts.
When adding tags to your post, consider the keywords somebody would add to the WordPress search bar when looking for specific blog posts. Or think of words you would use to search for your post.
Check out the tags I’ve added for this blog post. They appear at the end of every post.
Important information – Did you know this…?
The cardinal tagging rule on WordPress.com is that you should never add more than 15 tags and categories (combined) to your post; otherwise, it won’t appear in the WordPress Reader.This cap prevents spam posts from appearing on the reader list, as spammers and spambots tend to use many categories and tags to lure readers in
15 tags and categories can seem like a lot, but you don’t need to use all of them.
Never tag your blog post with words that have nothing to do with the post’s subject. Otherwise, visitors will come to your blog under false pretences and probably won’t return.
Generally, I add no more than three categories and between six and ten tags to my blog posts.
As with categories, it’s also essential to do some housekeeping for the tags you use on your blog.
How to delete and update tags
On the dashboard of your blog, click on Posts – Tags.
A page showing your tags and how many blog posts containing each tag appears.
To edit, view and delete posts containing a tag word, hover your mouse over each tag word and click edit, quick edit, view or delete.
You can also view the posts containing the tag word by clicking the number in the ‘Count’ column. I recommend deleting any tag words that are no longer being used.
Let’s wrap it up!
All blog posts should be categorised and tagged.
Categorising and tagging your blog posts makes them user-friendly, meaning people will likely return to your blog.
Not categorising your blog posts means they’ll be challenging to find.
When tagging posts, think of keywords others will use when searching for your blog post.
Don’t use tag words that have nothing to do with the subject of your blog post.
WordPress users – never add more than 15 tags and categories (combined) to your posts; otherwise, they won’t appear on the WordPress Reader.
Remember to perform regular housekeeping of categories and tags on your blog.
Adding the proper tags to your blog posts will increase the number of readers who find them. More readers mean higher stats, more comments, and new followers.
Do you categorise and add tags to all your blog posts? If not, why not? Which tags-words work best for you? Is there anything you’d like to add or ask regarding categories and tags in blog posts? Join the discussion by leaving a comment.
Did you enjoy reading this post? Then you may also like…
How obsessed are you with your blog stats and blogging? And what essential points have you learned about blogging?
How obsessed are you with your blog?
When I first started blogging in 2014, I was obsessed with my blog stats. I checked them almost hourly to see if anybody had visited my blog. We all know that wonderful feeling when somebody clicks the ‘like’ button, or better still, when somebody leaves a comment on one of our posts for the first time.
It didn’t matter what that comment said. Even if it was, ‘Great post,’ it made my day. How times have changed!
Taking the advice of other bloggers
When another more experienced blogger and somebody who had been blogging much longer than me told me that most of the hits my posts were getting were probably from people who didn’t stay more than a few seconds on my blog, my whole blogging world began caving in.
Even worse, that blogger told me that many of those who hit the ‘like’ button probably didn’t even read the post. What?
I was so deflated that I thought, ‘Why bother?’ It wasn’t until another blogger told me to stop obsessing over my blog stats and to put the energy of stat-watching into writing blog posts that I took that advice.
More trouble
A few months later, I found myself in trouble again. ‘Concentrate on the comments rather than how many people have visited your blog or how many have hit the ‘like’ button,’ another blogger told me. ‘Most importantly, don’t forget to visit, read and leave engaging comments on other blogs.’
But I took that last bit of information to heart and soon found myself spending all my blogging time reading and leaving engaging comments instead of writing posts. I was following over 500 blogs and I believed I had to read and comment on every single post.
Blogging guilt and stress crept up on me, and I thought I’d upset people if I didn’t read their posts and leave them comments, or, even worse, people would unfollow me if I stopped reading and leaving comments on their posts. After all, they were reading and commenting on all my posts.
Once again, I found myself on the edge of packing in blogging. I was going to delete my blog and find something else to do that was more fun and enjoyable.
How do you find the right blogging balance?
Thankfully, I never deleted my blog, but I know of bloggers who have done so, some of whom came back and started afresh. Unfortunately, it doesn’t always work out, and some of these bloggers went on to abandon their blogs for the same reasons they left blogging in the first place.
Finding a balance between writing blog posts and reading and commenting on other blogs can be a significant task. Thankfully, I found it.
I know some bloggers who balance blogging by reading as many posts as possible in as short a time as possible. They’ll often leave short, non-engaging comments on all those posts. It works for them, but not for me, but good for them if that’s what works.
What works for some won’t work for others.
Then there are the bloggers who reduce the number of blogs they follow without worrying that they’ll probably lose followers in the process (and they will), giving them more time to write. Good for them.
Why do bloggers suddenly stop leaving comments?
I’ve lost followers because I cut down on the number of blogs I followed. Now, I’m following around 75 blogs, all of which I’m interested in. That gives me more time to write, more time to read and more time to leave engaging comments on the blogs I follow.
I no longer get comments from people who always used to leave me comments, however, the fall in non-engaging comments is something I’m delighted with.
Some bloggers seem to have disappeared from the blogging world while others are still around, but have lost interest in what I have to say or no longer have anything interesting to add in a comment. But there’s nothing wrong with that. It’s not worth worrying about.
Are you more of an engaging or non-engaging blogger?
Someone once told me that a non-engaging comment indicates that the person who left it does not want to engage with you (or anybody else). This is usually because they’ll say they don’t have the time to engage. All they want to do is say, ‘Hello, I visited,’ before moving on quickly. They may not have even read the post.
And then there are the bloggers who leave comments like ‘Subscribe to my blog!’ or ‘Nice’ without saying anything else. Do they want to engage, or are they simply number/follower-hunting? I often wonder how would they react if I left them an engaging comment on one of their posts.
Of course, blogging isn’t only about engagement. Many people blog just to express their thoughts online. Some bloggers do not respond to comments. Some bloggers simply thank people for leaving a comment without engaging with them, even if the comment they’re responding to shouts, ‘I want to engage with you!’ thus taking the person who wants to engage down a dead-end.
Many bloggers want to engage, yet I’ve heard from some bloggers who say the comments section of blogs is a waste of time and should be removed. I don’t agree with that, but if a blogger does not want to engage then there is the option to turn off comments.
How often should you blog?
I’ve learned the only answer to this question is – ‘blog as often as you like without feeling obliged to publish something.’
It took me a while to find that I’m happier publishing two or three posts weekly. Any more than that, and I find I’m forcing myself to write posts, which makes blogging less enjoyable. Sometimes, I may only publish once a week.
I do not want to get myself feeling stressed because I haven’t got a post ready, so my advice is not to blog to any schedule of when you’re going to publish posts. If readers are interested in what you write and publish, they’ll read your posts regardless of how often or when you publish and sometimes that could mean days, weeks or even months after the publication of a post, so don’t close comments off to force your audience to read your posts within a particular time-frame. Blogging should always be a leisurely activity.
I also witnessed a drop in the quality of the posts I publish when publishing more than a few times a week. For me, quality is much more important than quantity, but it may not be the same for you.
I also tend to stay clear of blogs that publish more than once daily as they tend to bring an overwhelming feeling that I don’t like. Once again, it’s about finding the perfect balance that works best for you.
Blogging! It’s a fascinating subject, isn’t it? I could go on, but it’s now over to you. Can we discuss blogging honestly without fearing upsetting other people? What do you think? Let me know in the comments section. Let’s discuss blogging.
Pingbacks are a vital tool in the blogging world, fostering connections and increasing site traffic. Are you making the most of pingbacks or missing out on their benefits? This post details their benefits, creation, and anti-spam measures.
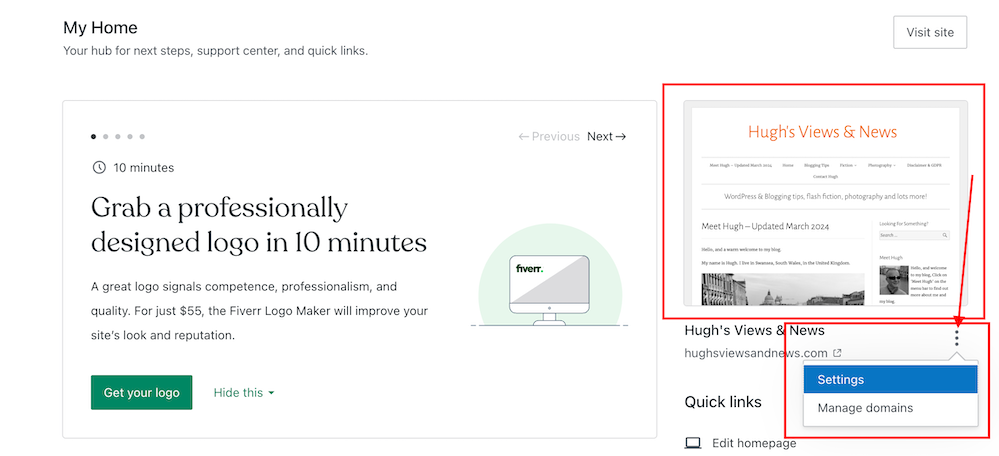
Have you noticed the new feature WordPress has added to your blog’s dashboard? It’s located on the ‘My Home‘ page in the top right corner.
But what does this new feature do?
This new ‘settings’ feature is easy to use. But what does it do?
For this post, I’m using an Apple iMac desktop computer and the ‘Default‘ view setting of my blog’s dashboard.
You’ll find this new feature on the ‘My Home’ page of your blog’s dashboard
Let’s get started
Click on the meatball menu (three horizontal dots) to open a new menu.
Click the kebab menu to open a new menu
The menu contains two options – Settings and Manage Domains.
Let’s take a look at the two options
Settings – this option takes you to the General Settings page of your blog.
You can make many changes to your blog on this page, including your blog’s icon (photo or image), name, and tagline.
Edit your blog’s icon, title and tagline
Click the ‘Save Settings‘ button if you make any changes.
On the same page, you can also create a logo for your blog via Fiverr logo maker (note that there is a charge for this) and set/change your blog’s primary language and timezone. Remember to save any changes you make.
Another option includes setting privacy settings for your blog.
Privacy – This is where you can set your blog to public viewing (anyone can view it) or private viewing (only visible to you and logged-in members you have approved to view it). There is also a ‘Coming Soon‘ option, so your blog is hidden from view until it’s ready for viewing.
Set privacy settings for your blog
Two other options are also available.
If ticked, the ‘Discourage search engines from indexing this site‘ option will prevent search engines from indexing your blog, but note that it is up to search engines to honour your request.
The ‘Prevent third-party sharing‘ option should be ticked if you want to restrict your blog’s content from AI training and third-party use. It will exclude your blog’s public content from WordPress’s network of third-party content and research partners. It also adds known AI bots to the ‘disallow’ list in your blog’s robots.txt file to stop them from crawling your site, though it is up to AI platforms to honour this request.
Click the ‘Save Settings‘ button if you make any changes.
Other settings include –
Accept a gift subscription – turn this setting on to accept gift subscriptions from visitors to your blog.
Footer credit: Here, you can choose or edit a footer credit that appears at the bottom of your blog’s pages and posts.
Site tools – this section allows you to do the following.
Register a new domain or change your blog’s URL address.
Transfer your blog to another blogging provider.
You can reset your blog and start afresh while keeping the same domain/blog name. (If you choose this option, all your posts, pages, and media will be deleted).
Delete your blog and give up your blog’s domain/address.
2. Manage Domains — This option takes you to the part of your blog where you can manage your blog’s domains.
It’s worth checking this page to see what domains you have and to see offers for other domains you may be interested in purchasing for your blog.
While you may not visit your blog’s settings page regularly, it’s worth knowing that there is now an even quicker way to find these settings.
WordPress constantly changes; some things keep changing and return to where they were before. That’s why I’ve updated and am republishing this post from July 2023.
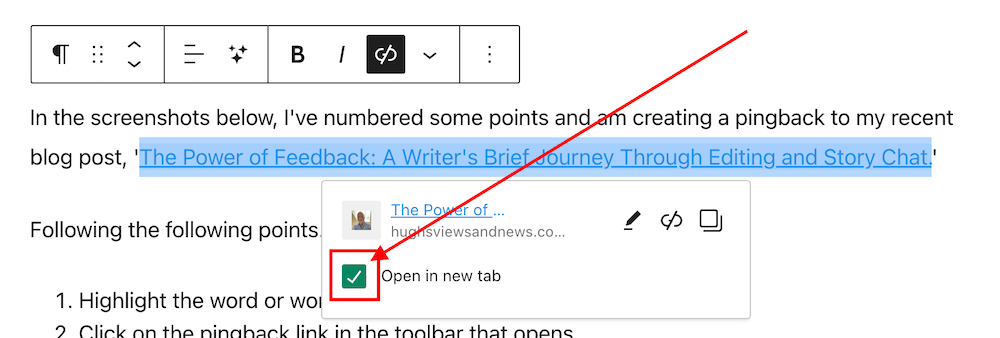
This is where to find the ‘Open in new tab’ box on WordPress.
If, like me, when you create a pingback, you prefer links to open in a new window rather than in the same window you’re viewing (thus losing the page), it’s vital that you tick the ‘open in new tab‘ box when adding links or pingbacks to a blog post.
The ‘open in new tab‘ box used to be visible when creating a pingback but has reverted to being hidden again. I don’t know why, but I wanted to show you where to find it.
I came across some comments recently where somebody asked how to create a pingback to the post they were leaving their comment on. The blog host didn’t know. It got me thinking that I should do an updated post on what pingbacks are and how to create them.
Pingbacks are a powerful blogging tool. Don’t miss out on not using them.
What are pingbacks?
A pingback is a type of notification that allows you to inform another blogger that you have linked to a post or article on their blog or website. This notification is typically automated and serves as a way to establish connections between different blogs or websites. Sometimes, pingbacks are also referred to as trackbacks.
If the other blogger has a pingback-enabled website or blog, then they can see a notification that you have linked to their article. They can then choose to allow your link to appear in the comments section of their blog post.
This may drive traffic to your blog when readers click on the pingback notification link.
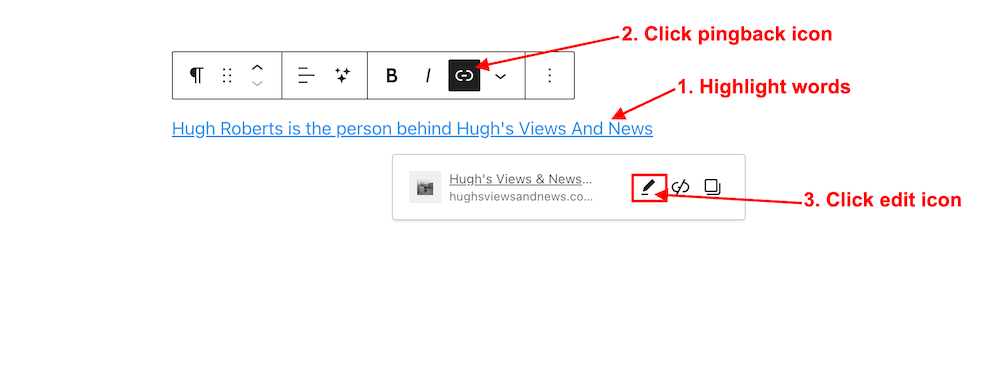
Click the pingback link that pops up in the toolbar.
In the URL box, enter the URL address of the blog post you’re linking to, or if it’s one of your own posts, search for the post.
Choose the post you’re linking to.
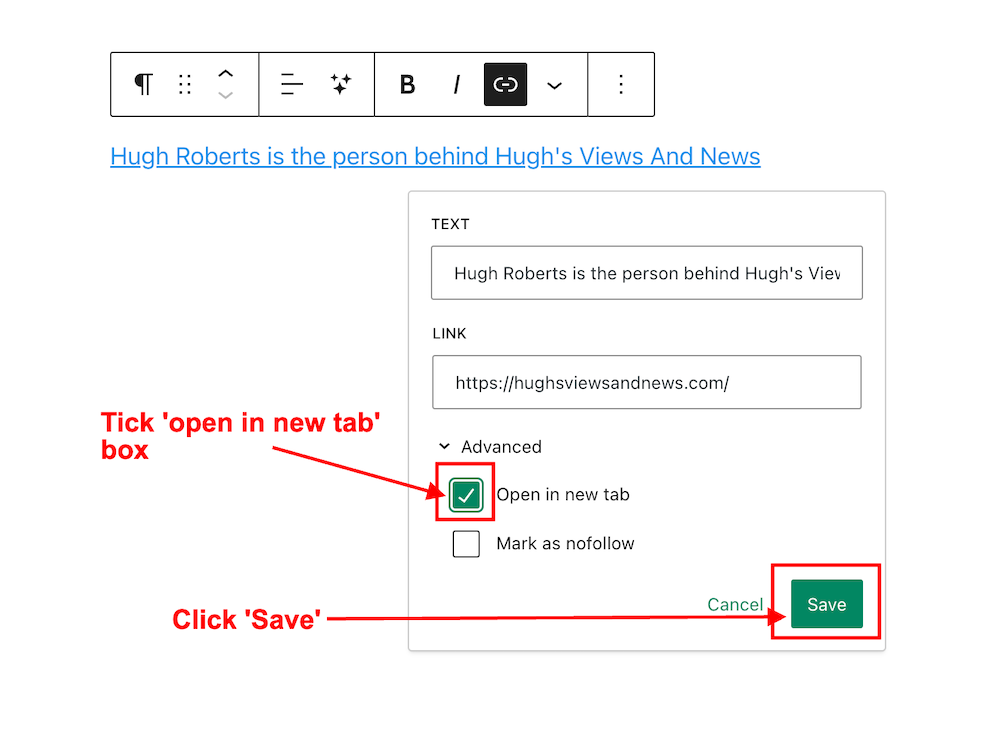
Finally, and most importantly, tick the box next to the ‘open in new tab‘ box.
Tick the ‘Open in new tab’ box.
Ticking the ‘open in new tab’ option guarantees that when users click the pingback link, the linked post will open in a new tab or page. This feature effectively retains users on the current page, allowing them to easily return to your post to leave a comment or engage with the content.
Not selecting the “open in new tab” option could result in missed opportunities for comments and likes.
Your pingback has been created and will be highlighted in the post.
Tip – You can also highlight the pingback by making the text bold. To do this, highlight the text and click ‘B‘ (bold button in the toolbar).
Before publishing your post, preview it first and make sure the pingback works. Does it go to the right location? If not, delete the URL and insert the correct one.
Once you are happy that your pingback is working, publish the post.
Pingbacks should be exclusively directed toward blog posts and websites relevant to the subject of the post you are sharing or where you have been specifically invited to link.
Never create a pingback to a post that has no connection with the subject of your post.
Should I ask first before creating a pingback to another blogger’s post?
It’s always nice to ask first, but you’re good to go if the blogger has enabled pingbacks. And if you know the blogger well, there is no need to ask. But it’s best to ask if it’s your first time linking to one of their posts.
However, there’s no guarantee that your pingback requests will get the thumbs up. I receive pingback approval requests every day, and I won’t approve any that seem spammy or are completely unrelated to the post they’re trying to link to.
Are there any advantages of having pingbacks on your blog posts?
Yes. Here are a few advantages.
Creates traffic to your blog.
SEO-friendly.
Search engine optimizations (SEOs) such as Google and Bing rank blog posts that include pingbacks higher.
Bloggers may link back to one of your blog posts.
Great for promoting older blog posts you have published that some of your followers may not have read.
Caution—It is crucial to refrain from creating a pingback to a blog or website’s home page. This practice is discouraged because it fails to notify the blogger whose post you are referencing.
Do pingbacks attract spam?
Some experts recommend not allowing any pingbacks or trackbacks to a blog because they attract spam. However, by moderating all pingback notifications, you can prevent any spam pingbacks from appearing in the comments section of your blog posts.
Good news from WordPress about spam comments
After an update in 2023, the WordPress anti-spam software has dramatically strengthened its ability to intercept spam. Consequently, there has been a significant decrease in the volume of visible spam comments reaching blogs. Previously, hundreds of spam comments inundated my blog on a daily basis. However, following the update, I only encounter one or two weekly.
Where possible, try and include at least one pingback in every blog post you publish.
You can use a mixture of pingbacks to your posts and those of other bloggers.
Are there any problems with allowing pingbacks on your blog?
None that I am aware of.
An invitation to create a pingback
If you’ve never created a pingback before, try creating one for this post. I’ll be happy to let you know if it works and include it in the comments section.
If you encounter any problems creating a pingback, don’t hesitate to ask me for some help.
Summary: The Power of Pingbacks and How to Create Them
This guide explains pingbacks, how to create them, and the best practices to follow.
This guide covers everything from creating a pingback to the benefits, staying safe from spam comments, and recent anti-spam updates from WordPress.
This post also encourages readers to use pingbacks and shares my positive experience. It’s helpful for new and experienced bloggers, giving them the knowledge and confidence to use pingbacks effectively.
In the busy blogging world, pingbacks are important for connecting and getting more site visitors.
Pingbacks, sometimes also known as trackbacks, are useful tools for bloggers that let other bloggers know when you link to their posts.
It’s polite to ask first before creating a pingback to another blog unless you know the blogger well or have been invited to link to a post.
Always tick the ‘open in a new tab’ box so that readers do not lose the page they are reading.
Pingbacks do not attract spam.
WordPress anti-spam software now eliminates the majority of visible spam, saving you time in checking for comments that may have been marked as spam by mistake.
Layout, content, settings, and format might differ on self-hosted blogs.
I actively utilise pingbacks as part of my content strategy. My experience with using them has been positive, as they help me foster connections with other blogs and websites and enhance engagement. If you have any questions about pingbacks, please leave them in the comments section below, and I’ll be happy to address them.
Encouraging visitors to join the conversation on my blog posts and those of other bloggers is a must for me. Personally, if I can’t quickly leave a comment on a blog post, I’ll move on to the next one.
It’s one of the reasons why I use WordPress, as I’ve found it difficult to leave comments on other blogging platforms. What about you?
I firmly believe that we should prioritise making it effortless for blog visitors to leave comments. It’s crucial not to burden them with unnecessary obstacles when they want to engage with us. But that comes with the cost of receiving comments from anonymous readers. But is that a problem?
Or should you make it easier for visitors to leave comments?
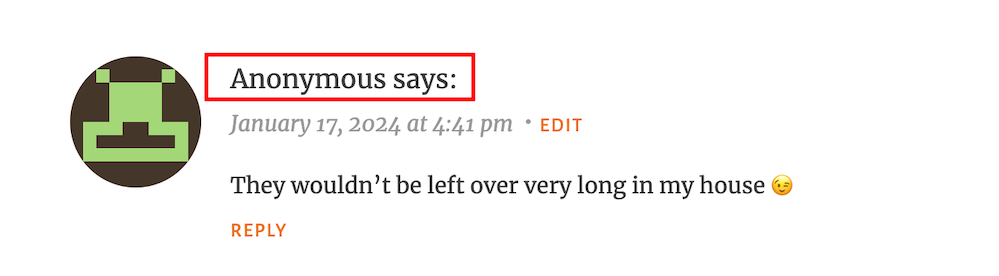
I’ve always received comments on my blog posts from visitors using ‘Anonymous’ or ‘Someone’ as their display names. But it has never bothered me because I can spot spam comments easily and guarantee that none will reach the comments section of my posts.
Here’s an anonymous comment I received recently.
Do anonymous comments annoy you?
I wasn’t concerned when it appeared because it was left on one of my recent Wordless Wednesday posts about leftover chocolate, so I knew it was genuine.
Not knowing who the comment is from could pose a problem, but if it sounds genuine and has no uninvited or suspicious links, I’ll reply and approve the comment.
However, I’ll mark it as spam if it looks or sounds like a spam comment or contains any uninvited links. Oh! And I never approve comments that say ‘Nice Post.’ ‘Nice’ or ‘Great photo,’ regardless of who left them.
How do I make it easier for visitors to leave comments on my posts or prevent them from being anonymous?
In the blog settings of WordPress.Com blogs, there are settings which users can turn on or off to make it easier for visitors to leave comments or to prevent comments from being shown as anonymous.
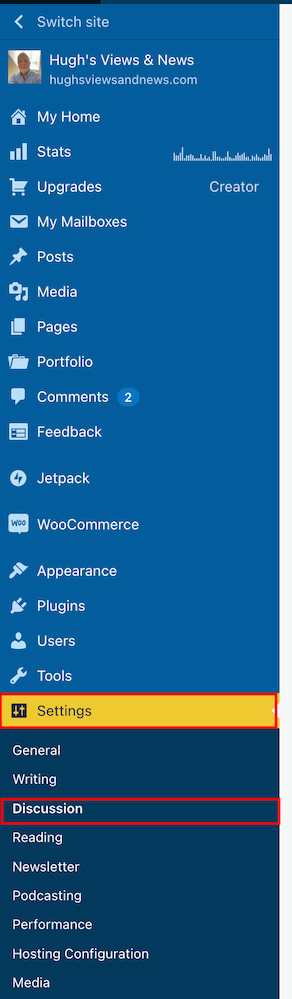
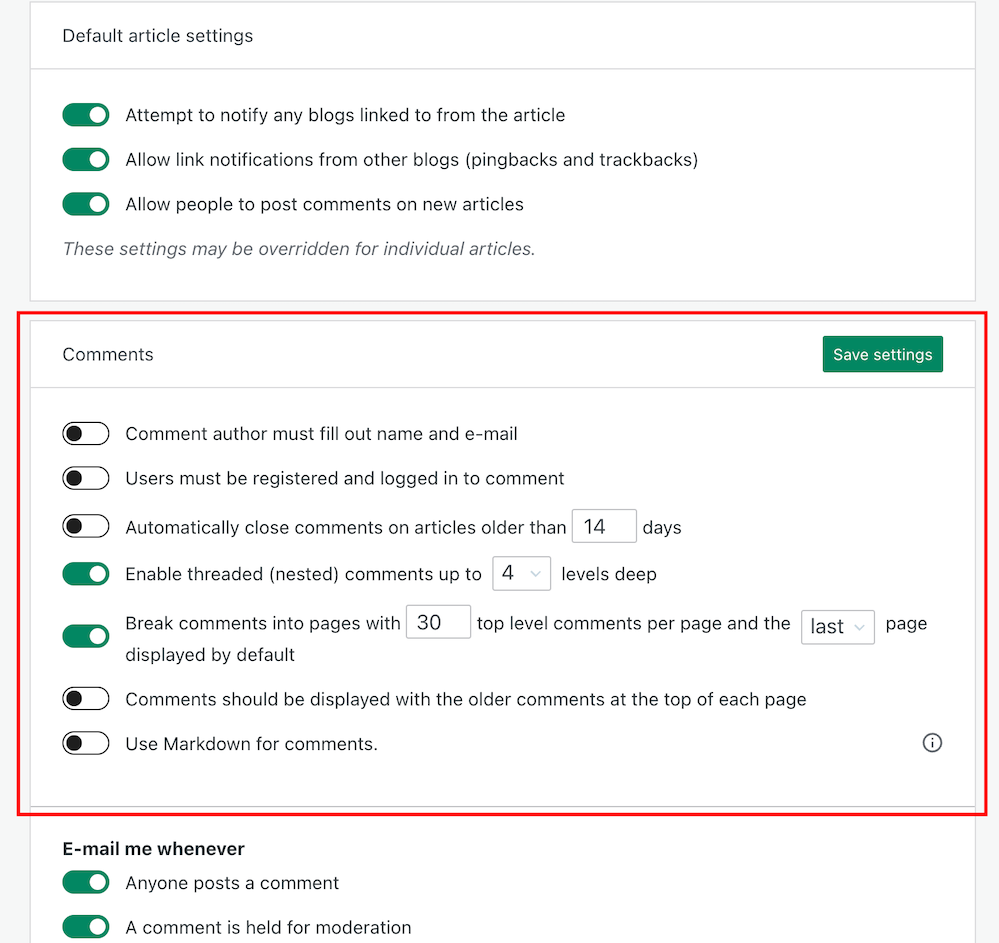
To find these settings on your blog’s dashboard, go to Settings – Discussion and scroll down to the ‘Comments‘ section on the ‘Discussion Settings‘ page. I’m using WordPress on an Apple iMac desktop computer in these screenshots.
Click on Settings – Discussion
Scroll to the ‘Comments’ section.
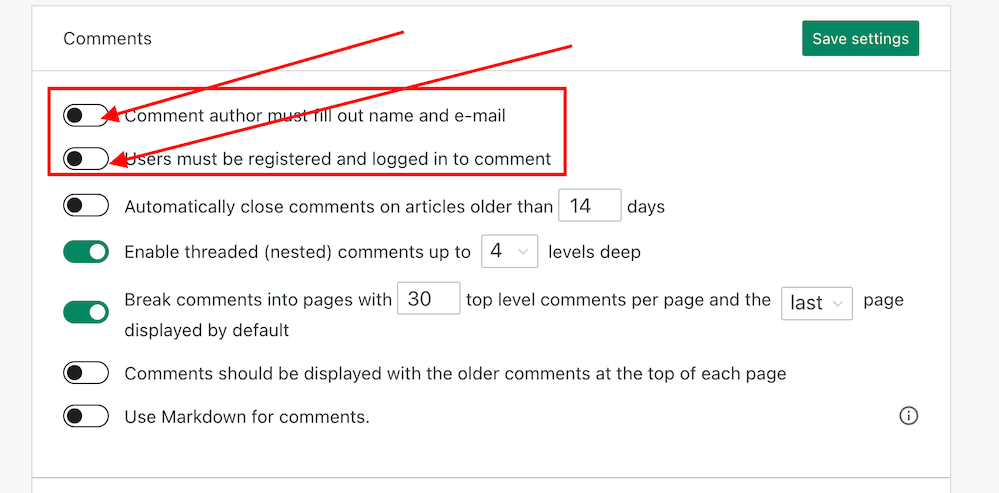
If you want to make it easy for visitors to your blog to be able to leave comments, ensure you have the first two settings in the ‘Comments‘ section, ‘Comment author must fill out name and email‘ and ‘User must be registered and logged in to comment,’ switched off.
Switch on or off depending on how easy you want it to be for visitors to leave comments on your blog.
If you do not want comments on any posts showing as ‘Anonymous’, ensure those two settings are switched on. However, beware that turning these settings on will make it more difficult for some users to leave comments.
Turning these settings on means that users must either fill out their name and email address or be registered as a WordPress user and logged in to be able to leave a comment. Some users may not like giving this information to be able to comment.
Make sure you click the ‘Save Settings’ button if you make any changes.
And that’s it. Only you can choose whether to have these settings on or off. Go with what you feel most comfortable with.
Do you make it easy for visitors to your blog to comment, or do you prefer to only allow those willing to give their information to be able to leave comments? Is WordPress the best platform for engagement and for leaving comments? Let me know in the comments.
Is your blog as secure as it can be? Take this final step to make sure nobody can hack it. Take a look at my recent post for more details.
You wouldn’t leave your doors unlocked if you were the last one to leave the house, would you?
Would you give a stranger the password to your online banking account?
Would you share or give a stranger the password to your blog?
Protecting your blog is just as important as protecting your home and online bank accounts, yet many bloggers share personal details about themselves on their blogs and on social media, which can be a treasure trove for scammers. Be careful what information you share.
Before sharing any information, ask yourself, ‘Would I share this information with a complete stranger?’
Adding this feature will give your blog an extra layer of security.
Although we’re all encouraged to use a strong password to protect our blogs, did you know that many blogging platforms, including WordPress, offer users an extra layer of security when it comes to protecting their blogs?
Two-factor authentication adds an extra layer of security by requiring you to enter a code or use another device in addition to your password. For example, you can use an app like Microsoft Authenticator or Google Authenticator to generate access codes for your blog.
WordPress offers users two-factor authentication security. Follow the guide below to set it up for your WordPress blog. For this example, I’m using an Apple iMac desktop computer.
How to set up two-step authentication for your WordPress blog.
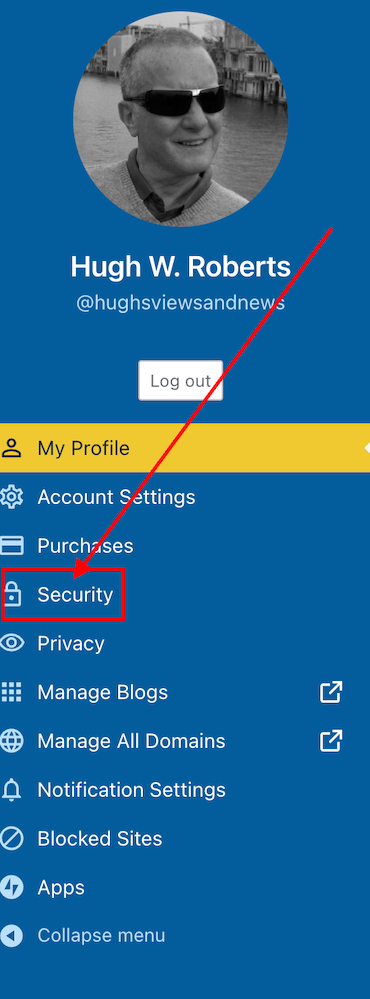
In the top right of your blog, click on your profile picture/avatar.
Click on ‘Security‘ in the menu on the page’s left side.
Click on the ‘Security’ tab.
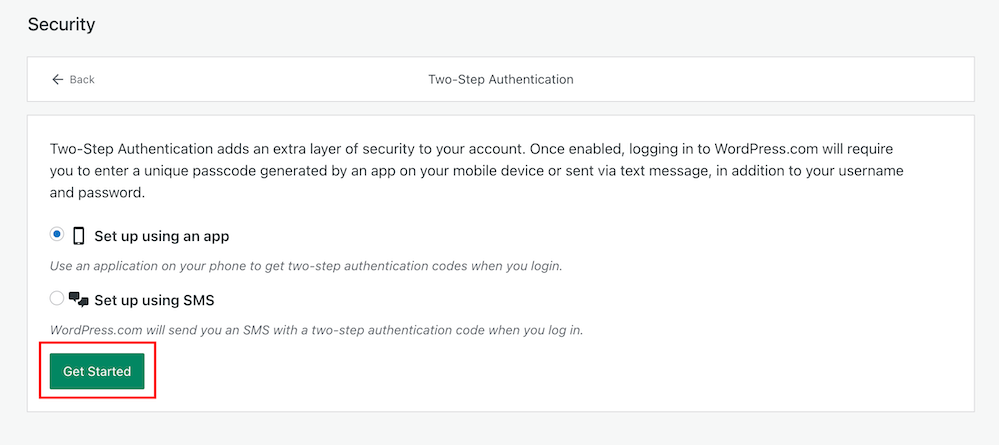
Select the ‘Two-step Authentication‘ option.
Select Two-Step Authentication
Select which method you would like to receive the two-step passcode generated by WordPress, and click the ‘Get Started‘ button.
Click the ‘Get Started’ button.
Follow the onscreen instructions depending on your selected method to receive the WordPress two-step authentication passcode.
Once enabled, logging into WordPress.com will require you to enter a unique passcode generated by an app on your mobile device or sent via text after adding your username and password.
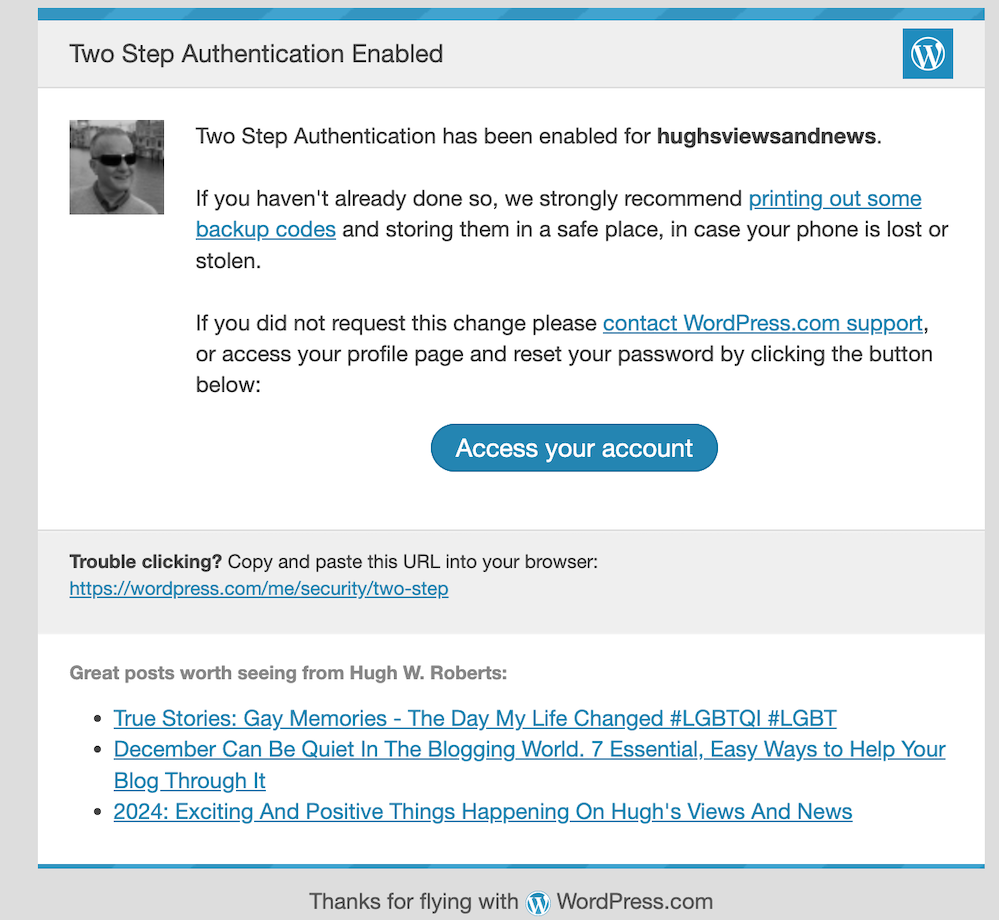
You will receive an email from WordPress confirming that two-step authentication has been enabled.
You’ll get an email from WordPress confirming that two-step authentication has been set up for your blog.
That’s it! Access to your blog is now protected by an extra layer of security.
I’d recommend adding or checking that the recovery email address and recovery SMS number for your WordPress blog/account are also correct when switching on two-step authentication.
Are you making the most of Two-Step Authentication to safeguard your blog? Need guidance on setting it up? Share your best practices for securing your blog in the comments below.