
This is post number one hundred and four this year. It was meant to be my one-hundredth post, but life got in the way (I’m not going to bore you with the details), and my Wordless Wednesday post from a few weeks ago earned the honour of being post number 100.

When you think about it, one hundred and four posts in ten mouths seem like an awful lot. Am I overwhelming readers with too many posts, or do you want more? I’m averaging nine monthly posts, which appears to have become a good balance.
If you asked me, ‘Am I publishing too many posts?’ I’d respond, ‘Do what feels best for you.’ However, we should never forget our audience, so there’s no harm in reaching out and asking. Without you (my audience) reading these posts and engaging with me, this blog would be like arriving on a barren planet. And nobody wants that.
I’d be interested to know how many posts you have published in 2024 and if you’re happy with that number. Let me know in the comments.
Let’s discuss other blogging topics
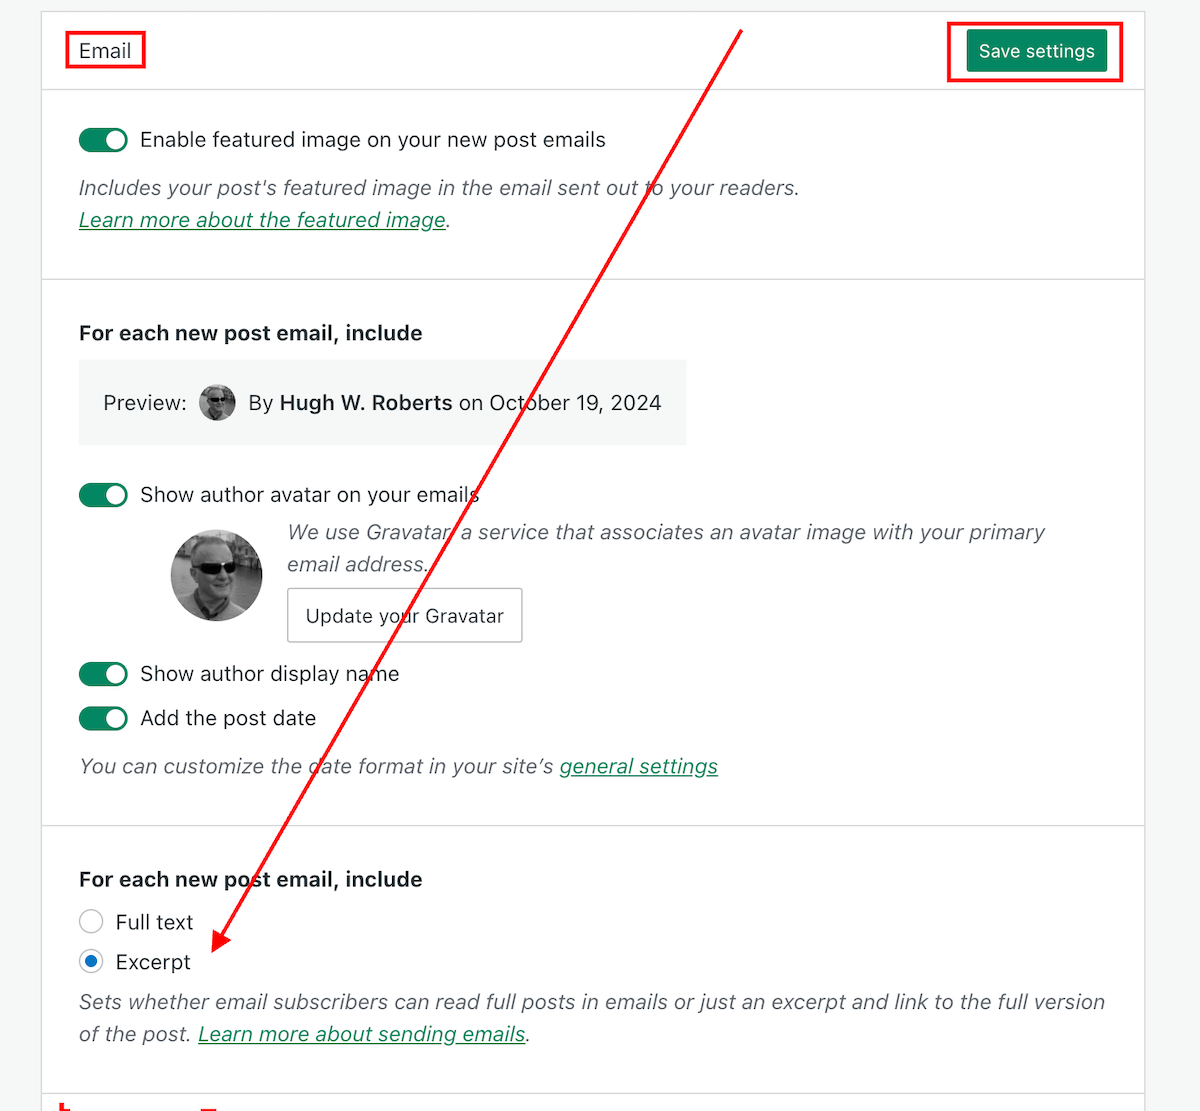
Did you see my recent post about whole blog posts being shown in emails? No? It’s titled ‘WordPress: Excerpts Are Working Again!‘ It’s worth reading if you only want an excerpt of your posts to show in email notifications and want visitors to visit your blog to read them. Reading posts by visiting a blog is a much better experience than reading them by email, especially since some blocks do not appear in emails, making posts look odd and broken.
There are many reasons to encourage visitors to visit your blog, one of which is that they are more likely to engage with you if they are on your blog (rather than reading from an email). Furthermore, visitors can explore your blog, catch up on posts they have not read, and check any links. This brings me nicely to the subject of engagement.
Are you engaging or comment spamming?
As regular visitors to my blog know, I am passionate about engagement in the blogging world. Recently, I came across an alarming article stating that engagement has decreased to an all-time low in blogging. How sad is that? However, when you look at some blogs with low engagement or, conversely, blogs with numerous non-engaging comments, it is evident that this is happening.
Here’s an example. I recently discovered a writing challenge blog and wanted to get involved. But when I checked out some of the comments left, I knew that participating would not be worthwhile. With lots of non-engaging comments such as ‘Nice one’ and ‘great attempt” being left on stories, nobody wanted to engage with one another. It was a barren planet. I left with a heavy heart.
When I publish a post, it’s the engagement I crave. So when I publish a short story or piece of flash fiction, I look for feedback beyond being told it was a great story. Engaging feedback is critical for all of us to improve our writing.
Do you agree? Do engaging comments help to improve your writing?
Take action if you want engagement
This may seem like a shock-horror move, but I’m now marking comments such as ‘nice’ and ‘beautiful post’ as spam. Leaving short comments all over the blogging world is like leaving spam everywhere. We all know how spam can cause frustration and diminish the enjoyment of blogging.
One main reason readers do not leave engaging comments is a lack of time. However, many who offer that excuse leave non-engaging comments everywhere. They spend the time they could have used to leave an engaging comment, posting numerous non-engaging comments everywhere. The flash fiction challenge I mentioned earlier seems to confirm this.
Some bloggers believe that nobody will leave comments on their blogs if they don’t comment, so they leave short, non-engaging comments everywhere. Honestly, that’s a crazy thought.
Before I finish discussing engagement, I want to reassure everyone that they should not feel obliged to leave comments on any of my posts. I won’t be upset if you don’t comment, but I will mark comments as spam if they are those pesky, non-engagement comments I mentioned. One engaging comment every once in a while is worth a thousand non-engaging comments.
I don’t know about you, but it makes all the difference if somebody wants to engage with me and does so in a way that proves they’ve read the post and are interested. Do you agree?
Please preview your posts before publishing them!
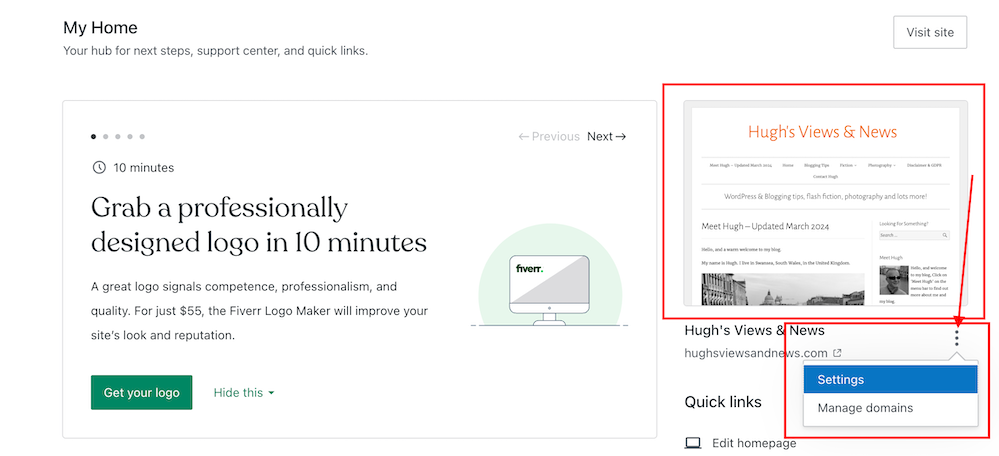
Did you know you can preview your posts before publishing them? It seems that some bloggers do not know they can do this. From seeing upside-down images to posts with a terrible and hard-to-read layout, there is no excuse for anyone not to preview their posts before publishing them. It’s so simple to do.
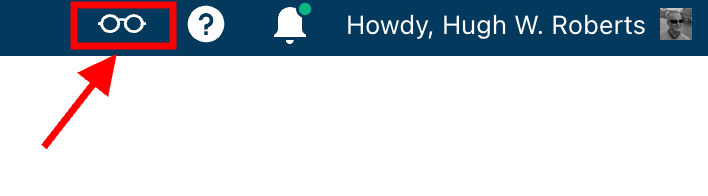
Before publishing a post, click the little ‘laptop computer’ symbol at the top right of the page on which you are drafting the post. You will be able to see a preview of your post as it will look on a desktop computer, tablet, and mobile phone. Plus, and this is fantastic news, WordPress has now moved the ‘preview email’ option to the same menu for how your post will look in an email.

Thank you for making that option more accessible to find, WordPress.
There is no excuse for sloppiness in ensuring your posts and WordPress notification emails are at their best for your audience.
Finally, how are your blogging stats performing?
I’m delighted that my blogging statistics have rocketed this year. I’ve surpassed last year’s total number of visitors and views to my blog. But to make things even better, 2024 is on track to be my best year ever (in the ten years I’ve blogged) in terms of viewing statistics and engagement. I believe this disproves those who tell you that you must publish posts every day for your blog to be successful. You don’t need to force yourself to blog every day.
A blog’s success depends not on how often it publishes posts but on the quality of those posts.
Thank you to everyone who visits my blog, reads my posts, and engages with me. Without you, Hugh’s Views and News would never have reignited my passion for writing and engaging with others.
How are your blogging stats this year? Tell me in the comments section.
Layout, content, settings, and format might differ on self-hosted blogs.
Click the buttons below to follow Hugh on Social Media
Copyright @ 2024 hughsviewsandnews.com – All rights reserved.