WordPress has managed to do it once more! It’s relocated a setting I frequently use, seemingly without informing anyone about it.
Turning comments off is simple to do. But WordPress has moved the settings!
During a recent post-drafting session, I attempted to disable comments on a post. I encountered difficulty locating the ‘Discussion‘ setting, which is the usual place for enabling or disabling comments on individual posts.
Why turn comments off?
I consistently close comments whenever I share another blogger’s post or a guest post I’ve written on another blog. This strategy ensures that new comments appear on the original post, consolidating the discussion in one place rather than being split between two posts. Kinda makes sense, doesn’t it?
Some bloggers also choose to close comments on older posts as a proactive measure. This practice became popular when WordPress faced a significant spam issue. Specific posts received hundreds of spam comments daily, making it challenging for bloggers to sift through the spam in their WordPress folders to find authentic comments that can sometimes end up there.
The installation of the updated Askimet anti-spam software in 2023 has led to a significant improvement in the spam situation. Thanks to Askimet’s enhanced functionality, the previously prevalent issue of hundreds of visible spam comments daily has been effectively curtailed to just a few a week. Consequently, there is no longer a necessity to close comments on these posts.
Where has the ‘Discussion’ setting gone?
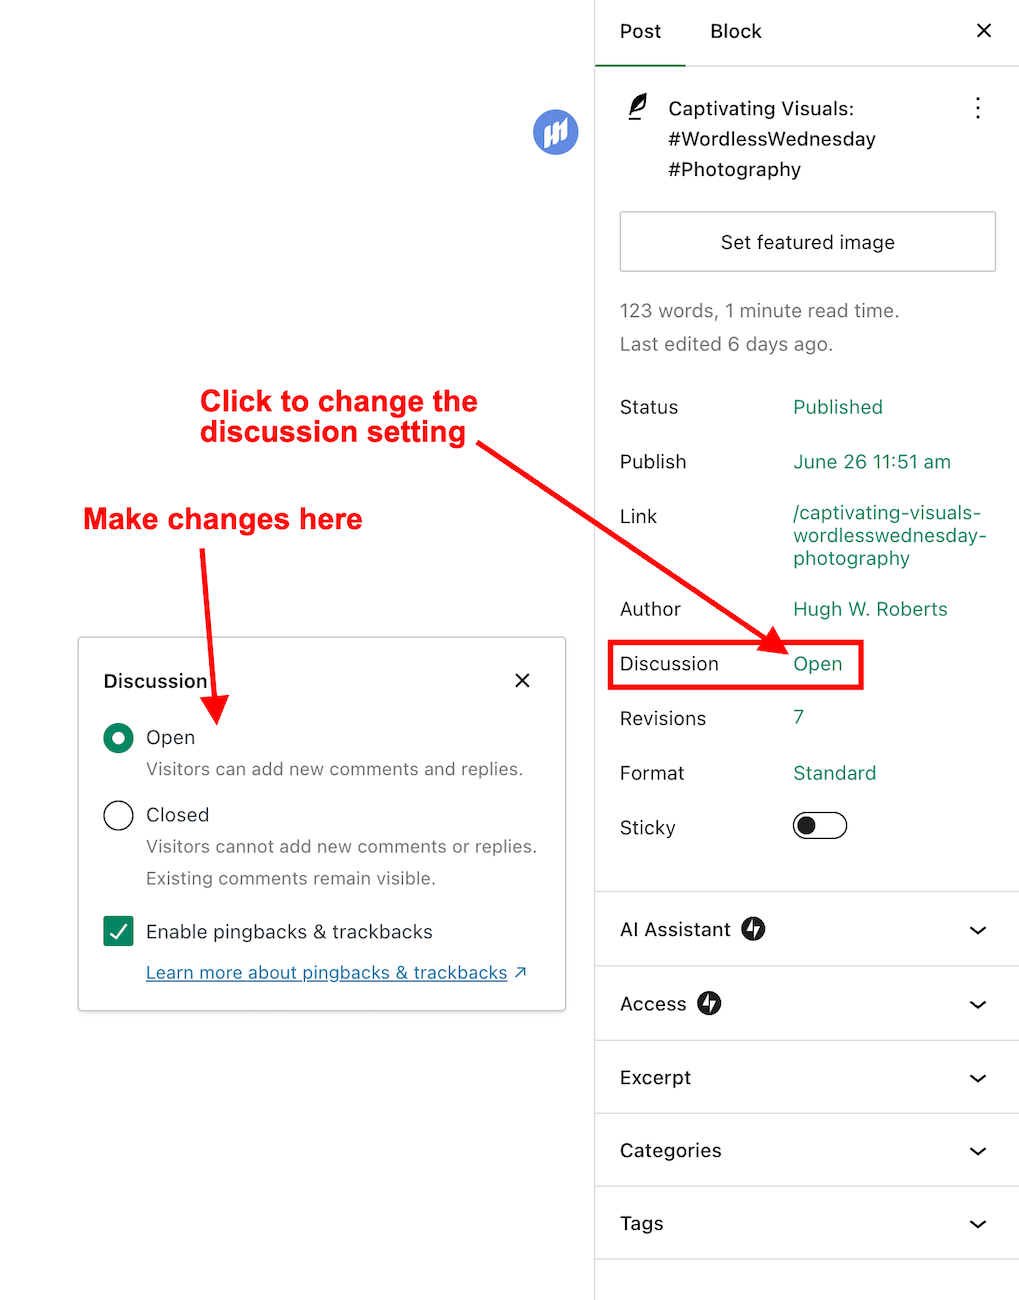
The ‘Discussion’ setting used to be located at the bottom of the settings box of a post.
The ‘Discussion’ setting used to sit under ‘Tags.’
Now, the discussion setting has been conveniently relocated to a more prominent position at the top of the post settings panel rather than at the bottom. This new placement, coupled with the clear indication of whether comments on a post are open or closed, significantly enhances the ease and user-friendliness of managing comments and pingbacks.
Changing the discussion setting is straightforward. Click on ‘open‘ or ‘closed‘ to make the change.
The ‘Discussion’ setting is now further up the ‘draft post’ section of a post.
This simple, user-friendly system also allows you to control comments, pingbacks, and trackbacks.
This is where to turn on or switch off pingbacks on your WordPress posts.
Pingbacks and trackbacks are methods for alerting other blogs that you have linked to them. However, they only work when the blog you’re linking to has enabled pingbacks and trackbacks and you do not link to a blog’s home page. My post, ‘The Power Of Pingbacks: How To Create One‘, has more details.
Do you disable comments on posts? If so, which posts? Do you have any questions about the ‘Discussion’ setting on WordPress? Please leave them in the comments box.
Layout, content, settings, and format might differ on self-hosted blogs.
Click the buttons below to follow Hugh on Social Media
WordPress constantly changes; some things keep changing and return to where they were before. That’s why I’ve updated and am republishing this post from July 2023.
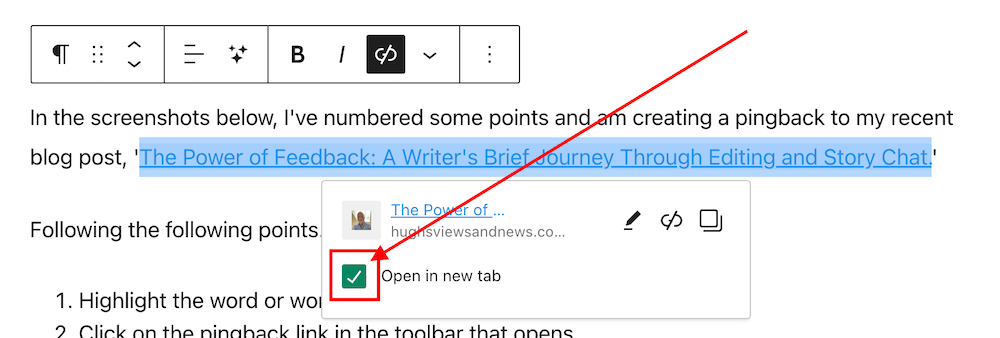
This is where to find the ‘Open in new tab’ box on WordPress.
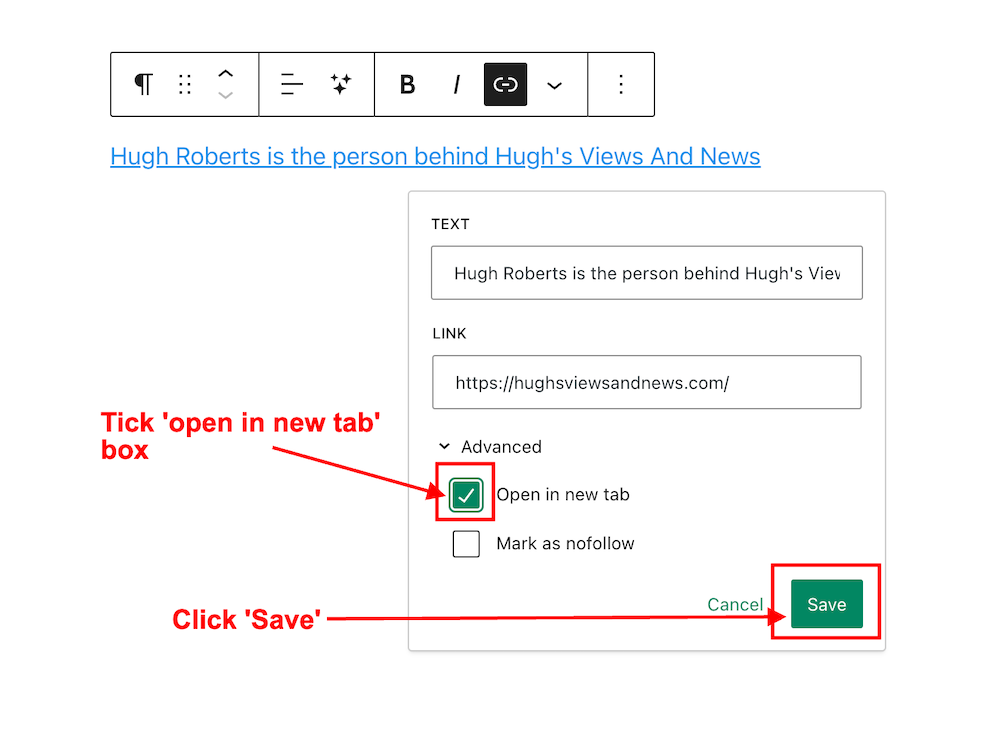
If, like me, when you create a pingback, you prefer links to open in a new window rather than in the same window you’re viewing (thus losing the page), it’s vital that you tick the ‘open in new tab‘ box when adding links or pingbacks to a blog post.
The ‘open in new tab‘ box used to be visible when creating a pingback but has reverted to being hidden again. I don’t know why, but I wanted to show you where to find it.
I came across some comments recently where somebody asked how to create a pingback to the post they were leaving their comment on. The blog host didn’t know. It got me thinking that I should do an updated post on what pingbacks are and how to create them.
Pingbacks are a powerful blogging tool. Don’t miss out on not using them.
What are pingbacks?
A pingback is a type of notification that allows you to inform another blogger that you have linked to a post or article on their blog or website. This notification is typically automated and serves as a way to establish connections between different blogs or websites. Sometimes, pingbacks are also referred to as trackbacks.
If the other blogger has a pingback-enabled website or blog, then they can see a notification that you have linked to their article. They can then choose to allow your link to appear in the comments section of their blog post.
This may drive traffic to your blog when readers click on the pingback notification link.
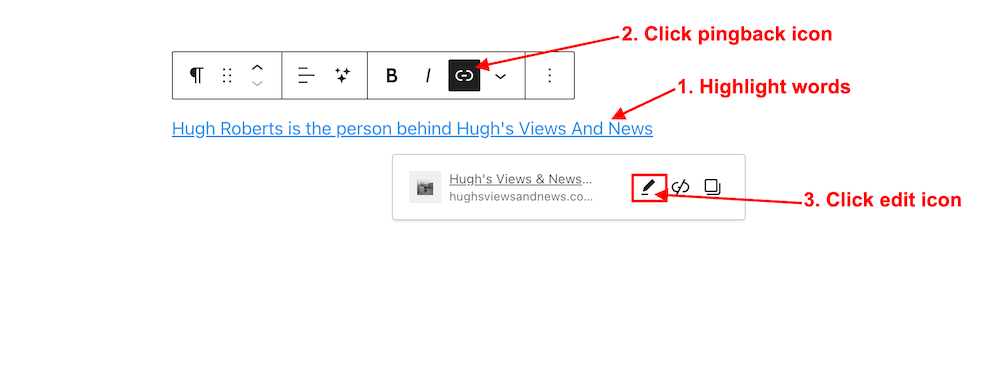
Click the pingback link that pops up in the toolbar.
In the URL box, enter the URL address of the blog post you’re linking to, or if it’s one of your own posts, search for the post.
Choose the post you’re linking to.
Finally, and most importantly, tick the box next to the ‘open in new tab‘ box.
Tick the ‘Open in new tab’ box.
Ticking the ‘open in new tab’ option guarantees that when users click the pingback link, the linked post will open in a new tab or page. This feature effectively retains users on the current page, allowing them to easily return to your post to leave a comment or engage with the content.
Not selecting the “open in new tab” option could result in missed opportunities for comments and likes.
Your pingback has been created and will be highlighted in the post.
Tip – You can also highlight the pingback by making the text bold. To do this, highlight the text and click ‘B‘ (bold button in the toolbar).
Before publishing your post, preview it first and make sure the pingback works. Does it go to the right location? If not, delete the URL and insert the correct one.
Once you are happy that your pingback is working, publish the post.
Pingbacks should be exclusively directed toward blog posts and websites relevant to the subject of the post you are sharing or where you have been specifically invited to link.
Never create a pingback to a post that has no connection with the subject of your post.
Should I ask first before creating a pingback to another blogger’s post?
It’s always nice to ask first, but you’re good to go if the blogger has enabled pingbacks. And if you know the blogger well, there is no need to ask. But it’s best to ask if it’s your first time linking to one of their posts.
However, there’s no guarantee that your pingback requests will get the thumbs up. I receive pingback approval requests every day, and I won’t approve any that seem spammy or are completely unrelated to the post they’re trying to link to.
Are there any advantages of having pingbacks on your blog posts?
Yes. Here are a few advantages.
Creates traffic to your blog.
SEO-friendly.
Search engine optimizations (SEOs) such as Google and Bing rank blog posts that include pingbacks higher.
Bloggers may link back to one of your blog posts.
Great for promoting older blog posts you have published that some of your followers may not have read.
Caution—It is crucial to refrain from creating a pingback to a blog or website’s home page. This practice is discouraged because it fails to notify the blogger whose post you are referencing.
Do pingbacks attract spam?
Some experts recommend not allowing any pingbacks or trackbacks to a blog because they attract spam. However, by moderating all pingback notifications, you can prevent any spam pingbacks from appearing in the comments section of your blog posts.
Good news from WordPress about spam comments
After an update in 2023, the WordPress anti-spam software has dramatically strengthened its ability to intercept spam. Consequently, there has been a significant decrease in the volume of visible spam comments reaching blogs. Previously, hundreds of spam comments inundated my blog on a daily basis. However, following the update, I only encounter one or two weekly.
Where possible, try and include at least one pingback in every blog post you publish.
You can use a mixture of pingbacks to your posts and those of other bloggers.
Are there any problems with allowing pingbacks on your blog?
None that I am aware of.
An invitation to create a pingback
If you’ve never created a pingback before, try creating one for this post. I’ll be happy to let you know if it works and include it in the comments section.
If you encounter any problems creating a pingback, don’t hesitate to ask me for some help.
Summary: The Power of Pingbacks and How to Create Them
This guide explains pingbacks, how to create them, and the best practices to follow.
This guide covers everything from creating a pingback to the benefits, staying safe from spam comments, and recent anti-spam updates from WordPress.
This post also encourages readers to use pingbacks and shares my positive experience. It’s helpful for new and experienced bloggers, giving them the knowledge and confidence to use pingbacks effectively.
In the busy blogging world, pingbacks are important for connecting and getting more site visitors.
Pingbacks, sometimes also known as trackbacks, are useful tools for bloggers that let other bloggers know when you link to their posts.
It’s polite to ask first before creating a pingback to another blog unless you know the blogger well or have been invited to link to a post.
Always tick the ‘open in a new tab’ box so that readers do not lose the page they are reading.
Pingbacks do not attract spam.
WordPress anti-spam software now eliminates the majority of visible spam, saving you time in checking for comments that may have been marked as spam by mistake.
Layout, content, settings, and format might differ on self-hosted blogs.
I actively utilise pingbacks as part of my content strategy. My experience with using them has been positive, as they help me foster connections with other blogs and websites and enhance engagement. If you have any questions about pingbacks, please leave them in the comments section below, and I’ll be happy to address them.