Where To Legally Source Amazing Images For Your Blog Posts

The majority of bloggers understand the importance of visual content. Posts that include images receive up to 70% more traffic than those that contain no images. However, there is one major pitfall associated with using images in blog posts, which I will address shortly.

Images not only enhance the appeal of our posts but also help us communicate our messages more effectively. However, a key question remains: where do you source your images and photographs for your blog posts?

Are you breaking the law by using images that are not your own?

I’ve become concerned by the increasing number of bloggers using images or photos without giving credit to the owner or specifying the source of the image. Many of these images have been obtained from the internet; some are copyrighted and not freely available for use. Bloggers using these images and photos are breaking the law.

Some bloggers believe they will never be caught using copyrighted images and photos. They argue that their blog is too small for anyone to care. Nobody will come after them. However, I am aware of a few bloggers who have been prosecuted and fined for downloading and using copyrighted images and photos on their blogs.

It may also not have crossed the minds of some bloggers that there are serious consequences for using images and photos to which they do not have the rights in their posts. Hence, this post.

Where do bloggers get their images from?

Some bloggers, including myself, use stock photo websites that provide images and photos for free. However, even some of these can incur costs if the images are only free to use for a limited time or require the user to give full credit to the owner, along with a link to where the image was sourced. Always read the small print before using any images or photos that are not your own.

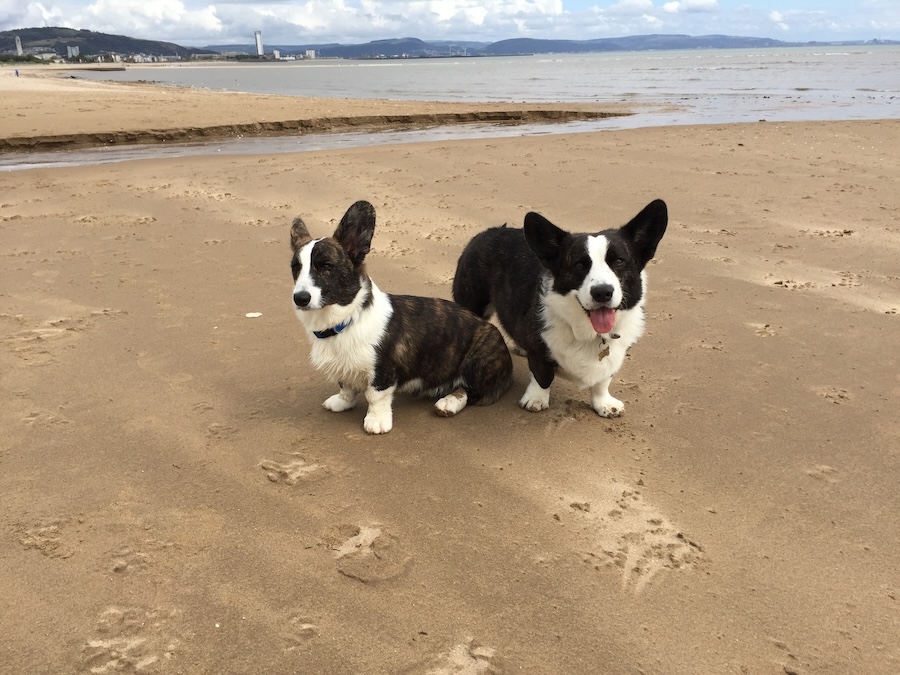
Here’s an example. The following image is from Pixabay, a website that offers a wide range of free-to-use images and photos.

An image of a desktop computer keyboard with the 'Copyright' trademark on it.
Image by Gerd Altmann from Pixabay

Notice that I have given credit to the person who created the image and where I obtained it from. The image is free to use, and although the content licence summary states ‘Use Content without having to attribute the author (although giving credit is always appreciated by our community!).’ I always include an attribute along with links to the source of the image.

Always check the content licence summary before downloading an image or photo from the internet and using it in a blog post. Ensure you follow any rules around the use of the image.

The perils of using copyrighted images

While it might be tempting to use appealing images from the internet, downloading and using copyrighted images and photos can result in serious legal trouble. Here are some risks to bear in mind:

Legal Consequences

Using copyrighted images without permission can lead to copyright infringement, which may result in potential legal action against you. This may result in hefty fines, the removal of your post, or even the closure of your blog, not to mention damage to your reputation.

Image Attribution Challenges

Even when images are shared with the intention of being used by others, understanding the precise attribution requirements can be confusing. Each source may have different rules, and failing to follow them can put you at risk.

Quality Concerns

Some free or low-cost images can often be of lower quality, which can damage the professionalism of your blog. Conversely, high-quality images usually come at a price, highlighting the importance of responsible sourcing. However, they can eat into your media space unless you reduce the size, which may then affect the quality.

The Perils of Reblogging

If you reblog a post of another blogger that contains images and photos, don’t think you are safe from prosecution if any of those images or pictures are copyrighted. You, too, could be fined for resharing images or photos that are not free to use, even though all you did was reblog the post. If you are not absolutely certain where those images and photos originated and whether they are free to use, don’t reblog the post.

Availability of Alternatives

Fortunately, there are many alternatives to using copyrighted images. Consider the following options:

  • Stock Photo Websites: Sites like Unsplash, Pexels, and Pixabay offer free images that are often licensed for commercial use.
  • Creative Commons: Use images that offer a Creative Commons license, ensuring you follow any stipulations regarding attribution or modification.
  • Original Content: Creating your own images can be the most reliable way to ensure your visuals are unique and free of legal concerns.
  • AI: Make use of the AI image creator on WordPress. It’s easy to use, although it doesn’t always come up with something relevant, especially if you don’t provide a clear enough description of what you want it to create, but I’ve found it very useful.

Summary:

In conclusion, sourcing images for your blog posts is an essential aspect of content creation that warrants careful consideration. However, be aware and always check if images and photos that do not belong to you are free to use!

The simplest way to avoid copyright issues with images and photos is to always use your own.

Please read this important yet alarming post by Jacqueline Lambert, ‘Bloggers Beware The Copyright Trolls – Even If You Use Royalty-Free Images,’ about a scam targeted at bloggers who use royalty-free images.

I want to open up the conversation and hear from you. What resources do you rely on for images? Do you have any favourite stock photo sites, or do you prefer to create your own visuals? Have you tried the WordPress AI image creator? What did you think of the images it created? Let’s discuss the various avenues we can explore to source images, and perhaps you’ll discover new options along the way.

The featured image in this blog post is taken from Pixabay. AI checked spelling and grammar mistakes.

Click the buttons below to follow Hugh on Social Media

Copyright @ 2025 hughsviewsandnews.com – All rights reserved.

The Best Ultimate Guide To Why Alt-Text Is Important

What answers would you provide if I asked you what alt-text means and what advantages it offers to bloggers?

What is alt-text, and why is it important?

Alt-Text (short for alternative text) is a commonly used term. It is essential to include it in posts that contain pictures, images or photographs. This unsung hero of the digital world ensures that everyone can access and benefit from the images included in your blog posts.

Blog posts that contain images, pictures, or photos attract, on average, 70% more traffic and clicks than those that do not. However, how many bloggers include alt-text information for these images, pictures, and photos? Unfortunately, the answer is not many. Furthermore, bloggers who fail to add alt-text to the images in their posts are missing out on providing some visitors with additional and important information.

Alt-Text assists those with vision impairments understand the content of the images and photos used in your blog post. Without it, they would be unaware, potentially missing out on crucial information. Imagine you’re showing off a brand new cover for your next book and don’t add alt-text to the image. They won’t have any idea what that new book-cover looks like. But that’s not all.

Utilising alt-text enhances your blog’s SEO rankings and helps search engines understand the content of your images. How will search engines determine what your pictures depict if no information is provided?

Search engine crawlers extract several key details from an image, including its file name, captions, title, and alt-text. When these details are absent, the post containing the images is ranked significantly lower. Visitors using a screen reader or other devices that inform them of the image’s content will remain unaware of what those images depict.

How to write alt-text.

When writing alt-text, keep it descriptive and straightforward—ensure it aligns with the content on the page. Include some keywords where appropriate, but avoid overdoing it. Keyword stuffing is not advisable, as it disrupts the user experience and can lead search engines to consider your site spam. Trust me, you don’t want that!

But where and how should you add alt text to your images, photographs, and pictures?

How to add alt-text to your images, photos, and pictures.

  • Click on the image you have uploaded to the media library.
  • On the right-hand side, you will see several boxes to which you need to add information.
  • Alternative Text – In this box, add information that describes what is in the image.
  • Title – Give the image a title.
  • Caption — Add a caption to the image, although you don’t need to if it’s unnecessary.
  • Description — Describe what’s in the image. You can use the same information you added for alternative text if you like.
  • File URL – This information will already be populated.

Here’s an example from my media library for the following photo.

A photo of two Welsh Cardigan Corgis sitting on a sandy beach, gazing towards the camera. In the background, there are several buildings of a city and some mountains. There are a few white clouds in the sky.
A walk on the beach with Toby and Austin, the Welsh Cardigan Corgis.
  • Here are the details of the alt-text and information I added to the photo.
An image provides information about the Alt-Text added to a photo in the WordPress media library.
Always add Alt-Text information to images, pictures and photos

The next time you add an image, photo, or picture to your blog post, don’t just add the image and run. Make sure you include the details outlined in this post.

Summary

  • Alt-Text, or alternative text, is crucial for bloggers who include images in their posts.
  • It enhances accessibility for those with vision impairments, ensuring they understand the content represented in images.
  • Additionally, it plays a significant role in improving SEO rankings by helping search engines identify image content.
  • Despite these advantages, many bloggers neglect to add alt-text to their images, missing out on valuable audience engagement and search engine visibility.
  • To effectively write alt-text, it should be descriptive, straightforward, and relevant to the content, with a mindful inclusion of keywords.
  • Bloggers can easily add alt-text by accessing the media library and providing a title, caption, and description of the images.
  • Overall, including alt-text enhances the user experience and optimises blog performance.

Do you add alt-text and other details to the images and photos included in your blog posts? If not, what’s holding you back?

The featured image in this blog post is taken from Pixabay. AI checked spelling and grammar mistakes.

I’m getting tough with non-engaging comments. Comments such as ‘Nice post’ are marked as spam.

Layout, content, settings, and format might differ on self-hosted blogs.

Click the buttons below to follow Hugh on Social Media

Copyright @ 2025 hughsviewsandnews.com – All rights reserved.

Is It Possible To Add Images And Photos To Comments On WordPress? Yes! Here’s How.

Have you seen images and photos in the comments section of blog posts and wondered how they were left there? It’s something I’ve written about before and, given the many changes at WordPress since I last wrote about it, deserves an update.

Light blue image with the words 'Is It Possible To Add Images And Photos To Comments On WordPress? Yes! Here's How.' in white text
Yes, it’s possible to leave photos and images in comments on WordPress blogs

When it comes to adding images and photos to comments, we have to be careful with what we add. We should always ensure the photo or image has a connection to the subject of the post we’re leaving the comment on. And not only that.

If a blogger invites readers to leave photos and images (such as in a photography challenge), then go ahead and leave them.

However, leaving an image or photo just for the sake of doing so is frowned upon by many bloggers, who will mark them as spam. And given that blogs are attacked by spammers daily, I don’t blame bloggers marking uninvited images and photos as spam.

I’ve added images and photos to the comments sections on my blog posts and the comments I have left on the blogs of other bloggers. However, unless I’ve been invited to leave an image or photo, I won’t leave them.

While many bloggers will be happy for you to leave images and photos, it’s always polite to ask first.

How to add images and photos to your comments

  • Add the image or photo to your WordPress media library.
  • Once the image has been added, click it and click the edit button to open it.
Image highlighting the 'Edit' button of a photo in the WordPress media library.
Click the edit button of the photo or image you want to add to a comment.
  • On the righthand side of the screen, you’ll see a window where you can add details about your image. It’s important to complete these details (see the image below).
  • Click the ‘Copy‘ button in the URL box.
Image highlighting the URL address of an image or photo in the WordPress media library.
Copy the URL address of the image or photo.
  • Paste the URL address into your comment.
  • Do not, at this stage, submit your comment as you need to edit one part of the text within the link.
  • Carefully delete the ‘s‘ from the ‘https‘ at the beginning of the link address, so it reads ‘http‘. (If you do not delete the ‘s‘ the image will not show in the comment).
  • Ensure your link ends with ‘.png’ or ‘.jpg’. If it doesn’t, delete any text after ‘.png’ or ‘.jpg’.
  • You can now submit your comment.

The image will now show on the comment. However, remember that if you are leaving an image in a comment on another blogger’s blog, they may have to approve it (and may even remove the link to the image) before it shows up.

I’ve only found this to work on WordPress.Com blogs. On self-hosted blogs, only the link to the image is visible rather than the image appearing. However, those clicking on the link will see the image.

Note – Not all images and photos will show if the security settings on your web browser are set high. However, this does not affect the photos or pictures you leave in the comments of your own blog posts. I recommend that you not change the security settings on your web browser.

Let’s wrap it up.

  • Yes, it is possible to insert images and photos into comments on WordPress.
  • After inserting the URL address of the image, ensure you remove the ‘s‘ from the beginning of the URL so that ‘https’ becomes ‘http.’
  • Only leave images and photos in comments if invited to do so or if you have asked for permission to do so first.
  • If the security settings on your web browser are set high, images and photos may not show. However, this does not affect the photos or pictures you leave in the comments of your own blog posts.

Want to give inserting an image or photo into a comment a go?

Leave me a comment with the link to your image. Perhaps it can be a photo of your latest book cover or of a family pet. I’ll leave it up to you, but only family-friendly images and photos, please.

If you have any further questions about inserting images or photos into the comments, leave them in the comments section.

Layout, content, settings, and format might differ on self-hosted blogs.

Follow Hugh on social media. Click the buttons below.

If you enjoyed this post and want more like it, enter your email address and click ‘Subscribe’ to stay up-to-date with my latest content.

Copyright @ 2024 hughsviewsandnews.com – All rights reserved.

5 Things You Can Do To Free Up Media Space In Your Blog’s Media Library.

‘Help! I’ve run out of media storage space on my blog and can no longer upload new photos, images or videos. What can I do?’

That was a question to me from Micheal, who blogs at Spo-Reflections.

Michael was happy to upgrade his WordPress plan to obtain more media space, but there are other things you could do if you find your blog running out of media space.

Light blue image with the words '5 Things You Can Do To Free Up Media Space In Your Blog's Media Library' written in white text.
Have you run out of media space on your blog? Here are 5 things you can do to obtain more.

1. Upgrade your plan.

WordPress currently offers 6 plans.

The amount of media storage space you get varies. Click the following link to see the plans – ‘There Is A Plan For You.’ Pricing is correct at the time of publication of this post.

Each plan provides the following media storage space.

Name of planStorage Amount
Free1GB
Personal6GB
Premium13GB
Business200GB
Commerce200GB
EnterpriseN/A

However, only upgrade your WordPress plan if you absolutely need to. Do not get into debt by upgrading unless you can afford it, as there are other things you can do to free up media storage space.

2. Resize the size of your images and photos.

One of the biggest reasons bloggers run out of media space is that they do not resize their images and photos before uploading them to their media library.

There are several ways you can reduce the size of images and photos. You can reduce them using photo editing software or via the tools of your device you use to blog.

I use an Apple iMac and can change the size of photos and images by clicking on ToolsAdjust size on the menubar of my desktop computer. I do this before uploading them to my WordPress media library.

I recommend reducing image and photo sizes to 900 x 675 pixels.

On a Windows computer, you can use Microsoft Paint. Open your image with that program, then click on Resize. You can find this option on the middle-right side of the “Image” section at the top of the Paint window.

The WordPress media library also has editing software, but please note that if you reduce the size of an image or photo using this tool, the original image is kept in your media library when you reduce the size of the picture – thus, you won’t have freed up any storage space.

Large images can also slow down your blog’s downloading speed, negatively impacting your blog’s search engine rankings and overall user experience. So, I recommend you always reduce the size of images and photos before uploading them to your blog.

3. Do not upload videos to your media library.

If you include videos in your blog posts, uploading them to your media library can take up vast amounts of space.

To overcome this problem and free up all the space they take up, upload your videos to YouTube. Then add the YouTube block to your blog post and include the link to the video in the block.

Image of the YouTube block on WordPress
Adding videos to your blog via YouTube helps free up media space for your blog.

Do this for any existing videos you have in your media library. Upload them to YouTube and add them via the YouTube block before deleting the original from your media library. This will free up large amounts of storage in your media library.

4. Delete images from your media library.

We can accumulate vast amounts of images and photos in our media library, many of which will become redundant.

Deleting these images will free up storage space. However, when you delete any images or photos in your media library, they disappear from the blog posts they appear on.

My blog post, ‘Are Your Old Blog Posts Damaging Your Blog? How To Stop It From Happening’ details why bloggers should delete old blog posts.

Deleting old, redundant blog posts containing images, photos, and videos frees up storage space. However, delete any images, photos and videos in your media library before deleting the posts.

If you’re unsure whether a post should be deleted, read my post, ‘Are Your Old Blog Posts Damaging Your Blog? How To Stop It From Happening,’ for advice.

5. Reduce the number of images and photos you add to blog posts.

While I recommend adding at least one image or photo to a blog post (because blog posts containing images get up to 70% more traffic), reducing the number of images and pictures will help save media space.

Before adding more images or photos, ask yourself if adding them to your post is necessary.

Let’s wrap it up.

  • Resize your images and photos before uploading them to your blog’s media library.
  • Upload videos to YouTube and use the YouTube block to show them on your blog posts.
  • Delete old images and photos from your media library, but remember to remove them from any posts first.
  • Do not resize images using tools in the media library, as this does not save storage space.
  • Consider deleting old blog posts that are no longer relevant.
  • Reduce the number of images and photos on blog posts. Ask yourself if they’re necessary.

How do you free up storage space in your blog’s media library? If you have any questions about this post, leave them in the comments section.

To follow Hugh on social media, click the links below.

If you enjoyed this post and want more like it, enter your email address and click ‘Subscribe’ to stay up-to-date with my latest content.

Copyright @ 2024 hughsviewsandnews.com – All rights reserved.

Adding Images Or Photos To Your Blog Posts? 4 Essential Things To Do.

Blog posts containing images and photos get up to 70% more traffic than posts without visuals. So why wouldn’t you use them in your posts?

Visual content is an essential component of any successful blog. Adding images, videos, and infographics to your blog posts can make your content more engaging and memorable.

An blue background image with the title of a blog post, 'Adding Images Or Photos To Your Blog Posts? 4 Essential Things To do' in white text.
Are you making any mistakes when adding images or photos to blog posts?

If you plan to include images or photos in your blog posts, there are four essential things to remember. These steps will help ensure your content is engaging and visually appealing while avoiding copyright issues.

1. Use High-Quality Images And Photos.

Always use high-quality images that are relevant to your post. Blurry or low-resolution images can detract from your message and make your blog appear unprofessional.

Additionally, using images that are not directly related to your topic can confuse readers and reduce the effectiveness of your post.

2. Ensure Images And Photos Are Not Copyrighted

Ensure you have permission to use any images and photos you include in your posts. This means sourcing images from websites offering free, non-copyrighted images (such as Pixabay) or purchasing the rights to use images from a stock photo website.

Not all images are free to use. And some that are free may only be free for a limited time. Always check the small print.

Don’t think you’ll ever get fined for using copyrighted images or photos. There are copyright bots continually looking for copyrighted images that have been illegally used and downloaded all over the web.

I know of two bloggers who have been fined for using images/photos on their blog posts that were not free to use.

To avoid copyright issues, use your own images and photos and watermark them before adding them to your blog posts. I use a free app called Photobulk to do this. Seeing a watermark is a great deterrent in persuading some thieves not to copy and use them.

Of course, if you’re not concerned about your photos and images being used by anybody else, you don’t need to watermark them.

3. Ensure Images And Photos Are The Correct Sizes.

Optimize your images for web use by compressing them to reduce file size.

Large images can slow down your website’s loading speed, negatively impacting your blog’s search engine rankings and overall user experience.

If you have limited space in your media library, not reducing the size of your images and photos will soon take up all your media space. When that happens, you won’t be allowed to download additional images to your blog unless you free up space or move to a plan that gives you more storage space.

I recommend reducing image and photo sizes to 900 x 675 pixels.

There are several ways you can reduce the size of images and photos. You can reduce them using photo editing software or your device’s software.

The WordPress media library also has editing software, but please note that if you reduce the size of an image or photo using this tool, the original image is kept in your media library when you reduce the size of the image- thus, you won’t save any storage space.

The newly edited image with the reduced size is added as a new file in your media library. You can always revert back to the original image by clicking on the image in the media library, selecting Edit, and then choosing the “Restore Original” button. If you’ve inserted an edited image into other published posts, reverting an image may break this image on those posts.

I use an Apple iMac and can change the size of photos and images by clicking on ToolsAdjust Size on the menubar of my desktop computer. I do this before adding them to my WordPress media library.

On a Windows computer, you can use Microsoft Paint. Open your image with that program, then click on Resize. You can find this option on the middle-right side of the “Image” section at the top of the Paint window.

However, as I mentioned earlier, you can also reduce the size of images and photos on WordPress. But only do this if your WordPress plan has a large storage space allowance.

  • To do this, ensure you view your media library in Classic view.
  • Click the edit image button on the image you want to edit.
Image showing the edit button of an image in the WordPress media library
Click the edit button.
  • Add the new dimensions in the Scale Image box and click the Scale button.
Image showing the new dimensions box and scale button on an image in the WordPress media library.
Add the new dimensions of your image.
  • Click the save or update button to save the changes.

Your photos and images will be reduced in size, but remember that a copy of the original is also kept, so you won’t save any storage space.

If posting to your site using the Jetpack App, the app can optimise images.

In the Jetpack app for iPhone, you can set the Max Image Upload Size so the original file is resized automatically when you upload it. This option can be found by going to My Site and clicking the profile icon in the top right, then choosing App Settings.

In the Jetpack app for Android, click on your profile icon in the top right corner and choose App Settings. There, enable Optimise Images to resize and compress images on upload.

4. Add information to your images and photos.

Don’t forget to include alt text and captions for your images.

Alt text is a description of the image that allows visually-impaired readers to understand what the image is conveying. At the same time, captions can add context and help readers engage with your content. This is especially important when participating in blog challenges such as Wordless Wednesday and Silent Sunday.

Screenshot of the Alt Text box, caption box and description box on an image in the WordPress media library.
Always add information about your images and photos.

Adding a description of the image or photo also helps with SEO searches.

  • Click the save or update button to save all the changes.

Following these four essential steps, you can create visually stunning and engaging blog content with images that stand out.

Let’s wrap it up.

  • Always use high-quality images and photos on your blog.
  • Never use images and photos that are copyrighted. You may be fined for doing so.
  • Use your own images and photos. That way, you won’t encounter any copyright issues.
  • Reduce the size of images and photos before loading them to your blog.
  • Alternatively, reduce the size of images and photos with WordPress’s tools in the media library, but only if you have a WordPress plan that offers a large amount of storage.
  • Always add information about images and photos before adding them to blog posts, as this allows visually-impaired readers to understand what the image conveys.
  • Adding a description of the image or photo also helps with SEO searches.

What do you use to resize images and photos for your blog posts? Do you always complete the details of images and photos in the Alt Text box? If you have any questions about adding images and photos to your blog, please leave them in the comments section.

To follow Hugh on social media, click the links below.

If you enjoyed this post and want more like it, click the ‘Subscribe’ button to stay up-to-date with my latest content.

Copyright @ 2024 hughsviewsandnews.com – All rights reserved.

This Is How Easy It Is To Centre Captions Underneath Images And Photos On WordPress

Once upon a time, getting captions to centre underneath photos and images on blog posts involved adding complicated CSS code to your blog.

I don’t know about you, but it doesn’t look right to me whenever I see uncentred captions. It gives blog posts a messy look.

However, WordPress now makes it much easier to centre captions under blog posts, images and photos.

Banner for the blog post 'This Is How Easy It Is To Centre Captions Underneath Images And Photos On WordPress'
Are your captions centred?

Here’s my simple guide to centring captions.

  • Add an image or photo to a blog post.
  • Click on the image to open the image toolbar.
Image of a photo on a WordPress blog highlighting the image toolbar
How to centre a caption

You’ll see that the caption is aligned to the left under the above photo. Arghhhhh!

  • On the toolbar, click on the ‘Align‘ button and on the dropdown menu that appears, click on ‘Align Centre.’
Image highlighting the Align Centre button on WordPress
Click on the Align Centre button.
  • The image or photo will now be centred on your blog post, as will the caption.
Image showing a centred caption under an image on a WordPress blog.
The caption is now centred underneath the photo.

How easy was that? No more ‘Arghhhhhs.’

The example I have given above works on the Block editor.

Of course, if you prefer captions on your blog posts to be aligned to the left or right, you can ignore everything I’ve said in this post.

If you have any questions about centring captions, leave them in the comments section.

Looking for more blogging tips? Click on the ‘Blogging Tips’ and ‘Block Editor – How To’ buttons on the menubar of my blog.

Follow Hugh on social media. Click on the buttons below.

Copyright © 2022 hughsviewsandnews.com – All rights reserved.