The Best Ultimate Guide To Why Alt-Text Is Important

What answers would you provide if I asked you what alt-text means and what advantages it offers to bloggers?

What is alt-text, and why is it important?

Alt-Text (short for alternative text) is a commonly used term. It is essential to include it in posts that contain pictures, images or photographs. This unsung hero of the digital world ensures that everyone can access and benefit from the images included in your blog posts.

Blog posts that contain images, pictures, or photos attract, on average, 70% more traffic and clicks than those that do not. However, how many bloggers include alt-text information for these images, pictures, and photos? Unfortunately, the answer is not many. Furthermore, bloggers who fail to add alt-text to the images in their posts are missing out on providing some visitors with additional and important information.

Alt-Text assists those with vision impairments understand the content of the images and photos used in your blog post. Without it, they would be unaware, potentially missing out on crucial information. Imagine you’re showing off a brand new cover for your next book and don’t add alt-text to the image. They won’t have any idea what that new book-cover looks like. But that’s not all.

Utilising alt-text enhances your blog’s SEO rankings and helps search engines understand the content of your images. How will search engines determine what your pictures depict if no information is provided?

Search engine crawlers extract several key details from an image, including its file name, captions, title, and alt-text. When these details are absent, the post containing the images is ranked significantly lower. Visitors using a screen reader or other devices that inform them of the image’s content will remain unaware of what those images depict.

How to write alt-text.

When writing alt-text, keep it descriptive and straightforward—ensure it aligns with the content on the page. Include some keywords where appropriate, but avoid overdoing it. Keyword stuffing is not advisable, as it disrupts the user experience and can lead search engines to consider your site spam. Trust me, you don’t want that!

But where and how should you add alt text to your images, photographs, and pictures?

How to add alt-text to your images, photos, and pictures.

  • Click on the image you have uploaded to the media library.
  • On the right-hand side, you will see several boxes to which you need to add information.
  • Alternative Text – In this box, add information that describes what is in the image.
  • Title – Give the image a title.
  • Caption — Add a caption to the image, although you don’t need to if it’s unnecessary.
  • Description — Describe what’s in the image. You can use the same information you added for alternative text if you like.
  • File URL – This information will already be populated.

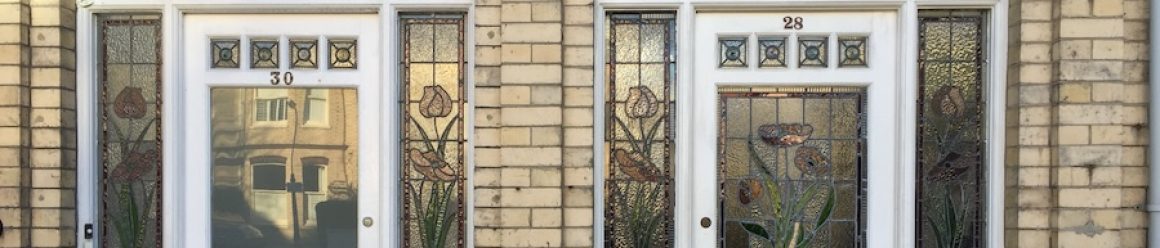
Here’s an example from my media library for the following photo.

A photo of two Welsh Cardigan Corgis sitting on a sandy beach, gazing towards the camera. In the background, there are several buildings of a city and some mountains. There are a few white clouds in the sky.
A walk on the beach with Toby and Austin, the Welsh Cardigan Corgis.
  • Here are the details of the alt-text and information I added to the photo.
An image provides information about the Alt-Text added to a photo in the WordPress media library.
Always add Alt-Text information to images, pictures and photos

The next time you add an image, photo, or picture to your blog post, don’t just add the image and run. Make sure you include the details outlined in this post.

Summary

  • Alt-Text, or alternative text, is crucial for bloggers who include images in their posts.
  • It enhances accessibility for those with vision impairments, ensuring they understand the content represented in images.
  • Additionally, it plays a significant role in improving SEO rankings by helping search engines identify image content.
  • Despite these advantages, many bloggers neglect to add alt-text to their images, missing out on valuable audience engagement and search engine visibility.
  • To effectively write alt-text, it should be descriptive, straightforward, and relevant to the content, with a mindful inclusion of keywords.
  • Bloggers can easily add alt-text by accessing the media library and providing a title, caption, and description of the images.
  • Overall, including alt-text enhances the user experience and optimises blog performance.

Do you add alt-text and other details to the images and photos included in your blog posts? If not, what’s holding you back?

The featured image in this blog post is taken from Pixabay. AI checked spelling and grammar mistakes.

I’m getting tough with non-engaging comments. Comments such as ‘Nice post’ are marked as spam.

Layout, content, settings, and format might differ on self-hosted blogs.

Click the buttons below to follow Hugh on Social Media

Copyright @ 2025 hughsviewsandnews.com – All rights reserved.

How To Find Free Photos And Images On WordPress: Why You Should Use Them.

I’ve published many posts about the perils of using copyrighted images and photos. Several bloggers I know have been fined for downloading copyrighted images and photos, including when they reblogged posts.

Did you know that WordPress offers free, high-quality images and photos to enhance the visual appeal of your WordPress website or blog?

You’re searching for the right image for your new blog post. Rather than doing a Google search in a separate tab — and running the risk of using an image you don’t have rights to — use the free images and photos WordPress offers.

Light blue image with the words 'How To Find Free Photos And Images On WordPress: Why You Should Use Them' in white text
Did you know that WordPress offers users free photos and images?

To avoid any chances of being fined for using copyrighted images and photos, the best advice is to always try and use your own photos and images in your blog posts.

Of course, you could choose not to include any images or photos, but given that posts that include photos or images get 70% more traffic, you should add at least one image or photo to all your blog posts.

Where Do I Find The Free Images And Photos WordPress Offers?

  • Add an Image block to your blog post.
  • Click on the ‘Select Image‘ link to open a new menu.
  • The free images and photos are under ‘Pexels Free Photos‘ and ‘Openverse‘.
Image highlighting where to find Pexels Free Photos and Openverse in the media library of a WordPress blog.
WordPress offers hundreds of free images and photos to all WordPress users.

Pexels Free Photos

  • When you click Pexels Free Photos, a new window will open that includes a search bar.
  • Add a description of the image or photo you are looking for in the search bar and click the ‘Search‘ button.
  • Look through the results, click the image you want to use and click the ‘Select‘ button.
  • Click the ‘Load More‘ button at the bottom of the page to see more results.

When you select an image from Pexels Free Photos, it is downloaded to your media library. Remember to add information about the image to help readers with sight impediments and who may use speech software on their devices.

WordPress will have already completed the title of the image or photo and added credit details, so the only information you need to add is Alt Text and Description.

Openverse

Openverse works like Pexels Free Photos. It’s a search engine for openly licensed media, which gives access to over 600 million Creative Commons licensed and public domain image and audio files. All files can be used free of charge.

You can use the search box to find content licensed for commercial use and content that may be modified.

If you use any images or photos from Openverse, they are downloaded to your media library. You’ll need to complete the Alt Text and Description boxes, giving the image/photo details.

It’s Not Only WordPress That Offers Free Images And Photos.

Several websites offer free images that you can use on your WordPress website. These websites curate collections of high-quality images that are free to use, often under various Creative Commons licenses. Here are some popular websites you can explore:

Review and respect the license terms associated with each image when using images from these sites. Providing proper attribution to the photographer or the source is always good practice.

WordPress Plugins

Another convenient way to find free images within your WordPress editor is by using plugins specifically designed for this purpose. These plugins integrate with popular free image websites, allowing you to search and insert images directly from your WordPress dashboard.

Some notable plugins for finding free images include:

Installing and activating these plugins will add additional options to your media library, making browsing and selecting free images for your content effortless.

Note: Plugins are not available on all WordPress plans.

Image SEO Best Practices

While finding free images for your WordPress blog is essential, optimising any images or photos you use for search engines is equally crucial. Following some basic image SEO best practices can improve your blog’s visibility and attract more organic traffic. Here are a few tips:

  • Use descriptive filenames and alt tags that reflect the image content.
  • Optimise image file sizes to improve site loading speed.
  • Add relevant captions and descriptions to provide more context.
  • Ensure images are responsive and look good on all devices.

By incorporating these strategies, you enhance the visual appeal of your content while improving your blog’s overall SEO performance.

Let’s Wrap It Up.

  • Finding free images and photos for your WordPress website or blog is easier than ever.
  • Whether you explore the WordPress options, leverage free image websites, or use dedicated plugins, the possibilities are abundant.
  • Adhering to image licensing requirements and optimising your images for SEO will ensure a visually appealing and optimised blog.

So go ahead and utilise the resources available to you, and make your WordPress blog shine with stunning images that complement your content!

Remember, a picture is worth a thousand words.

Disclaimer: Always review and respect each image’s terms and conditions and licensing rights. The information provided in this article is for educational purposes only and should not be considered legal advice.

Where do you get the images and photos you use on your blog? If you have any questions about using free images and photos on your blog, leave them in the comments section. Alternatively, please join the discussion and conversation if you’d like to add any information about using free images and photos.

Layout, content, settings, and format might differ on self-hosted blogs.

Follow Hugh on his social media platforms by clicking the buttons below.

If you enjoyed this post and want more like it, enter your email address and click ‘Subscribe’ to stay up-to-date with my latest content.

Copyright @ 2024 hughsviewsandnews.com – All rights reserved.

5 Things You Can Do To Free Up Media Space In Your Blog’s Media Library.

‘Help! I’ve run out of media storage space on my blog and can no longer upload new photos, images or videos. What can I do?’

That was a question to me from Micheal, who blogs at Spo-Reflections.

Michael was happy to upgrade his WordPress plan to obtain more media space, but there are other things you could do if you find your blog running out of media space.

Light blue image with the words '5 Things You Can Do To Free Up Media Space In Your Blog's Media Library' written in white text.
Have you run out of media space on your blog? Here are 5 things you can do to obtain more.

1. Upgrade your plan.

WordPress currently offers 6 plans.

The amount of media storage space you get varies. Click the following link to see the plans – ‘There Is A Plan For You.’ Pricing is correct at the time of publication of this post.

Each plan provides the following media storage space.

Name of planStorage Amount
Free1GB
Personal6GB
Premium13GB
Business200GB
Commerce200GB
EnterpriseN/A

However, only upgrade your WordPress plan if you absolutely need to. Do not get into debt by upgrading unless you can afford it, as there are other things you can do to free up media storage space.

2. Resize the size of your images and photos.

One of the biggest reasons bloggers run out of media space is that they do not resize their images and photos before uploading them to their media library.

There are several ways you can reduce the size of images and photos. You can reduce them using photo editing software or via the tools of your device you use to blog.

I use an Apple iMac and can change the size of photos and images by clicking on ToolsAdjust size on the menubar of my desktop computer. I do this before uploading them to my WordPress media library.

I recommend reducing image and photo sizes to 900 x 675 pixels.

On a Windows computer, you can use Microsoft Paint. Open your image with that program, then click on Resize. You can find this option on the middle-right side of the “Image” section at the top of the Paint window.

The WordPress media library also has editing software, but please note that if you reduce the size of an image or photo using this tool, the original image is kept in your media library when you reduce the size of the picture – thus, you won’t have freed up any storage space.

Large images can also slow down your blog’s downloading speed, negatively impacting your blog’s search engine rankings and overall user experience. So, I recommend you always reduce the size of images and photos before uploading them to your blog.

3. Do not upload videos to your media library.

If you include videos in your blog posts, uploading them to your media library can take up vast amounts of space.

To overcome this problem and free up all the space they take up, upload your videos to YouTube. Then add the YouTube block to your blog post and include the link to the video in the block.

Image of the YouTube block on WordPress
Adding videos to your blog via YouTube helps free up media space for your blog.

Do this for any existing videos you have in your media library. Upload them to YouTube and add them via the YouTube block before deleting the original from your media library. This will free up large amounts of storage in your media library.

4. Delete images from your media library.

We can accumulate vast amounts of images and photos in our media library, many of which will become redundant.

Deleting these images will free up storage space. However, when you delete any images or photos in your media library, they disappear from the blog posts they appear on.

My blog post, ‘Are Your Old Blog Posts Damaging Your Blog? How To Stop It From Happening’ details why bloggers should delete old blog posts.

Deleting old, redundant blog posts containing images, photos, and videos frees up storage space. However, delete any images, photos and videos in your media library before deleting the posts.

If you’re unsure whether a post should be deleted, read my post, ‘Are Your Old Blog Posts Damaging Your Blog? How To Stop It From Happening,’ for advice.

5. Reduce the number of images and photos you add to blog posts.

While I recommend adding at least one image or photo to a blog post (because blog posts containing images get up to 70% more traffic), reducing the number of images and pictures will help save media space.

Before adding more images or photos, ask yourself if adding them to your post is necessary.

Let’s wrap it up.

  • Resize your images and photos before uploading them to your blog’s media library.
  • Upload videos to YouTube and use the YouTube block to show them on your blog posts.
  • Delete old images and photos from your media library, but remember to remove them from any posts first.
  • Do not resize images using tools in the media library, as this does not save storage space.
  • Consider deleting old blog posts that are no longer relevant.
  • Reduce the number of images and photos on blog posts. Ask yourself if they’re necessary.

How do you free up storage space in your blog’s media library? If you have any questions about this post, leave them in the comments section.

To follow Hugh on social media, click the links below.

If you enjoyed this post and want more like it, enter your email address and click ‘Subscribe’ to stay up-to-date with my latest content.

Copyright @ 2024 hughsviewsandnews.com – All rights reserved.

Adding Images Or Photos To Your Blog Posts? 4 Essential Things To Do.

Blog posts containing images and photos get up to 70% more traffic than posts without visuals. So why wouldn’t you use them in your posts?

Visual content is an essential component of any successful blog. Adding images, videos, and infographics to your blog posts can make your content more engaging and memorable.

An blue background image with the title of a blog post, 'Adding Images Or Photos To Your Blog Posts? 4 Essential Things To do' in white text.
Are you making any mistakes when adding images or photos to blog posts?

If you plan to include images or photos in your blog posts, there are four essential things to remember. These steps will help ensure your content is engaging and visually appealing while avoiding copyright issues.

1. Use High-Quality Images And Photos.

Always use high-quality images that are relevant to your post. Blurry or low-resolution images can detract from your message and make your blog appear unprofessional.

Additionally, using images that are not directly related to your topic can confuse readers and reduce the effectiveness of your post.

2. Ensure Images And Photos Are Not Copyrighted

Ensure you have permission to use any images and photos you include in your posts. This means sourcing images from websites offering free, non-copyrighted images (such as Pixabay) or purchasing the rights to use images from a stock photo website.

Not all images are free to use. And some that are free may only be free for a limited time. Always check the small print.

Don’t think you’ll ever get fined for using copyrighted images or photos. There are copyright bots continually looking for copyrighted images that have been illegally used and downloaded all over the web.

I know of two bloggers who have been fined for using images/photos on their blog posts that were not free to use.

To avoid copyright issues, use your own images and photos and watermark them before adding them to your blog posts. I use a free app called Photobulk to do this. Seeing a watermark is a great deterrent in persuading some thieves not to copy and use them.

Of course, if you’re not concerned about your photos and images being used by anybody else, you don’t need to watermark them.

3. Ensure Images And Photos Are The Correct Sizes.

Optimize your images for web use by compressing them to reduce file size.

Large images can slow down your website’s loading speed, negatively impacting your blog’s search engine rankings and overall user experience.

If you have limited space in your media library, not reducing the size of your images and photos will soon take up all your media space. When that happens, you won’t be allowed to download additional images to your blog unless you free up space or move to a plan that gives you more storage space.

I recommend reducing image and photo sizes to 900 x 675 pixels.

There are several ways you can reduce the size of images and photos. You can reduce them using photo editing software or your device’s software.

The WordPress media library also has editing software, but please note that if you reduce the size of an image or photo using this tool, the original image is kept in your media library when you reduce the size of the image- thus, you won’t save any storage space.

The newly edited image with the reduced size is added as a new file in your media library. You can always revert back to the original image by clicking on the image in the media library, selecting Edit, and then choosing the “Restore Original” button. If you’ve inserted an edited image into other published posts, reverting an image may break this image on those posts.

I use an Apple iMac and can change the size of photos and images by clicking on ToolsAdjust Size on the menubar of my desktop computer. I do this before adding them to my WordPress media library.

On a Windows computer, you can use Microsoft Paint. Open your image with that program, then click on Resize. You can find this option on the middle-right side of the “Image” section at the top of the Paint window.

However, as I mentioned earlier, you can also reduce the size of images and photos on WordPress. But only do this if your WordPress plan has a large storage space allowance.

  • To do this, ensure you view your media library in Classic view.
  • Click the edit image button on the image you want to edit.
Image showing the edit button of an image in the WordPress media library
Click the edit button.
  • Add the new dimensions in the Scale Image box and click the Scale button.
Image showing the new dimensions box and scale button on an image in the WordPress media library.
Add the new dimensions of your image.
  • Click the save or update button to save the changes.

Your photos and images will be reduced in size, but remember that a copy of the original is also kept, so you won’t save any storage space.

If posting to your site using the Jetpack App, the app can optimise images.

In the Jetpack app for iPhone, you can set the Max Image Upload Size so the original file is resized automatically when you upload it. This option can be found by going to My Site and clicking the profile icon in the top right, then choosing App Settings.

In the Jetpack app for Android, click on your profile icon in the top right corner and choose App Settings. There, enable Optimise Images to resize and compress images on upload.

4. Add information to your images and photos.

Don’t forget to include alt text and captions for your images.

Alt text is a description of the image that allows visually-impaired readers to understand what the image is conveying. At the same time, captions can add context and help readers engage with your content. This is especially important when participating in blog challenges such as Wordless Wednesday and Silent Sunday.

Screenshot of the Alt Text box, caption box and description box on an image in the WordPress media library.
Always add information about your images and photos.

Adding a description of the image or photo also helps with SEO searches.

  • Click the save or update button to save all the changes.

Following these four essential steps, you can create visually stunning and engaging blog content with images that stand out.

Let’s wrap it up.

  • Always use high-quality images and photos on your blog.
  • Never use images and photos that are copyrighted. You may be fined for doing so.
  • Use your own images and photos. That way, you won’t encounter any copyright issues.
  • Reduce the size of images and photos before loading them to your blog.
  • Alternatively, reduce the size of images and photos with WordPress’s tools in the media library, but only if you have a WordPress plan that offers a large amount of storage.
  • Always add information about images and photos before adding them to blog posts, as this allows visually-impaired readers to understand what the image conveys.
  • Adding a description of the image or photo also helps with SEO searches.

What do you use to resize images and photos for your blog posts? Do you always complete the details of images and photos in the Alt Text box? If you have any questions about adding images and photos to your blog, please leave them in the comments section.

To follow Hugh on social media, click the links below.

If you enjoyed this post and want more like it, click the ‘Subscribe’ button to stay up-to-date with my latest content.

Copyright @ 2024 hughsviewsandnews.com – All rights reserved.