Have you noticed that snow is falling on some WordPress blogs? As you read the post, small flakes of snow gently drift down. Meanwhile, on other blogs, like mine, there’s no snow.
WordPress introduced the festive snowfall feature a few years ago. It only works when reading a post via the WordPress website. You won’t see it if you’re reading a post in the WordPress Reader or the Jetpack App unless you click through to the website. This time, it runs until 4th January 2026. But how do you turn the feature on or off? Easy – follow my instructions.
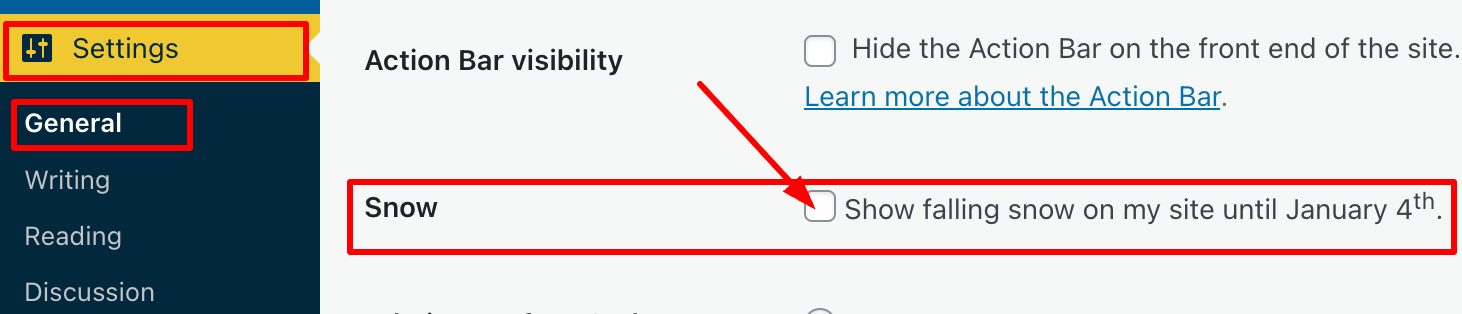
Go to your blog’s dashboard and click Settings – General.
Scroll down the page until you come to ‘Snow.’
You’ll see a box with the words ‘Show falling snow on my site until January 4th.’
Where to turn on/off falling snow on your WordPress blog
If you want snow to fall on your blog, tick the box. If you don’t want snow falling on your blog, untick the box.
Click the ‘Save Changes‘ box at the bottom of the page.
Ensure the changes are effective by opening one of your posts on the WordPress website.
I’m not a lover of anything moving onscreen while I’m reading, as I find it distracting. However, I know that many bloggers love the idea of gently drifting snowflakes while they read blog posts during the festive season.
The choice is yours. And now you know how to switch on or turn off snow falling on your blog.
For the above instructions, I’m using a desktop computer. The falling snow effect is only controlled through your WordPress.com dashboard, not the Jetpack mobile app.
Is it snowing on your blog? If not, do you want it to snow? Let me know why you like or dislike the idea of snowflakes drifting on WordPress blogs.
The featured image on this blog post is sourced from Pixabay. AI reviewed spelling and grammar errors.
Over the past few years, I’ve published a post around this time of year outlining some jobs all bloggers can do to ensure their blog not only looks good but also functions correctly.
One thing bloggers who never do any blog housekeeping refuse to believe is that many problems on their blogs originate from a lack of maintenance. They’ll blame WordPress, instead of themselves. Continuing to use an outdated theme can also cause issues and create a security risk.
One job all bloggers are recommended to do
One important task I am currently working on in the housekeeping aspect of my blog is reviewing posts and removing any images that I cannot be certain are entirely free to use. But why am I doing this?
The comments sections of both posts offer interesting reading, so I recommend taking a look.
I’m a personal blogger, so this won’t affect me!
Wrong! Just because you are a personal blogger, don’t think you are exempt from being fined for copyright infringement. Downloading and using copyrighted images, photos, song lyrics, and some GIFs in your blog posts is illegal; therefore, nobody should encourage bloggers to download or publish any copyrighted material.
Most of the images I deleted are from flash fiction challenges I used to participate in. However, I have also found some images in other posts where I either failed to give proper attribution to the source or used images from the host blogger that I could not guarantee were free to use when taking part in their link-up.
And don’t forget to delete those images and photos from your media library, too. Not only are they proof that you downloaded them illegally, but deleting them will free up valuable storage space.
Unless you are completely certain that images, photos, song lyrics and GIFs are not copyrighted and free to use, avoid using them. Sure, you might get away with it, but why risk a hefty fine?
Back to why December is the ideal time for some blog housekeeping
I’ve already had the pleasure of seeing bloggers bid farewell to their blogs and followers for the festive season, joyfully extending warm wishes to their readers for a Merry Christmas while eagerly expressing their intention to return promptly in the New Year.
Image created using the WordPress AI image generator.
Some have published their final posts of 2025, while others have happily shared their anticipated dates for a well-earned blogging break.
And who can blame them? Blogging is enjoyable, but all bloggers need a break from the blogging world. I’m taking a blogging break during the last few weeks of December.
For those who do not celebrate Christmas, December still provides a valuable opportunity to focus on blog maintenance and security. This can include reviewing and updating posts, auditing existing content for accuracy and relevance, fixing broken links, and improving website speed and SEO.
Furthermore, it’s an excellent time to review your blog’s design and user experience, making necessary adjustments to improve accessibility and engagement. By investing time in these areas, bloggers can keep a polished, secure platform ready to impress their audience in the upcoming year.
As December rolls in and its days dwindle, you’ll probably witness how much of the blogging world falls into a hush. So why let your blog languish in neglect? This is your golden opportunity to roll up your sleeves and give it the fierce love and attention it deserves, ensuring it runs flawlessly for another year.
Let’s wrap it up!
At least once a year, focus on housekeeping tasks to enhance your blog’s appearance and functionality.
Many blog issues stem from a lack of maintenance; outdated themes can pose security risks.
One essential task is reviewing and removing any images from posts and your blog’s media library that may not be free to use to avoid copyright infringement.
Personal bloggers are not exempt from potential copyright-related legal issues when downloading or using copyrighted materials.
December is an ideal time for blog maintenance as many bloggers take breaks. It’s an opportunity for bloggers to give their blogs the attention they deserve before the New Year.
Are you excited about some upcoming blog housekeeping or maintenance? If so, what fantastic plans do you have in store? Perhaps you’ve already tackled some blog maintenance—if that’s the case, I’d love to hear about the wonderful jobs you accomplished!
The featured image in this post was created using the WordPress AI Image Generator block. AI was also used for checking spelling and grammar mistakes.
Click the buttons below to follow Hugh on Social Media
Let me begin with a new scam that is unrelated to blogging or publishing. It’s a scam that comes via a voicemail message on mobile phones.
I’ve lost track of how many times I’ve had the same call and message saying, ‘Please add my number to WhatsApp.’ Each time, the number the scammer uses is slightly different, but it’s always the voice of the same woman.
Thanks to Apple’s advanced AI, my phone now does a great job at identifying spam calls and sends them straight to voicemail. It doesn’t even ring. The spammers’ numbers then show in my call list, which I mark as ‘Spam – Delete and send details to Apple.’ I should add that since I enabled AI on my phone, the number of spam calls I receive has dropped significantly.
The latest Blogging scams
Recently, I encountered a concerning blogging email scam. It purportedly originated from WordPress, claiming that my payment details were incorrect in my account and included a link for me to click to rectify them.
I immediately recognised the email as fraudulent because the email failed to address me by name. All it said was ‘Dear WordPress User,’ But what alarmed me was that the same scammer went on to also send me the same email through the ‘Contact Hugh‘ form on my blog, neglecting to begin the message with ‘Dear Hugh.’ It’s important to note that I request anyone using the form to begin their message with ‘Dear Hugh,’ as this practice helps identify potential spam, particularly from automated spam bots.
I don’t know how the scammer obtained my email address, but it must have appeared on a list with some connection to WordPress. This is likely how they discovered I had a WordPress blog, although nowhere on my blog do I provide an email address. Anyone wanting to contact me must go via the ‘Contact Hugh’ form.
Although this was an easy scam for me to spot, I still feel bad for any blogger who falls for it. If you are unsure whether an email from WordPress is genuine, always log in to your WordPress account to verify any details. Never click on any uninvited links and never give an email address anywhere on your blog.
Image generated using WordPress AI
However, more concerning was news of a blogging scam that involved using royalty-free platforms, such as Pixabay. Author, writer and blogger Jacqueline Lambert left a comment on my recent post, Where To Legally Source Amazing Images For Your Blog Posts.’ outlining how she was almost scammed by a company after using a royalty-free image from Pixabay on one of her posts.
I strongly encourage you to read Jacqueline’s insightful post ‘Bloggers Beware The Copyright Trolls – Even If You Use Royalty-Free Images‘ to glean valuable lessons from her experience. It is imperative to remain vigilant and not become a target of such scams that specifically seek to exploit bloggers.
I would also like to reiterate that downloading and publishing copyrighted images or photographs on your blog is strictly prohibited. Always verify that such materials are free for use. This also applies to reblogging blog posts from other bloggers that contain images or photos. If you share copyrighted images from another blogger’s post, you could be fined.
A plea to you – yes, you!
Despite my recent post addressing copyright infringement, I continue to observe bloggers (you know who you are) using images and photos in their posts without proper attribution regarding their sources. They probably believe that nobody will come after them for downloading and using copyrighted images, but I know of two bloggers who have been fined for doing so. Never believe that it will never happen to you.
Even if the images and photos are your own, I recommend that you indicate in your post that they are your property. If you don’t believe me, read Jacqueline’s post. As she elaborates, numerous companies are employing image recognition technology to scan the internet for unauthorised use of images and photographs, especially in blogging posts. Some bloggers have even been threatened with legal action and fines for using their own pictures.
The latest publishing scam
My thanks again to Jacqueline, who recently published a guest post by author Peter Barber about a publishing scam he fell for. Titled ‘Publish and Be Damned: How I Got Scammed, Learned My Lesson, and Came Out Fighting‘, Peter details how he fell head-over-heels for a scam many authors will probably encounter at some point in their writing lives. I urge you to read his post and learn from it because it could happen to you.
Are you aware of any current scams related to blogging or publishing? Please share details in the comments section. Have you ever fallen victim to a blogging or publishing scam? If so, what happened?
The featured image on this blog post is sourced from Pixabay. AI reviewed spelling and grammar errors.
I used to publish a substantial amount of photography on my blog, especially in Wordless Wednesday posts, and then it all ceased!
I couldn’t help but notice how they generated little to no engagement. I felt somewhat disheartened by this apparent lack of interest in my photography. After all, how can you respond week after week to the same ‘Great shot’ comments, other than with a ‘Thank you?’ It almost seems as if people are just going through the motions with those kinds of comments without truly engaging with the content.
Can a photography blog post generate meaningful engagement?
It’s something I wasn’t entirely convinced about. I only had to look around the blogosphere and see the same ‘Great photo’ comments on photography posts.
However, some photo challenges seem to spark discussion and engagement, although you’ll sometimes have to sift through the ‘Nice shot’ types of comments. Nevertheless, as I’ve discovered, hosting any kind of blog challenge is hard work, so it’s always a shame when people drop links or short comments and run without recognising the effort the host has put into creating the post. Some of those hosts must feel disheartened when it happens, but the thoughtful and engaging comments they get must make all the difference.
I love photography, so why don’t I showcase mine?
After realising I was missing out on sharing my photography and not wanting to create my own photography challenge, I decided to publish a monthly photography post showcasing four photographs I’ve never featured on my blog before.
Not only that, but at the end of each post, I will display the photos in a separate WordPress photo Gallery block and give a brief explanation of that block’s features.
So, here we go. I’m excited to share with you four never-before-seen photos that I’m delighted to finally unveil on my blog!
1. How old is this tree?
How old was this tree?
What initially caught my eye in this shot were those colourful buildings in the background. But the fallen tree had me asking many more questions.
Can you actually determine a tree’s age by counting the rings in its trunk? Well, this tree got a bit overzealous during a storm and decided to take a nap across a footpath! It turned into the ultimate footpath block, leading to some unfortunate lumberjack shenanigans where it had to be chopped into manageable pieces.
Not only did I ponder the ancient age of this tree—seriously, is it older than me?—but I also found myself wondering about the brave soul who planted it and how many people have swung from its branches or taken leisurely naps beneath its leafy embrace. The rings? Oh, they’ve got secrets, but counting them seemed as feasible as getting my two dogs to sit still long enough for a family photo.
Today, the chunks of trunk are still hanging around, serving as a posh Airbnb for wildlife that need a place to kick back and relax. I’m thrilled parts of it are still there because this tree has decided to become the ultimate retirement home for other species.
2. Do you know this bear?
I’m lost. Have you seen my owner?
This cheeky face practically yanked a grin out of me when it halted my stroll. I simply had to snap a photo—who could resist it? There it was, perched impossibly high, making me ponder not just how it got there, but also who the previous owner was. Was it a child’s hat, a brave toy that escaped the toy box, or maybe even a rogue UFO pilot’s accessory? Hey, a guy can dream about flying a UFO dressed as a Bear, can’t he!?
A few days later, the bear was gone. Someone had either claimed it or rehomed it, although my darker, more creative mind was also insisting that it had fallen off the wall and was now trapped behind it (was that a call for help I could hear?).
Whatever had happened to this smiling bear, I was thankful for the joy it had not only given me when I spotted it, but also for the smiles it must have brought to others who had seen it on their journeys. I hope it was reunited with its owner.
3. Does this sign give you mixed emotions?
This way please
This sign will probably evoke mixed feelings. After all, that first line isn’t pleasant, is it? It evoked a vision of a horror story and film by one of my favourite authors, Stephen King. However, the bottom part of this sign brought to mind a beautiful, tranquil place that could be the name of a location you’d find in a children’s book.
I wondered why there was not a separate sign for the dogs’ graves. After all, who would want to visit a dog’s graveyard, apart from maybe pet owners who had buried their beloved pets there? Bluebell Wood, on the other hand, sounded like a lovely place for a walk, especially during bluebell season in May. I pictured myself sitting in Bluebell Wood, forest-bathing, while recharging my body and mind.
Later, I discovered that the gardens, where the photo was taken, were purchased by William Graham Vivian in 1860, when he acquired Clyne Castle, a nearby dwelling, and began creating the surrounding landscape gardens. He died in 1912, and the many dogs buried in the graveyard were his pet dogs. So, there’s the answer to why the dogs’ graveyard is on the sign.
4. Do you know this dog?
Do you think I look younger than my age?
Talking of dogs, the chap in the above photo turned 14 last month.
For those of you who haven’t read my ‘About‘ page, this is Toby, the older of the two Welsh Cardigan Corgis my partner and I own. I still recall the day we collected him and how, from the moment we met him, our lives took a new turn. It’s one of the best days of our lives.
Toby is a photography subject, like me, in that he usually moves when a picture is taken. However, on this particular day, his 14th birthday, he posed for the camera, and I was thrilled with the result.
Toby’s hobbies include sleeping, walking, and meeting his mates on the beach. He also enjoys having a mad 10 minutes after dinner, when I have to chase him (very slowly) around the dining table while carrying his favourite toy in his mouth. Additionally, he likes to believe he’s in charge of the household.
When I first started blogging in 2013, Toby was a prominent feature on my blog, but over the years, he hasn’t been as interested in appearing. However, he has recently garnered considerable attention on Bluesky, where some of his photos have been shared hundreds of times and generated a lot of engagement. It’s a rare occurrence that he appears on my blog, and I’m very grateful that he agreed to let me share his photo.
The Gallery Block
The first WordPress gallery I am displaying and featuring is the ‘Gallery‘ block. Here are my four photos.
This way pleaseHow old was this tree?I’m lost. Have you seen my owner? Do you think I look younger than my age?
The Gallery block is a straightforward photo gallery that lets you drag and rearrange images to display them in any way you prefer. It’s a useful gallery, and I notice it being used more frequently than any of the other image blocks provided by WordPress.
Notice how the captions I’ve added to my photos appear at the bottom of each one. You don’t need to add captions to photos, but they are a great way to boost engagement from visitors, especially when asking a question.
To find the ‘Gallery‘ block, search for ‘Gallery‘ under the ‘Blocks‘ tab when drafting a post.
The Gallery Block
Click the following link for more information about the Gallery Block.
How to make a photographer’s day.
Next time you leave a comment on a photography post, instead of simply saying ‘Great photo,’ explain what it was about the picture that made you think it was great. Was it the subject, the lighting, the scenery, the angle it was taken from, or the emotion it evoked when you saw it? It only needs to be a few lines, but they will appreciate the feedback much more than when all you say time after time is that it’s a great photo.
How do you usually engage with photography posts? What encourages you to leave a comment other than saying, ‘These are nice photos.’ Are you a photography blogger? If so, does engagement on your posts matter to you?
The featured image in this blog post is taken from Pixabay. AI checked spelling and grammar mistakes.
I’m surprised by how many bloggers miss the opportunity of having their posts shared for free by not displaying sharing buttons on their blog posts.
Of course, some bloggers don’t want any of their posts shared, but they tend to be in the minority.
In today’s digital age, having social sharing buttons on your blog is crucial for expanding your reach and boosting engagement. This post will guide you through the steps to add sharing buttons to your WordPress blog and emphasise the benefits of including them.
For the purpose of this guide, I’m using an iMac desktop computer.
To add and edit sharing buttons on your WordPress.com blog, follow these steps:
Log in to your WordPress.com account.
From your dashboard, navigate to ‘Settings‘ and select ‘Sharing.’
Click the ‘Sharing’ option.
You’ll be taken to the ‘Sharing Options‘ page of your blog, where you will see a variety of options that include –
Available services
Enabled services
Live preview
Button style
Sharing label
Show buttons on
WordPress.com Likes are
WordPress.com Reblog button
Comment Likes are
Let’s have a look at each of these options and what they mean.
Available services – This displays any sharing buttons not currently visible on your blog. To add an available sharing button, drag it to the ‘Enabled services‘ box and click the ‘Save‘ button at the bottom of the page.
There is also an ‘Add a new service‘ link that, when clicked, allows a user to add new sharing services that are not currently available on WordPress.
Enabled Services – This section shows all the sharing buttons currently on display on your blog. Here’s an image of the sharing buttons available on my blog posts and pages.
Sharing buttons on Hugh’s Views And News blog.
Notice the ‘Customise buttons‘ link under the buttons. Click this to be taken straight to the ‘Sharing options‘ page of your blog.
You may also have noticed the ‘More‘ sharing button. This is where you can group certain sharing buttons under one button. To do this, simply drag the buttons you want to hide to the ‘Services dragged here will be hidden behind a share button‘ box. On my blog, the ‘More‘ button includes sharing buttons for ‘X’, ‘Email’ and ‘Print.’
Hide sharing buttons behind one button.
To rearrange the order of how sharing buttons display on your blog, simply drag the buttons to the order you want them in. Remember to save any changes.
To remove a sharing button from your blog, drag the button to the ‘Available services‘ section and click the ‘Save‘ button at the bottom of the page.
Live preview – This section shows how the sharing buttons display on your blog.
Button style – There are four options to choose from.
Icon + Text
Icon only
Text only
Official buttons
On my blog, I have chosen sharing buttons to show ‘Icon + Text’ as this helps those using speech software know which sharing button is which. If you use ‘Icon only,’ speech software won’t know what each sharing button is.
Sharing label – This section allows users to change and display their own message above their sharing buttons. Simply add the text you want and click the save button.
Show buttons on – Choose where on your blog you want sharing buttons to appear. Place a tick next to the options and click the save button.
Choose where you want the sharing buttons to display on your blog.
WordPress.com Likes are – This is where you can turn off (or on) the ‘Like’ button on blog posts and pages.
WordPress.com Reblog button – This is where you can turn off (or on) the reblog button on blog posts and pages.
Comment Likes are – This is where you can turn off (or on) the availability of a ‘like’ button on comments on your blog.
Once you’ve added sharing buttons to your blog, remember to always test them. The best way to do this is to visit one of your blog posts to ensure the sharing buttons appear as intended. Click on each button to check that it links correctly to the respective social media platforms.
Top tip: If you have an account on a social media platform, remember to ensure that there is a sharing button for that platform on your blog. You don’t need to remove share buttons where you don’t have an account, as other bloggers and readers may want to share your posts and pages to their own social media accounts. For example, I don’t have a Facebook account, but I allow visitors to my blog to share my posts and pages on their Facebook accounts.
But, at the end of the day, it’s your decision as to how many sharing buttons you want to display on your blog.
Advantages of Having Sharing Buttons on Your Blog
Increased Visibility: Sharing buttons allow visitors to easily share your content with their networks, leading to greater visibility and new readers.
Enhanced Engagement: When users share your posts, it engages their followers, creating conversations and interactions around your content.
Improved SEO: Social shares can boost your search engine rankings. Search engines often view shared content as more credible and relevant.
Brand/Blog Awareness: Every share increases exposure for your brand/blog, helping you capture a larger audience over time.
Traffic Boost: Each share potentially drives more traffic back to your blog, increasing your overall reach and influence in your niche.
User-Friendly: A streamlined sharing process enhances the user experience, encouraging visitors to interact more with your content.
By integrating sharing buttons into your WordPress blog, you not only make it easier for readers to share your posts but also create new opportunities for engagement and growth.
Summary:
Many bloggers miss out on free content-sharing opportunities by not displaying sharing buttons. These buttons are crucial for expanding reach and boosting engagement.
It’s easy to add and display sharing buttons on your WordPress blog. Follow the guide in this post.
Ensure you deal with each option available to you on the ‘Sharing options‘ page of your blog.
There are many advantages of displaying sharing buttons on your blog, including increased visibility, enhanced engagement and improved SEO ratings.
If you have a social media account, ensure you display a sharing button for that account on your blog.
Add as many sharing buttons as you like, even for those social media platforms where you don’t have an account.
Test that the sharing buttons are working correctly at least once every few months.
Make the most of the other options available on the ‘Sharing options’ page of your blog, such as switching on/off the like button and whether or not you want a ‘Reblog’ button to show.
I want to open up the conversation and hear from you. What social media platforms do you find most effective for sharing your blog content? Have you noticed an increase in your blog traffic after adding sharing buttons? How much of a difference has it made? Have you experimented with the different button styles? Which one do you think looks best on your blog? If you could add one feature to the sharing buttons on your blog, what would it be and why?
Layout, content, settings, and format might differ on self-hosted blogs.
Click the buttons below to follow Hugh on Social Media
The featured image on this blog post is taken from Pixabay. AI checked spelling and grammar mistakes. Images, which were taken from screenshots of my blog, were created by me.
Copyright @ 2025 hughsviewsandnews.com – All rights reserved.
The majority of bloggers understand the importance of visual content. Posts that include images receive up to 70% more traffic than those that contain no images. However, there is one major pitfall associated with using images in blog posts, which I will address shortly.
Images not only enhance the appeal of our posts but also help us communicate our messages more effectively. However, a key question remains: where do you source your images and photographs for your blog posts?
Are you breaking the law by using images that are not your own?
I’ve become concerned by the increasing number of bloggers using images or photos without giving credit to the owner or specifying the source of the image. Many of these images have been obtained from the internet; some are copyrighted and not freely available for use. Bloggers using these images and photos are breaking the law.
Some bloggers believe they will never be caught using copyrighted images and photos. They argue that their blog is too small for anyone to care. Nobody will come after them. However, I am aware of a few bloggers who have been prosecuted and fined for downloading and using copyrighted images and photos on their blogs.
It may also not have crossed the minds of some bloggers that there are serious consequences for using images and photos to which they do not have the rights in their posts. Hence, this post.
Where do bloggers get their images from?
Some bloggers, including myself, use stock photo websites that provide images and photos for free. However, even some of these can incur costs if the images are only free to use for a limited time or require the user to give full credit to the owner, along with a link to where the image was sourced. Always read the small print before using any images or photos that are not your own.
Here’s an example. The following image is from Pixabay, a website that offers a wide range of free-to-use images and photos.
Notice that I have given credit to the person who created the image and where I obtained it from. The image is free to use, and although the content licence summary states ‘Use Content without having to attribute the author (although giving credit is always appreciated by our community!).’ I always include an attribute along with links to the source of the image.
Always check the content licence summary before downloading an image or photo from the internet and using it in a blog post. Ensure you follow any rules around the use of the image.
The perils of using copyrighted images
While it might be tempting to use appealing images from the internet, downloading and using copyrighted images and photos can result in serious legal trouble. Here are some risks to bear in mind:
Legal Consequences
Using copyrighted images without permission can lead to copyright infringement, which may result in potential legal action against you. This may result in hefty fines, the removal of your post, or even the closure of your blog, not to mention damage to your reputation.
Image Attribution Challenges
Even when images are shared with the intention of being used by others, understanding the precise attribution requirements can be confusing. Each source may have different rules, and failing to follow them can put you at risk.
Quality Concerns
Some free or low-cost images can often be of lower quality, which can damage the professionalism of your blog. Conversely, high-quality images usually come at a price, highlighting the importance of responsible sourcing. However, they can eat into your media space unless you reduce the size, which may then affect the quality.
The Perils of Reblogging
If you reblog a post of another blogger that contains images and photos, don’t think you are safe from prosecution if any of those images or pictures are copyrighted. You, too, could be fined for resharing images or photos that are not free to use, even though all you did was reblog the post. If you are not absolutely certain where those images and photos originated and whether they are free to use, don’t reblog the post.
Availability of Alternatives
Fortunately, there are many alternatives to using copyrighted images. Consider the following options:
Stock Photo Websites: Sites like Unsplash, Pexels, and Pixabay offer free images that are often licensed for commercial use.
Creative Commons: Use images that offer a Creative Commons license, ensuring you follow any stipulations regarding attribution or modification.
Original Content: Creating your own images can be the most reliable way to ensure your visuals are unique and free of legal concerns.
AI: Make use of the AI image creator on WordPress. It’s easy to use, although it doesn’t always come up with something relevant, especially if you don’t provide a clear enough description of what you want it to create, but I’ve found it very useful.
Summary:
In conclusion, sourcing images for your blog posts is an essential aspect of content creation that warrants careful consideration. However, be aware and always check if images and photos that do not belong to you are free to use!
The simplest way to avoid copyright issues with images and photos is to always use your own.
I want to open up the conversation and hear from you. What resources do you rely on for images? Do you have any favourite stock photo sites, or do you prefer to create your own visuals? Have you tried the WordPress AI image creator? What did you think of the images it created? Let’s discuss the various avenues we can explore to source images, and perhaps you’ll discover new options along the way.
The featured image in this blog post is taken from Pixabay. AI checked spelling and grammar mistakes.
Click the buttons below to follow Hugh on Social Media
I recently began receiving emails from WordPress informing me that another blogger has recommended my blog.
Of course, there’s an easy way to recommend another blog simply by writing and publishing a post and linking to that blog, but this new way of recommending another blog was something I thought was much better.
After all, once you read a post recommending a blog, it isn’t long before that post gets pushed down your reader list, until it’s probably forgotten about. So, if you haven’t read the post or maybe thought you’d come back to it later, you probably won’t.
However, this new method of recommending a blog is better because the blogs you recommend appear on your Gravatar profile when using the WordPress Reader, which means that anyone checking your Gravatar will see a list of the blogs you recommend.
It’s easy to add the blogs you want to recommend. I’m using an Apple iMac desktop computer to demonstrate this. Here’s how to do it.
On the dashboard of your blog, click the ‘Reader‘ icon (represented by a pair of spectacles).
Click the ‘Reader’ icon.
On the Reader menu, open ‘Lists‘ and click on ‘Recommended Blogs.’
Click the Recommended Blogs link.
Click the ‘Edit‘ button and open the ‘Sites‘ tab. As you will see from the image below, I’ve already recommended some blogs.
Click the ‘Sites’ tab.
To remove a recommended blog, click on the ‘Remove‘ button.
To add a blog, start typing the name of the blog in the ‘Search or enter URL to follow‘ box, and a list of suggestions will appear.
Start typing to display a list of blogs.
Click the ‘Recommend‘ button to add a blog to your Recommended Blogs list. Note that if you are already following a blog, you’ll see ‘Subscribed‘ next to it.
The blog you recommended is now added to your Recommended Blogs list and will appear whenever anyone hovers their mouse over your Gravatar profile in the WordPress Reader. Click the ‘View All‘ link to see a list of all the blogs they recommend.
As you recommend blogs, they will appear on your Gravatar profile.
Whenever another blogger recommends your blog, you should receive a notification email from WordPress with the details of who has recommended your blog, provided you have not switched off notifications. However, I’ve not yet seen these notifications appear under the notification bell icon.
Based on my observations, after clicking on the Gravatars of many bloggers, few have recommended any blogs so far. Additionally, some bloggers haven’t included their blog details on their Gravatar, making it harder for others to find their blog. And remember that if you leave comments on other blogs, your Gravatar will appear next to your comment.
Have you seen this new feature on WordPress? Has anyone recommended your blog in this way? Will you start using the ‘Recommend Blog’ feature? Have you added your blog details to your Gravatar?
Layout, content, settings, and format might differ on self-hosted blogs.
The featured image in this blog post is taken from Pixabay. AI checked spelling and grammar mistakes.
Click the buttons below to follow Hugh on Social Media
What do you do to make it easy for your readers to contact you?
Most bloggers aim to connect with their audience. This is mainly achieved through the comments section of blog posts, but sometimes someone may wish to contact you privately, which may not be suitable for public view. For example, I receive messages asking for help with WordPress or requests to buy a signed copy of one of my books. Nobody wants to share their address, email, or contact number in the comments section.
A ‘Contact’ page is an important connection point between a blogger and their readers, offering a convenient way to get in touch privately. If you look at the menubar of my blog, you’ll see a ‘Contact Hugh‘ link. That’s where any visitor to my blog can contact me privately.
Here’s why you should prioritise having a Contact page on your blog and how to easily set one up.
Benefits of Having a Contact Page
1. Establishes Credibility
Having a dedicated Contact page gives your blog a welcome and friendly impression. It demonstrates that you’re open to communication and approachable, increasing your credibility with readers and new visitors.
2. Facilitates Communication
A Contact page offers a clear and straightforward way for visitors to get in touch with you. Whether they have questions, feedback, or collaboration ideas, this page acts as a direct link to you, preventing confusion about how to contact you.
3. Encourages Engagement
By encouraging readers to contact you, you’re promoting engagement with your audience. This can lead to meaningful discussions, valuable feedback, and even new ideas for content, further benefiting and enhancing your blog.
4. Supports Networking Opportunities
For the majority of bloggers, networking is essential. A Contact page makes it easy for other bloggers to reach out for collaborations, sponsorships, or guest posting opportunities, contributing to your blog’s growth and visibility.
5. Keeps Your Private Details Private
Having a contact form means you don’t need to share your personal details, like an email address, on your blog. After all, do you know everyone who visits your blog? Even if you provide an email address solely for your blog, advertising it will attract spam, spammers, and trolls.
Some bloggers might prefer not to engage with their audience, so a Contact page may not be essential. However, if you choose not to engage, ensure you turn comments off.
How to Install a Contact Page
Creating a Contact page is a simple process. Here’s how you can set one up on your blog. For this purpose, I’m using an Apple iMac desktop computer.
Go to the dashboard of your blog, click Pages and then Add Page.
Click ‘Add Page.’
Title your page ‘Contact’ or ‘Get in Touch’ or choose a title you prefer.
Add a Contact template. WordPress offers several ‘Contact’ templates. To find them, click the ‘+‘ symbol in the top-left corner of the page, then select Patterns and Contact.
Click ‘Contact’ to find the WordPress contact templates.
Choose the template you want to use and make any edits to it. For the contact form on my blog, I used Template Number One.
Preview your contact form before publishing it. Once you’re happy, click the publish button so it appears on your blog.
Tip: Yes, you’ll likely receive spam or spam bots trying to contact you. To quickly sort out those messages, add a line to your Contact form giving instructions on what to do. I added the following details to my Contact form –
Please complete and submit the form below to contact me securely. To verify that you are not a bot or spam, please start your message with ‘Dear Hugh.’ I will then get back to you as quickly as possible.
Messages that do not start ‘Dear Hugh’ will be marked as spam.
And guess what, it works!
You can also find additional Contact forms under Jetpack – Forms (select the ‘About‘ tab) on the dashboard of your blog.
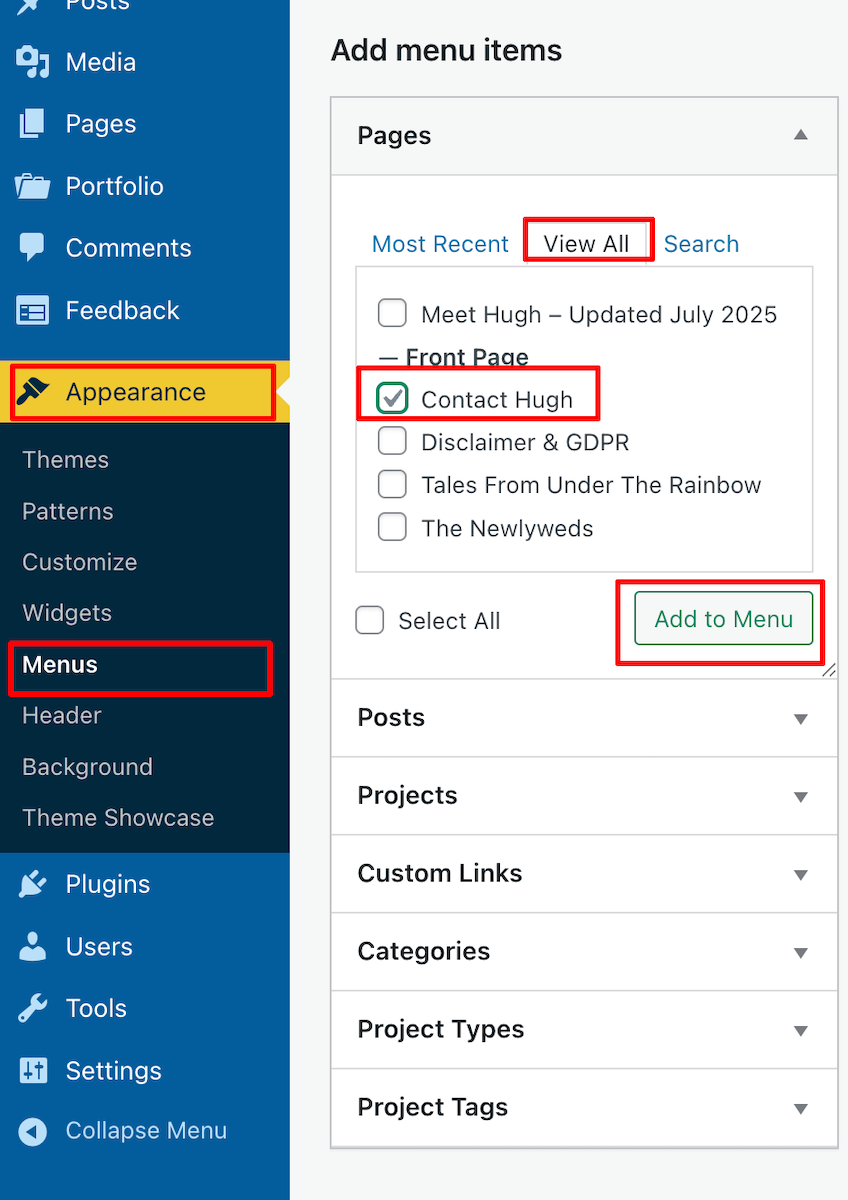
Next, to make it easy for readers to contact you, add your contact form to the menubar of your blog.
On the dashboard of your blog, go to Appearance – Menus.
Search for your Contact form by clicking View All, tick the box next to it, and click the ‘Add To Menu’ Button.
Add your Contact form to your blog’s menubar.
Click the Save Menu button at the bottom of the page.
To reposition the Contact form on the menubar, on the Menus page, click on it and drag it to the desired location. Remember to click the Save Menu button after any changes.
Click and drag the contact form button to move it on the menu bar.
Check the menubar of your blog to ensure the Contact form is visible and in the correct place.
WordPress also offers Contact forms plugins.
Contact Form 7:
Install and activate the plugin.
Go to Contact – Add New in the dashboard.
Customise your form fields as needed, then save.
Copy the shortcode provided and paste it into your Contact page.
Add the Contact form to your menubar.
WPForms:
Install and activate the plugin.
Create a new form using their drag-and-drop builder.
Save your form and copy the shortcode.
Paste the shortcode into your Contact page content.
Add the Contact form to your menubar.
How do I know when somebody has contacted me via my Contact form?
WordPress sends an email to you whenever anyone contacts you via the Contact form (except when they consider it as spam). Users will also see a notification under Jetpack – Forms on the dashboard of their blog.
Anything considered spam by WordPress goes straight to the spam folder. Spam is deleted automatically after 30 days, so there’s no need to worry about it.
Conclusion
Having a Contact page is essential for fostering communication and building relationships with your audience. By following these simple steps, you can easily set up a Contact page on your blog and start engaging with your visitors today!
Do you have a way that visitors to your blog can contact you directly? Any questions? Leave them in the comments section or contact me directly.
Layout, content, settings, and format might differ on self-hosted blogs.
The featured image in this blog post is taken from Pixabay. AI checked spelling and grammar mistakes.
Click the buttons below to follow Hugh on Social Media
Should You Delete, Update, or Republish Your Old Blog Posts?
As a blogger, you likely know that maintaining high-quality content is crucial for your blog’s success. One of the key aspects is dealing with old blog posts. What should we do with them? Give them a new lease of life? Delete them? Should we allow them to rot away in our archives, where nobody sees them anymore?
Many blogging experts agree that outdated articles can harm your blog, especially its SEO (search engine optimisation) rating. Even if you are regularly publishing fresh content, any remaining outdated information can diminish your efforts and lower the rankings of your new posts.
Search engines favour accurate, up-to-date information and often direct readers to sites that provide it. That’s one reason I recommend updating your ‘About Me‘ page every six to nine months (I update mine every three months). This also applies to all posts on your blog—outdated content is pointless and can deter readers. Imagine you’re an author and have new visitors to your blog reading out-of-date information. Are they likely to buy any of your books?
I make it a point to clear out old blog posts at least once a year, usually in December, when the blogging scene tends to slow down.
Before you hit delete: Things to consider
Before deleting old posts, take a moment to assess each one. Should bloggers update, rewrite, or simply delete older posts?
If a post remains relevant, provides valuable information, and includes evergreen content, it is advisable to update it. This is especially true if it contains valid pingbacks to other live posts on your blog, other blogs, or reputable external sites.
If a post continues to receive traffic, it may be worth updating. Did you know that you can check how much recent traffic every one of your blog posts has had? On the ‘Posts’ page of your blog’s dashboard, look for the ‘Stats’ column, and check the numbers.
How many recent views have my blog posts had?
Also, check for incoming pingbacks from other blogs that are still valid; you’ll find them in the comments section of your posts. For example, I recently had to remove several pingbacks to one of my posts because the original content on other blogs was deleted. Broken links can harm your SEO—too many of them, and readers are likely not to return to your site because links don’t work or lead to a ‘404 Content Not Found’ page.
When is it time to rewrite?
If you have an old post with outdated or low-quality content (including low-resolution images) that you believe still holds value, then it’s time for a rewrite. Just remember to delete the older version before publishing the new one.
While rewriting, consider creating a new title that encourages your readers to learn more. A captivating title can significantly boost your click-through rates.
If a post is irrelevant and can only be salvaged through a thorough rewrite, do it! Your audience will value fresh and engaging content, and many of them will never have read the original post.
This post is a rewrite of a popular post from 2022.
Checking for broken links
After deleting any old posts, take a moment to check your blog for broken links. Using a free broken link checker, such as Brokenlinkcheck.com, can assist you with this. However, if it’s your first time, the initial results may seem overwhelming. I recommend pausing the report after identifying about 20 broken links, fixing them, and then running another check.
WordPress also offers a broken link plugin, available depending on your plan or if you’re self-hosted.
Once you’ve finished a broken link check, I recommend doing it at least monthly or whenever old posts are deleted. Also, remember to remove any pingbacks on posts you’re about to delete, as well as delete any images or photos from your media library that are on the post. This helps free up library space.
Is it worth reading old blog posts?
It depends, but if you hear someone celebrating their 5000th blog post, it’s hard to ignore that many of those posts are likely outdated and probably never received any traffic a few days after publication. They may be keeping them for a reason, but don’t hold your breath for any real engagement on them. Many of the comments will also be outdated and probably from readers who no longer have profiles.
If you have posts you want to keep, consider moving them from your blog to a secure location (such as a memory stick).
Can rewritten blog posts be successful?
Absolutely!
I’ve rewritten and republished several of my earlier blog post tips. Initially, these posts had low views and lacked depth, but I revitalised them with improved procedures and high-quality images. I also added links to some of my most successful posts for context.
Many of these revamped pieces have since become top performers on my blog.
Are there any blogs that don’t require regular updating?
No! Every blog needs to be updated. Although some blogs, such as photography blogs, may not require frequent updates to posts, and some blog owners may not prioritise SEO rankings, the ‘About’ page will always need to be updated and links checked to ensure they still work.
Conclusion:
Delete any old blog posts that contain outdated information that cannot be salvaged.
Before deleting, deactivate any incoming and outgoing pingbacks associated with the post.
Delete images from your blog’s media library from posts you are about to delete to free up space.
Conduct a broken link report on your blog at least once a month or following the deletion of old posts.
SEO benefits rely on your blog’s capacity to provide updated information; lack of it can hurt your new posts.
If a post remains relevant and useful with evergreen content, be sure to update it, especially if it contains valid links to other relevant content and continues to receive traffic.
Rewrite posts that feature outdated or poor-quality content but still hold some relevance and give them a fresh title.
Always remove older versions of rewritten posts before going live with the new content.
Every blog needs regular updates, especially the ‘About’ page and a check for broken links.
What criteria do you use when deciding whether to update or delete an old blog post? Have you ever resurrected an old post? What changes did you make to breathe new life into it? How often do you check your blog for broken links, and what tools do you find most effective? Have you ever regretted deleting a post? What would you have done differently?
Layout, content, settings, and format might differ on self-hosted blogs.
The featured image in this blog post is taken from Pixabay. AI checked spelling and grammar mistakes.
Click the buttons below to follow Hugh on Social Media
Imagine turning on your computer, laptop, or phone and discovering that your blog had vanished without a trace. What a horrible nightmare, yes?
In the 12 years I’ve been blogging, it has never happened to me, although there was an occasion when the setup of my blog (and that of many others) changed completely overnight, all due to a bug that affected many WordPress blogs. Fortunately, it was fixed quickly, even though it caused many users a nightmare they never thought would happen.
If you’re a WordPress.com blogger, be assured that if your blog and all its content suddenly vanish, WordPress will have a backup. Regardless of your WordPress plan, WordPress backs up every blog and keeps a copy, just in case it is ever needed. All you need to do is contact WordPress and request the file. They will send you a file containing the most recent backup they made. However, as we will discuss later, backups do not include everything.
But there’s no need to contact WordPress
If you’ve ever had a bad experience contacting WordPress or don’t want to contact them, there is another step you can take to ensure you have a backup of your blog. I’m using an Apple iMac desktop computer for the following guide.
How to backup your WordPress blog.
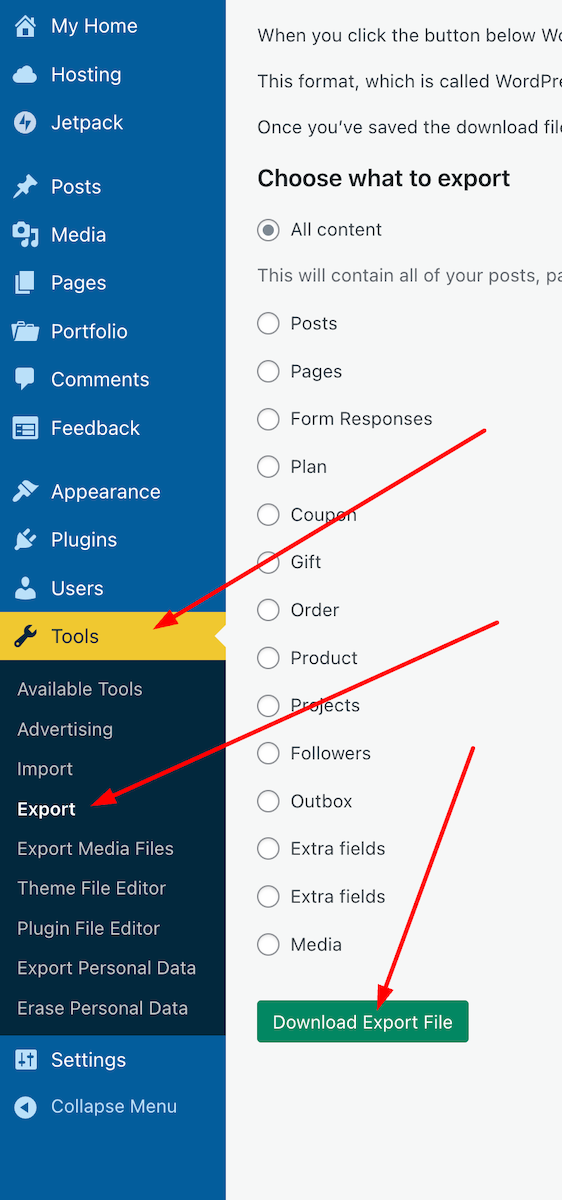
On the dashboard of your blog, go to Tools – Export.
Choose the items you wish to export (I recommend ‘All content‘) and click the ‘Download Export File‘ button.
Press these buttons to begin the process of backing up your WordPress blog.
You will see a message informing you that your export file is being processed, along with the email address where a download link will be sent once the process is complete.
Access your email account where the link is sent, locate the email, and open it. Click on the ‘Download‘ button within the email.
Click the ‘Download’ button in the email.
The file will be downloaded to your device. Ensure you remember its location and move it to another folder if necessary. I’ve created a file on my computer called ‘WordPress Backups’. Note that the file is only available for download for 7 days.
Remember to delete any previous WordPress backup files to free up memory on the device you are using.
The backup file you have downloaded does not include any media such as images, videos, or photographs. To back up media, follow the above instructions but select ‘Export Media Files‘ from the Tools menu – Tools – Export Media Files.
Do the backup files include everything?
It depends on which WordPress plan you have.
Users on a Free, Personal, or Premium plan can back up content and media. However, themes and plugins are not included in the backup. Therefore, if you ever need to download a backup file and have been using a retired theme that WordPress no longer supports, you will need to choose a new, current theme that is still supported. You’ll also need to download any plugins your blog uses.
Those with Business or Commerce plans have access to Jetpack Vault Backup, which allows them to view and restore backups at any time from their blog’s dashboard. This can be accessed at Jetpack – Backup. These backups include everything, including the theme and any plugins you use.
Click the Backup link to access the Jetpack Vault backup file.
Should I need to worry about backing up my blog?
Given that WordPress backs up your blog, no! However, for total peace of mind, and depending on how often you publish posts, you might consider backing up your blog at least once a month. If you publish posts daily or more frequently, I’d recommend backing up your blog at least once a week. However, after performing a backup, remember to delete the previous backup file.
Most likely, you’ll never need a backup copy of your blog, but I suggest you save a copy of this post in case you ever lose all the content of your blog.
All WordPress blogs also come with an ‘ActivityLog‘ feature where bloggers can reinstall posts they have deleted by mistake. However, this feature is limited by the extent to which you can recover posts, depending on the WordPress Plan you have.
Click the Activity Log button to see the most recent activity on WordPress.
Conclusion:
WordPress automatically backs up WordPress.com blogs, but it doesn’t include everything.
Users can contact WordPress and request a copy of the backup file.
Users can backup their blogs via the dashboard.
For backing up media files, remember to perform a backup by going to Tools – Export Media Files.
What is backed up depends on your WordPress plan.
Business or Commerce plan users have access to Jetpack Vault Backup, which includes everything (themes, plugins, etc.) and can be accessed at any time via the dashboard.
Backup links are only valid for 7 days.
Remember to delete previous backup files to free up space on your device.
While WordPress does back up your blog, regular manual backups (such as monthly or weekly) are recommended for added peace of mind.
The Activity Log feature allows recovery of accidentally deleted posts, with limitations based on your plan.
Keep a copy of this guide for future reference.
Have you ever lost content on your blog? If so, how did you handle it? What has been your experience with WordPress backups? Have you ever had to restore a backup? Are there any specific plugins or tools you recommend for backing up a self-hosted blog? Would you prefer to rely on WordPress’s automatic backups, or do you believe manual backups are essential? Join the discussion and leave your comments and answers.
Layout, content, settings, and format might differ on self-hosted blogs.
The featured image in this blog post is taken from Pixabay. AI checked spelling and grammar mistakes.
Click the buttons below to follow Hugh on Social Media