
I used to publish a substantial amount of photography on my blog, especially in Wordless Wednesday posts, and then it all ceased!
I couldn’t help but notice how they generated little to no engagement. I felt somewhat disheartened by this apparent lack of interest in my photography. After all, how can you respond week after week to the same ‘Great shot’ comments, other than with a ‘Thank you?’ It almost seems as if people are just going through the motions with those kinds of comments without truly engaging with the content.
Can a photography blog post generate meaningful engagement?
It’s something I wasn’t entirely convinced about. I only had to look around the blogosphere and see the same ‘Great photo’ comments on photography posts.
However, some photo challenges seem to spark discussion and engagement, although you’ll sometimes have to sift through the ‘Nice shot’ types of comments. Nevertheless, as I’ve discovered, hosting any kind of blog challenge is hard work, so it’s always a shame when people drop links or short comments and run without recognising the effort the host has put into creating the post. Some of those hosts must feel disheartened when it happens, but the thoughtful and engaging comments they get must make all the difference.
I love photography, so why don’t I showcase mine?
After realising I was missing out on sharing my photography and not wanting to create my own photography challenge, I decided to publish a monthly photography post showcasing four photographs I’ve never featured on my blog before.
Not only that, but at the end of each post, I will display the photos in a separate WordPress photo Gallery block and give a brief explanation of that block’s features.
So, here we go. I’m excited to share with you four never-before-seen photos that I’m delighted to finally unveil on my blog!
1. How old is this tree?

What initially caught my eye in this shot were those colourful buildings in the background. But the fallen tree had me asking many more questions.
Can you actually determine a tree’s age by counting the rings in its trunk? Well, this tree got a bit overzealous during a storm and decided to take a nap across a footpath! It turned into the ultimate footpath block, leading to some unfortunate lumberjack shenanigans where it had to be chopped into manageable pieces.
Not only did I ponder the ancient age of this tree—seriously, is it older than me?—but I also found myself wondering about the brave soul who planted it and how many people have swung from its branches or taken leisurely naps beneath its leafy embrace. The rings? Oh, they’ve got secrets, but counting them seemed as feasible as getting my two dogs to sit still long enough for a family photo.
Today, the chunks of trunk are still hanging around, serving as a posh Airbnb for wildlife that need a place to kick back and relax. I’m thrilled parts of it are still there because this tree has decided to become the ultimate retirement home for other species.
2. Do you know this bear?
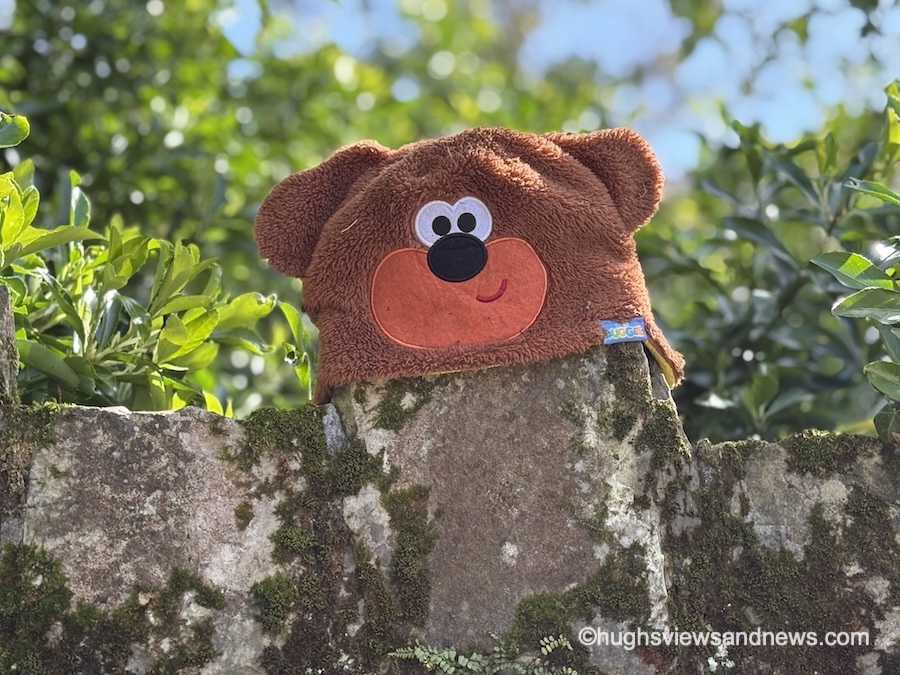
This cheeky face practically yanked a grin out of me when it halted my stroll. I simply had to snap a photo—who could resist it? There it was, perched impossibly high, making me ponder not just how it got there, but also who the previous owner was. Was it a child’s hat, a brave toy that escaped the toy box, or maybe even a rogue UFO pilot’s accessory? Hey, a guy can dream about flying a UFO dressed as a Bear, can’t he!?
A few days later, the bear was gone. Someone had either claimed it or rehomed it, although my darker, more creative mind was also insisting that it had fallen off the wall and was now trapped behind it (was that a call for help I could hear?).
Whatever had happened to this smiling bear, I was thankful for the joy it had not only given me when I spotted it, but also for the smiles it must have brought to others who had seen it on their journeys. I hope it was reunited with its owner.
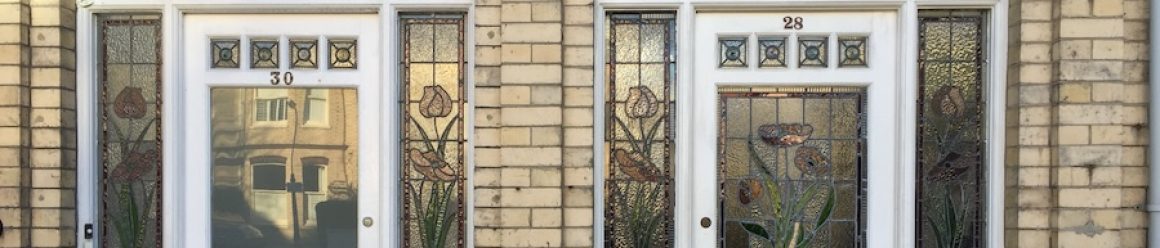
3. Does this sign give you mixed emotions?

This sign will probably evoke mixed feelings. After all, that first line isn’t pleasant, is it? It evoked a vision of a horror story and film by one of my favourite authors, Stephen King. However, the bottom part of this sign brought to mind a beautiful, tranquil place that could be the name of a location you’d find in a children’s book.
I wondered why there was not a separate sign for the dogs’ graves. After all, who would want to visit a dog’s graveyard, apart from maybe pet owners who had buried their beloved pets there? Bluebell Wood, on the other hand, sounded like a lovely place for a walk, especially during bluebell season in May. I pictured myself sitting in Bluebell Wood, forest-bathing, while recharging my body and mind.
Later, I discovered that the gardens, where the photo was taken, were purchased by William Graham Vivian in 1860, when he acquired Clyne Castle, a nearby dwelling, and began creating the surrounding landscape gardens. He died in 1912, and the many dogs buried in the graveyard were his pet dogs. So, there’s the answer to why the dogs’ graveyard is on the sign.
4. Do you know this dog?

Talking of dogs, the chap in the above photo turned 14 last month.
For those of you who haven’t read my ‘About‘ page, this is Toby, the older of the two Welsh Cardigan Corgis my partner and I own. I still recall the day we collected him and how, from the moment we met him, our lives took a new turn. It’s one of the best days of our lives.
Toby is a photography subject, like me, in that he usually moves when a picture is taken. However, on this particular day, his 14th birthday, he posed for the camera, and I was thrilled with the result.
Toby’s hobbies include sleeping, walking, and meeting his mates on the beach. He also enjoys having a mad 10 minutes after dinner, when I have to chase him (very slowly) around the dining table while carrying his favourite toy in his mouth. Additionally, he likes to believe he’s in charge of the household.
When I first started blogging in 2013, Toby was a prominent feature on my blog, but over the years, he hasn’t been as interested in appearing. However, he has recently garnered considerable attention on Bluesky, where some of his photos have been shared hundreds of times and generated a lot of engagement. It’s a rare occurrence that he appears on my blog, and I’m very grateful that he agreed to let me share his photo.
The Gallery Block
The first WordPress gallery I am displaying and featuring is the ‘Gallery‘ block. Here are my four photos.
The Gallery block is a straightforward photo gallery that lets you drag and rearrange images to display them in any way you prefer. It’s a useful gallery, and I notice it being used more frequently than any of the other image blocks provided by WordPress.
Notice how the captions I’ve added to my photos appear at the bottom of each one. You don’t need to add captions to photos, but they are a great way to boost engagement from visitors, especially when asking a question.
To find the ‘Gallery‘ block, search for ‘Gallery‘ under the ‘Blocks‘ tab when drafting a post.

Click the following link for more information about the Gallery Block.
How to make a photographer’s day.
Next time you leave a comment on a photography post, instead of simply saying ‘Great photo,’ explain what it was about the picture that made you think it was great. Was it the subject, the lighting, the scenery, the angle it was taken from, or the emotion it evoked when you saw it? It only needs to be a few lines, but they will appreciate the feedback much more than when all you say time after time is that it’s a great photo.
How do you usually engage with photography posts? What encourages you to leave a comment other than saying, ‘These are nice photos.’ Are you a photography blogger? If so, does engagement on your posts matter to you?
The featured image in this blog post is taken from Pixabay. AI checked spelling and grammar mistakes.
You can follow me at the following sites.
Copyright @ 2025 hughsviewsandnews.com – All rights reserved.