
Just a heads-up: This blog post might make you think I’m talking about you.
A couple of years ago, the following post debuted on this blog.
7 Common Mistakes To Avoid When Deciding Whether To Follow A Blog
It got people rethinking why they follow particular blogs. And that was my aim. Job done! Or so I thought.
It won’t come as a surprise that, having already read many posts this year where the writer outlines how they are already feeling overwhelmed and guilty about not being able to keep up with reading, commenting, and writing posts (and we’re only a few days into the 2026), I thought it a good point to say a few things that some bloggers find difficult to talk about.
Is this you?
Not only is following too many blogs something that can have an adverse effect on your mental health, but it can also have a negative effect on your writing and creativity.
Some people act immediately when they start to feel overwhelmed, stressed, or guilty about blogging, but sadly, some leave the world of blogging, sometimes without giving any notice of their intention to do so.
Of course, some people also give up blogging on a positive note.
As I already mentioned, following too many blogs is one of the biggest pitfalls of blogging because many bloggers believe they have to follow every blogger that follows them, read their posts and leave comments on every post. Sure, some of those bloggers only ever leave short, non-engaging comments more as proof they’ve visited, but sadly, some go on to abandon their blogs when it all becomes too much.
Let me be clear. If anyone suggests it’s only polite to follow the blogs of everyone who follows your blog, they are talking nonsense. If I took that advice, I’d be following over 7,000 blogs. Can you imagine how overwhelming that would be and the effect it would have on my mental health, especially if I felt I had to read and comment on every post?
Thankfully, I only read and comment on posts that interest me.
Before following any blog, ask yourself these questions.
1. How often are new posts published?
The frequency at which posts are published is important. Some bloggers publish a new post once a month; others publish weekly; some publish daily; and then there are those who publish more than one post a day.
I once followed a blog where the host was publishing up to five new posts daily.
I could have ignored how often she published new posts, but because I found some of her posts interesting and she was following my blog, I felt obliged not only to follow her blog but also to read and comment on all her posts. Yes, those comments were short and non-engaging because I was not able to keep up.
This led to guilt when I missed any of her posts, left comments only to prove I visited and to feeling overwhelmed by it all.
Check how often posts are published before pressing the ‘subscribe’ button. If posts are published daily, and that’s too much for you, consider not following or do not feel obliged to read all the posts.
If you receive email notifications for new posts, consider getting one email a week with the posts they publish. Yes, there’s an option for that. You can then choose which of those posts you want to read.
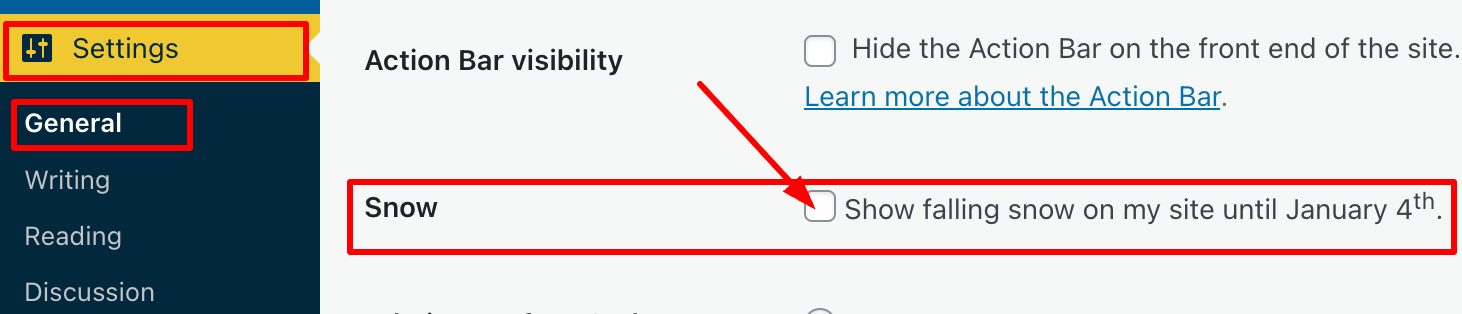
How To Change How often You receive New Post Notifications
On the ‘Manage Subscriptions‘ page of your blog (under the ‘Reader‘ button), click on the three dots (Kebab menu) next to any of the WordPress.com blogs you follow and choose how frequently you get email notifications of new posts.
The choices are Instantly, Daily or Weekly.

Consider getting new post notifications via web and mobile notifications if getting email notifications become too overwhelming.
If you are happy with the frequency of new posts, by all means, subscribe and enjoy.
2. Is the content interesting enough?
Time is something many of us cannot manage when reading blogs, usually because we feel we do not have time to read everything, yet we feel obliged to and often leave a comment as proof. It’s a surefire way to get yourself on a slippery slope toward blogging burnout.
If none of the content interests you, don’t feel obliged to follow or read.
Don’t become a ‘ghost’ follower by subscribing to blogs you know you’ll never visit. After all, would you read a book on a subject that did not interest you? Be honest and ask yourself, ‘will I actually read this blog, or will it just add guilt to my unread list?‘
Time is precious, and wasting it on reading content you have no interest in is one of the main blogging mistakes you can make.
Spend time on reading content that interests you and which may inspire you to leave genuine, thoughtful comments.
Leaving a thoughtful, genuine comment occasionally far outweighs the impact of posting brief, unengaging comments on every post simply to show you were there. Make your comments count, ensuring that “thank you” isn’t the only response that resonates.
Thoughtful comments show you are interested and want to engage. Short, non-engaging comments simply prove you visited. They do not prove you read the post.
And remember that if a blog you follow publishes posts on various subjects, you are under no obligation to read everything they publish. Read only what interests you.
3. Does the host look after their blog?
- Would you shop on a website with lots of broken links, a poor layout, or where you have difficulty finding what you are looking for?
- Would you follow a blog that is broken because the host keeps blaming WordPress or anybody else but themselves for the faults?
- Would you follow a poorly designed blog or one full of errors, broken links, and no sense of organisation?
- Would you follow a blog that no longer has security updates because of it’s outdated theme or has a comments section full of spam and unverified links?
I hope you answered ‘No’ to all of those questions.
Just as taking care of your home creates a warm, inviting, friendly, comfortable, and safe place for family and friends to visit, maintaining your blog is equally important. Bloggers who prioritise maintaining their blogs demonstrate their commitment to making a positive impression on visitors, showing that they truly care about their audience.
Unmaintained blogs present a significant security threat to visitors. Bloggers utilising unsupported WordPress themes are not receiving crucial security updates, jeopardising the safety of their audience, particularly when clicking links.
Consider carefully before following or engaging with any blog that presents itself as outdated, disorganised, unsafe, or uninviting due to its poor layout. This caution extends to blogs that permit hostile or inappropriate comments in the comment section.
4. What do you know about the hosts(s)?
- Who is the individual behind this blog?
- What is their name, and what is their geographical location?
- What topics do they cover in their writing?
These are critical questions to consider before deciding to follow any blog. Reflect thoroughly on the implications of following a blog that fails to provide sufficient information about its author(s). While their posts may appear engaging, the absence of identifiable information raises concerns regarding the safety and credibility of your decision to follow.
I have misjudged by following various blogs based on the appeal of their content, only to discover particulars of the hosts that were quite disconcerting. A more sensible approach would have been to inquire about the blog’s authorship and to consider why I should place my trust in them.
More often than not, some bloggers adopt a seemingly friendly manner to attract visitors, only to later reveal their true intentions, often by posting derogatory comments directed at you or fellow bloggers.
I’ve discovered that with time, I can quickly judge what people are like from their blog posts before deciding to follow their blogs. However, if I can’t find any information about who they are and what they blog about, I won’t follow.
A simple rule of thumb
If, after reading 3–5 posts, you’d be disappointed not to see the next post, it’s probably worth subscribing.
What has been your experience with following too many blogs? Have you felt overwhelmed? Do you prefer quantity or quality in blog subscriptions? How do you choose which blogs are worth your time? How important is it to know about the host behind a blog before following? What tips do you have for bloggers feeling overwhelmed by subscriptions? How do you balance reading, commenting, and writing?
You can follow me at the following sites.
The featured image on this blog post is sourced from Pixabay. AI reviewed spelling and grammar errors.
Copyright @ 2026 hughsviewsandnews.com – All rights reserved.