Do you draft blog posts on a desktop computer or laptop? If so, did you know you can now add photos to your post directly from your mobile phone? No more having to download photos to your computer or laptop.

Here’s how to do it:
Ensure you have the Jetpack app on your phone. If not, download it from the app store.
- Insert an ‘Image‘ or ‘Gallery‘ Block on your post/page.
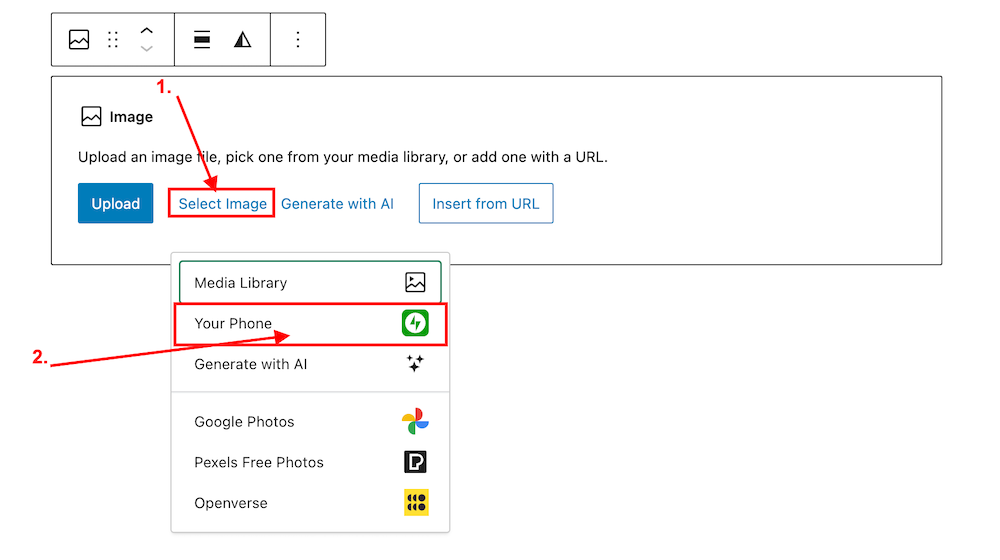
- Click ‘Select Image.‘
- From the dropdown menu, select ‘Your Phone.’ A message will pop up on your phone with a QR code.

4. Use your phone’s camera to scan the QR code. This will automatically open the Jetpack app on your phone and then your photo library.
5. Choose the image(s) you want to use: From there, simply click the image or images you wish to add to your post/page.
6. Click ‘Add‘ (top right corner): Watch your image(s) automatically appear in your desktop/laptop editor. Here’s one I added directly from my phone.

Can I adjust the size of images in the Jetpack app?
Yes. This is important to do to prevent images from taking up too much storage space in your blog’s media library. By default, the “Optimise Images” option is turned on. You can set the ‘Max Image Upload Size‘ so the original file is resized automatically when you upload it.
Here’s how to do it:
In the Jetpack app for iPhone and the Jetpack app for Android, to adjust the settings, follow these steps:
- Log into the Jetpack app on your phone.
- Click your profile icon in the bottom right.
- Click ‘App Settings‘.
You can toggle ‘Optimize Images‘ off (not recommended) or adjust the ‘Max Image Upload Size‘. The default is 2000 x 2000px.

As you can see from the above image, I’ve set the maximum image upload size to 1000 x 1000px. I recommend not going any higher than this.
Is there anything to remember when uploading images directly from your phone?
Yes. If you add copyright information to images and photos on your computer or laptop (something I recommend you do), remember to add copyright information to your images and photos on your phone before you add them to your blog posts.
Remember to also complete the ‘Alt-Text‘ and ‘Description‘ details of the images in your blog’s media library. My blog post ‘Adding Images Or Photos To Your Blog Posts? 4 Essential Things To Do,’ gives full details as to why this information should always be completed.
Would you use this method for adding photos and images to your blog posts? If you have questions, please leave me a comment.
Layout, content, settings, and format might differ on self-hosted blogs.
Click the buttons below to follow Hugh on Social Media
Copyright @ 2024 hughsviewsandnews.com – All rights reserved.

