A blogroll is a curated list of links to other blogs or websites that a blogger recommends, follows, or finds interesting, which they can display on their blog. Usually shown in a blog or website’s sidebar, footer, menu bar, or dedicated page, it helps foster community, share resources, and help readers find related content. Essentially, it is a “roll” of recommended blogs.
Unfortunately, WordPress deprecated the Links/Blogroll widget several years ago. However, users of the Block Editor can now access the ‘Blogroll’ block to display a list of recommended or followed blogs.
If, like me, your blog has a widget bar, you can show the blogroll there. If you don’t have a widget bar, you can display a blogroll on a page, post, or in the menubar of your blog.
In this post, I will show you how to create a blogroll in a widget bar and on a blog post or page. I’m using an iMac desktop computer for this.
How to add a blogroll to a widget bar.
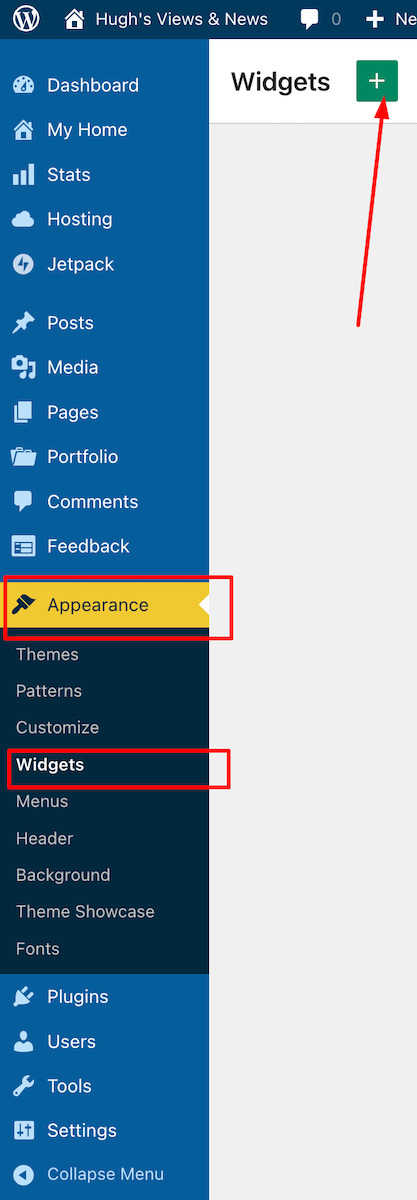
On your blog’s dashboard, navigate to Appearance – Widgets and click the ‘+‘ symbol in the top right corner.
Click Appearance – Widgets
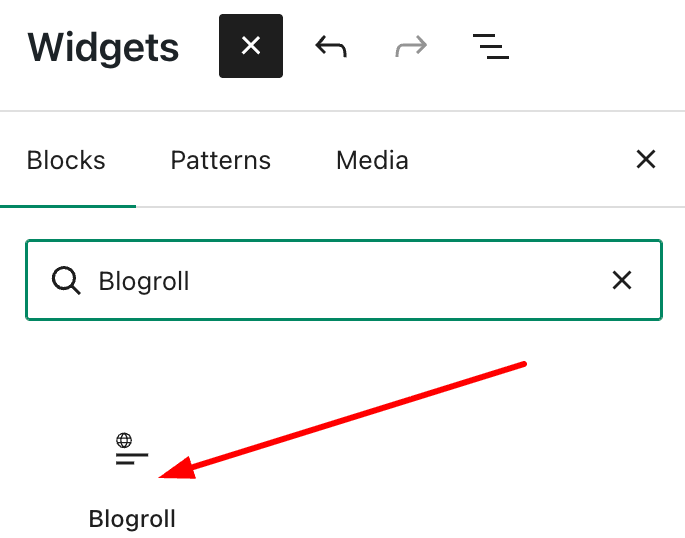
Find the Blogroll block by typing ‘Blogroll’ in the search bar. Click on the Blogroll block to add it to your widget bar.
Add the ‘Blogroll’ block
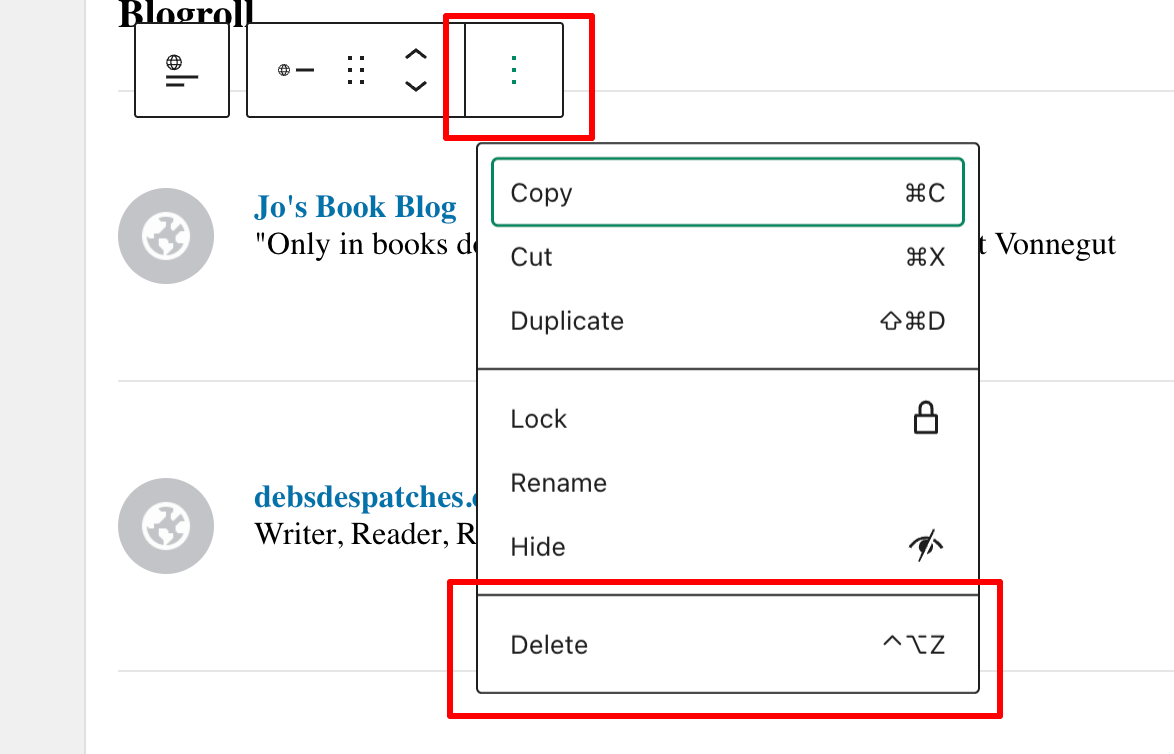
For some reason, when you add a Blogroll block, it automatically populates with several blogs, some of which you may not recognise. I found this quite odd, but it’s simple to remove any unwanted ones.
To delete a blog, select the blog you wish to remove, then click the three vertical dots (kebab menu) and choose Delete.
Deleting blogs from a Blogroll is easy
To add blogs, click on the ‘+‘ symbol and select from the list that appears or use the search bar to find the blogs you wish to add.
Add or search for the blogs you want to add to your blogroll.
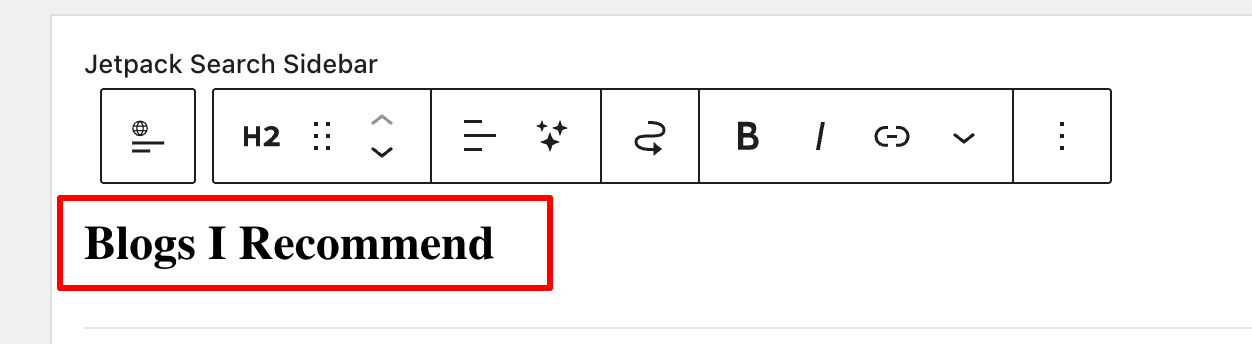
To change the name of your blogroll, click next to ‘Blogroll‘ and add your own description.
Rename your blogroll
Click the Update button in the top right corner to publish the Blogroll in the widget bar.
Check your blog to ensure the Blogroll widget is visible. You can see the blogroll I created towards the bottom of the widget bar on the right side of my blog. It contains the blogs I read the most.
How to add a blog roll to a page or post.
Add the Blogroll block anywhere on a page or post.
To add or remove blogs from your blogroll list, follow the instructions above.
Remember that you can change the name of your blogroll. However, be aware that if your blogroll contains many blogs, it will take up a lot of space on the post or page.
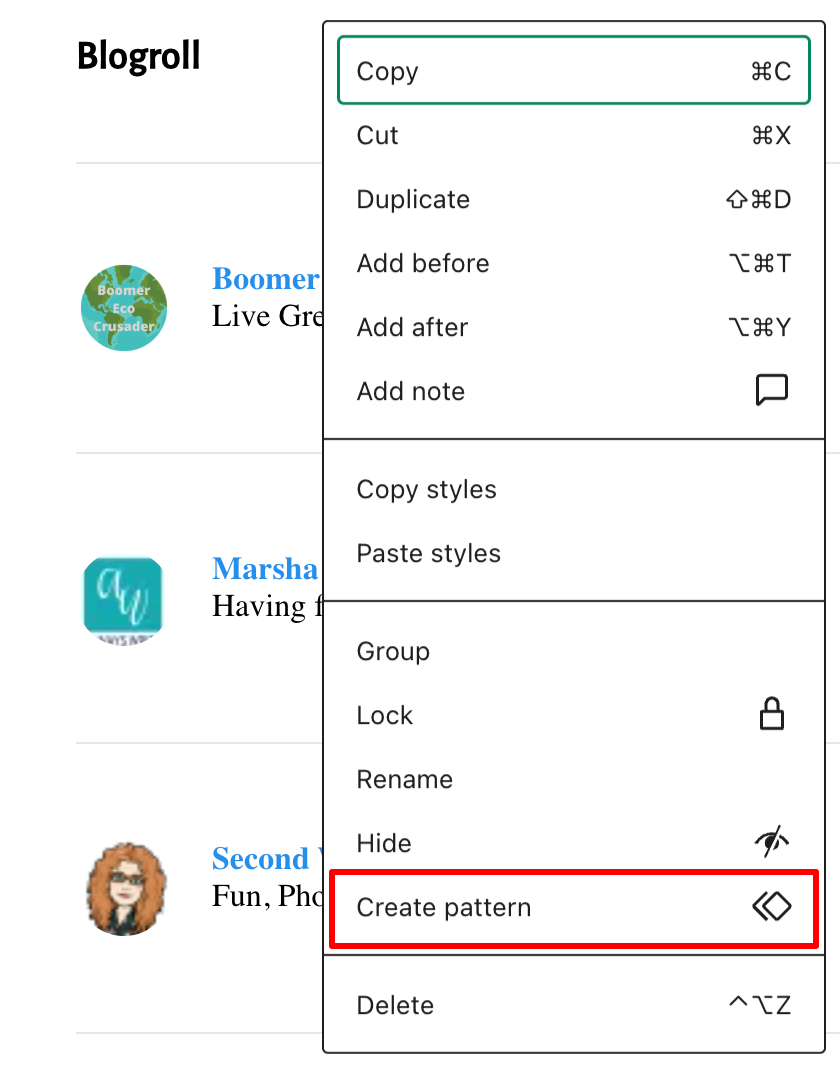
You can also convert your blogroll into a reusable block, now called a Pattern, by clicking on the block, then selecting the three dots (kebab menu) and choosing ‘Create Pattern.’
Turn your blogroll into a reusable block
A reusable block on WordPress, now often called a Synced Pattern, is a feature that allows you to save a specific block or group of blocks for use across multiple posts or pages. This is particularly helpful for those selling items on their blog, such as books. For example, if a link to your books needs updating or the price changes, the updates are automatically reflected everywhere the block appears. Clever stuff!
To answer the question I raised in the title of this post, what happens when you add a blog roll to your site? Well, that’s straightforward. It means you promote the blogs you enjoy reading most. In doing so, you help foster a community and bring its members closer together. In turn, you’ll be supporting them in developing their blogs and community. What better way to say ‘thank you’ to those special people?
I’m looking forward to seeing your blogrolls as I’m looking for some new blogs to follow. If you have a blogroll on your blog, let me know.
Note: Widget bars only show when viewing posts and pages on a desktop computer. When viewing posts on a tablet or mobile phone, click the menu button to see them.
Have you ever created a blogroll on your own blog? Which blogs or websites did you include? How do you think a blogroll can improve the reader’s experience on a blog? How often do you update your blogroll or the blogs you follow? Have you come across any new blogs from fellow bloggers’ blogrolls? If so, which ones?
The featured image on this blog post is sourced from Pixabay. AI reviewed spelling and grammar errors.
Layout, content, settings, and format might differ on self-hosted blogs.
If you happen to be reading this in January, then it’s officially ‘Happy New Year!’ If it’s any other month, well, ‘Happy New Year’ anyway—because let’s face it, every day is just a chance to start fresh, much like your New Year’s resolution to stop binge-watching shows… which you’ve probably already forgotten by now!
I’m diving headfirst into 2026 with a parade of my 12 most beloved posts from 2025, all crafted by yours truly. Maybe they slipped under your radar, or perhaps you’re just itching to relive them—feel free to leave a fresh comment, even if you’ve already showered them with praise before. Because, let’s be honest, who doesn’t love a little comment déjà vu?
I kicked the year off talking ‘Social Media,’ a subject that became a hot topic during 2025, sometimes for the wrong reasons.
Not only can social media be a ravenous beast in eating up a lot of your time, but it’s also a fantastic way to promote your blog posts, the posts of other bloggers (a great way to support other bloggers), and, best of all, it’s free to use unless you decide to pay for a subscription.
I not only shouted out the three social media platforms I’m still romancing, but I also gave a little eulogy for the ones I’ve ghosted. After all, as someone hilariously pointed out, ‘spreading yourself too thinly on social media is like trying to butter a piece of toast with a frozen brick of butter—good luck with that!’
Do you know who you are? I hope most of you chimed in with a confident ‘Yes!’ But how well do you know the owners of the blogs you follow? I mean, do you really know them, or are they just mysterious internet wizards pulling strings from their lairs?
I’m still somewhat bemused by the number of bloggers who have an ‘About’ page that says, ‘This is the template for telling your audience a little about yourself and what you blog about,’ – well, something along those lines.
It’s truly wonderful to share a bit about yourself on your blog! You don’t need to provide a lot of information—a first name and a little insight into your location can go a long way. Plus, letting visitors know what your blog is about will help create a friendly connection and encourage them to explore your unique perspective!
As you’ll see in the comments section of the post, many bloggers won’t engage, let alone follow a blog that has no information about its host(s).
Although published 10 months ago, this post from March 2025 is still attracting attention, making it my top pick of the month! If you’re a BlueSky user, this post is an absolute gem, offering you the fantastic opportunity to not just get your blog posts read but also to inspire meaningful engagement from your readers.
Bluesky can boost traffic and visitors to your blog.
Even if you don’t have a Bluesky account yet, it’s worth a read, as the information contained within the post can apply to other social media platforms.
Talking of engagement, imagine my shock when, in April, there was a lot of talk amongst bloggers about killing off commenting on their blogs.
Most of the talk was on social media, but I also noticed that some bloggers had decided to disable commenting on their posts, citing the amount of time it took to respond.
But isn’t that what blogging is all about? Being able to engage, discuss and ask questions? Check the comments for the answers.
It’s a sad fact that not everyone who visits your blog can see images or photos. Fortunately, WordPress allows users to add Alt-Text to all images in blog posts. This helps visitors who use screen readers and other software that describe images to know what’s in them. Sadly, many bloggers don’t help these visitors by not adding Alt-Text to their pictures.
Don’t know what Alt-Text is? Check out the post for details. And once you read it, make it a mission to welcome everyone to your blog.
What’s the one thing you could do to help other bloggers?
I’m sure there are many different answers to that question, but the answer I give in my post is one that I’m positive the majority of bloggers want! Yes, there will be exceptions, and I’m sure one or two will tell me, but if you’re somebody who gives excuse after excuse as to why you can’t do this, then you’ve allowed the problem to beat you.
I didn’t write as much flash fiction during 2025 as I had intended, but this piece of flash fiction was my favourite of the year. It involves two people you’d probably pass in the street most days. Meet Bill and his wife, both in the autumn years of their lives. Are they a normal couple you wouldn’t give a second look at, or are they two people who each come with a dark secret? Only you can decide, but only if you read the piece of flash fiction that gives you a glimpse into their lives.
This 4-minute read packs a punch.
I’ll be making amends and writing more flash fiction during 2026, so you better watch out!
August was the flattest month for me, blogging-wise, in 2025. It felt like I was on a plateau with no way up or down. There was little to choose from in terms of blog posts because I didn’t publish much, but thankfully, this post got a lot of engagement, proving it wasn’t as quiet out there as I thought.
Ask yourself these questions. Why would anybody want to contact you? But more importantly, how easy is it to contact you via your blog other than by leaving you a comment? Remember that leaving a comment isn’t always the right way to contact someone. After all, anyone visiting your blog can read comments. Are you missing out on any golden opportunities? Check the post for full details. You may be surprised.
I had to take an unexpected blogging break in September, but thankfully, this post had already been published before I departed. And I wasn’t disappointed with the reaction in the comments section to something the majority of WordPress users had no idea existed.
Short but sweet, this blog post from September 2025 packed as much of a punch as Bill and his wife did in July.
The latter quarter of 2025 saw me focusing very much on copyright issues, with many bloggers believing that their blogs are so small and private, nobody will care if they use images, photographs, or any material, including song lyrics, that are copyrighted. How wrong they are.
If you can not guarantee that the material or images you are using in your blog posts are free to use, then are you breaking the law? And, even worse, could you be fined?
How many of you believe that you’d never get scammed online?
With the advent of AI, the perpetration of scams has become significantly more sophisticated, leading to an alarming increase in the number of individuals who are susceptible to such deceit.
Different scams are emerging continuously, yet it appears increasingly challenging to identify them. Are you equipped to recognize a scam?
In November, I shared my exciting decision to dive back into my passion for photography blogging, but this time with a fresh perspective. Although I had paused my photography posts in the past due to engagement challenges, I’m now thrilled to explore new ways to connect and inspire my audience.
This post not only showcased more of my own photography but also offered readers a wonderful opportunity to share a bit about themselves. Success! Engagement flourished, and I ended the year just as I hoped, fostering genuine connections rather than mere visits masked by guilt.
Finally, a glimpse into the inside of 2025 for my blog.
How well did your blog perform in 2025?
43 posts published
32,600 words written
2,700 clicked the ‘like’ button on my posts
2,100 comments left
A busy blogging year full of creativity and engagement.
What was your favourite blog post of 2025 on your blog? Why did it resonate with you?What’s the most significant lesson you learned about blogging and engaging with your audience in 2025?
Have you noticed that snow is falling on some WordPress blogs? As you read the post, small flakes of snow gently drift down. Meanwhile, on other blogs, like mine, there’s no snow.
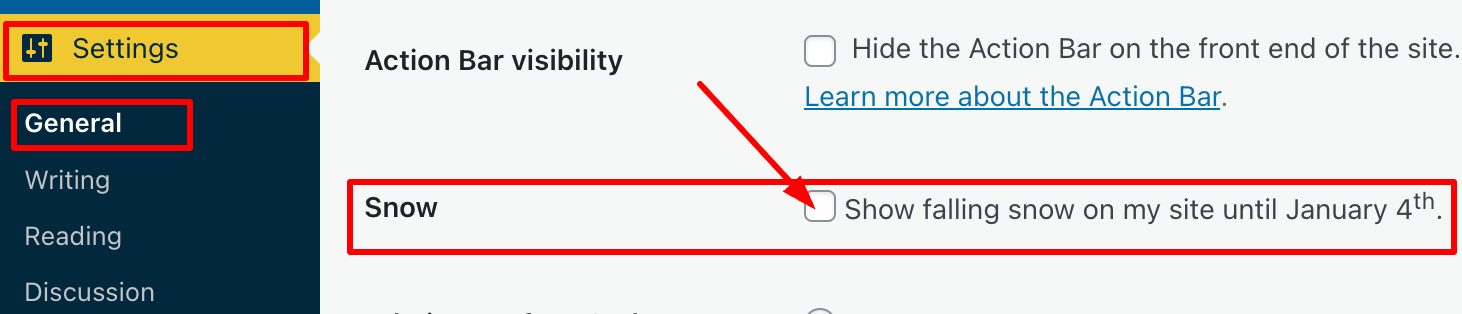
WordPress introduced the festive snowfall feature a few years ago. It only works when reading a post via the WordPress website. You won’t see it if you’re reading a post in the WordPress Reader or the Jetpack App unless you click through to the website. This time, it runs until 4th January 2026. But how do you turn the feature on or off? Easy – follow my instructions.
Go to your blog’s dashboard and click Settings – General.
Scroll down the page until you come to ‘Snow.’
You’ll see a box with the words ‘Show falling snow on my site until January 4th.’
Where to turn on/off falling snow on your WordPress blog
If you want snow to fall on your blog, tick the box. If you don’t want snow falling on your blog, untick the box.
Click the ‘Save Changes‘ box at the bottom of the page.
Ensure the changes are effective by opening one of your posts on the WordPress website.
I’m not a lover of anything moving onscreen while I’m reading, as I find it distracting. However, I know that many bloggers love the idea of gently drifting snowflakes while they read blog posts during the festive season.
The choice is yours. And now you know how to switch on or turn off snow falling on your blog.
For the above instructions, I’m using a desktop computer. The falling snow effect is only controlled through your WordPress.com dashboard, not the Jetpack mobile app.
Is it snowing on your blog? If not, do you want it to snow? Let me know why you like or dislike the idea of snowflakes drifting on WordPress blogs.
The featured image on this blog post is sourced from Pixabay. AI reviewed spelling and grammar errors.
I’m surprised by how many bloggers miss the opportunity of having their posts shared for free by not displaying sharing buttons on their blog posts.
Of course, some bloggers don’t want any of their posts shared, but they tend to be in the minority.
In today’s digital age, having social sharing buttons on your blog is crucial for expanding your reach and boosting engagement. This post will guide you through the steps to add sharing buttons to your WordPress blog and emphasise the benefits of including them.
For the purpose of this guide, I’m using an iMac desktop computer.
To add and edit sharing buttons on your WordPress.com blog, follow these steps:
Log in to your WordPress.com account.
From your dashboard, navigate to ‘Settings‘ and select ‘Sharing.’
Click the ‘Sharing’ option.
You’ll be taken to the ‘Sharing Options‘ page of your blog, where you will see a variety of options that include –
Available services
Enabled services
Live preview
Button style
Sharing label
Show buttons on
WordPress.com Likes are
WordPress.com Reblog button
Comment Likes are
Let’s have a look at each of these options and what they mean.
Available services – This displays any sharing buttons not currently visible on your blog. To add an available sharing button, drag it to the ‘Enabled services‘ box and click the ‘Save‘ button at the bottom of the page.
There is also an ‘Add a new service‘ link that, when clicked, allows a user to add new sharing services that are not currently available on WordPress.
Enabled Services – This section shows all the sharing buttons currently on display on your blog. Here’s an image of the sharing buttons available on my blog posts and pages.
Sharing buttons on Hugh’s Views And News blog.
Notice the ‘Customise buttons‘ link under the buttons. Click this to be taken straight to the ‘Sharing options‘ page of your blog.
You may also have noticed the ‘More‘ sharing button. This is where you can group certain sharing buttons under one button. To do this, simply drag the buttons you want to hide to the ‘Services dragged here will be hidden behind a share button‘ box. On my blog, the ‘More‘ button includes sharing buttons for ‘X’, ‘Email’ and ‘Print.’
Hide sharing buttons behind one button.
To rearrange the order of how sharing buttons display on your blog, simply drag the buttons to the order you want them in. Remember to save any changes.
To remove a sharing button from your blog, drag the button to the ‘Available services‘ section and click the ‘Save‘ button at the bottom of the page.
Live preview – This section shows how the sharing buttons display on your blog.
Button style – There are four options to choose from.
Icon + Text
Icon only
Text only
Official buttons
On my blog, I have chosen sharing buttons to show ‘Icon + Text’ as this helps those using speech software know which sharing button is which. If you use ‘Icon only,’ speech software won’t know what each sharing button is.
Sharing label – This section allows users to change and display their own message above their sharing buttons. Simply add the text you want and click the save button.
Show buttons on – Choose where on your blog you want sharing buttons to appear. Place a tick next to the options and click the save button.
Choose where you want the sharing buttons to display on your blog.
WordPress.com Likes are – This is where you can turn off (or on) the ‘Like’ button on blog posts and pages.
WordPress.com Reblog button – This is where you can turn off (or on) the reblog button on blog posts and pages.
Comment Likes are – This is where you can turn off (or on) the availability of a ‘like’ button on comments on your blog.
Once you’ve added sharing buttons to your blog, remember to always test them. The best way to do this is to visit one of your blog posts to ensure the sharing buttons appear as intended. Click on each button to check that it links correctly to the respective social media platforms.
Top tip: If you have an account on a social media platform, remember to ensure that there is a sharing button for that platform on your blog. You don’t need to remove share buttons where you don’t have an account, as other bloggers and readers may want to share your posts and pages to their own social media accounts. For example, I don’t have a Facebook account, but I allow visitors to my blog to share my posts and pages on their Facebook accounts.
But, at the end of the day, it’s your decision as to how many sharing buttons you want to display on your blog.
Advantages of Having Sharing Buttons on Your Blog
Increased Visibility: Sharing buttons allow visitors to easily share your content with their networks, leading to greater visibility and new readers.
Enhanced Engagement: When users share your posts, it engages their followers, creating conversations and interactions around your content.
Improved SEO: Social shares can boost your search engine rankings. Search engines often view shared content as more credible and relevant.
Brand/Blog Awareness: Every share increases exposure for your brand/blog, helping you capture a larger audience over time.
Traffic Boost: Each share potentially drives more traffic back to your blog, increasing your overall reach and influence in your niche.
User-Friendly: A streamlined sharing process enhances the user experience, encouraging visitors to interact more with your content.
By integrating sharing buttons into your WordPress blog, you not only make it easier for readers to share your posts but also create new opportunities for engagement and growth.
Summary:
Many bloggers miss out on free content-sharing opportunities by not displaying sharing buttons. These buttons are crucial for expanding reach and boosting engagement.
It’s easy to add and display sharing buttons on your WordPress blog. Follow the guide in this post.
Ensure you deal with each option available to you on the ‘Sharing options‘ page of your blog.
There are many advantages of displaying sharing buttons on your blog, including increased visibility, enhanced engagement and improved SEO ratings.
If you have a social media account, ensure you display a sharing button for that account on your blog.
Add as many sharing buttons as you like, even for those social media platforms where you don’t have an account.
Test that the sharing buttons are working correctly at least once every few months.
Make the most of the other options available on the ‘Sharing options’ page of your blog, such as switching on/off the like button and whether or not you want a ‘Reblog’ button to show.
I want to open up the conversation and hear from you. What social media platforms do you find most effective for sharing your blog content? Have you noticed an increase in your blog traffic after adding sharing buttons? How much of a difference has it made? Have you experimented with the different button styles? Which one do you think looks best on your blog? If you could add one feature to the sharing buttons on your blog, what would it be and why?
Layout, content, settings, and format might differ on self-hosted blogs.
Click the buttons below to follow Hugh on Social Media
The featured image on this blog post is taken from Pixabay. AI checked spelling and grammar mistakes. Images, which were taken from screenshots of my blog, were created by me.
Copyright @ 2025 hughsviewsandnews.com – All rights reserved.
The majority of bloggers understand the importance of visual content. Posts that include images receive up to 70% more traffic than those that contain no images. However, there is one major pitfall associated with using images in blog posts, which I will address shortly.
Images not only enhance the appeal of our posts but also help us communicate our messages more effectively. However, a key question remains: where do you source your images and photographs for your blog posts?
Are you breaking the law by using images that are not your own?
I’ve become concerned by the increasing number of bloggers using images or photos without giving credit to the owner or specifying the source of the image. Many of these images have been obtained from the internet; some are copyrighted and not freely available for use. Bloggers using these images and photos are breaking the law.
Some bloggers believe they will never be caught using copyrighted images and photos. They argue that their blog is too small for anyone to care. Nobody will come after them. However, I am aware of a few bloggers who have been prosecuted and fined for downloading and using copyrighted images and photos on their blogs.
It may also not have crossed the minds of some bloggers that there are serious consequences for using images and photos to which they do not have the rights in their posts. Hence, this post.
Where do bloggers get their images from?
Some bloggers, including myself, use stock photo websites that provide images and photos for free. However, even some of these can incur costs if the images are only free to use for a limited time or require the user to give full credit to the owner, along with a link to where the image was sourced. Always read the small print before using any images or photos that are not your own.
Here’s an example. The following image is from Pixabay, a website that offers a wide range of free-to-use images and photos.
Notice that I have given credit to the person who created the image and where I obtained it from. The image is free to use, and although the content licence summary states ‘Use Content without having to attribute the author (although giving credit is always appreciated by our community!).’ I always include an attribute along with links to the source of the image.
Always check the content licence summary before downloading an image or photo from the internet and using it in a blog post. Ensure you follow any rules around the use of the image.
The perils of using copyrighted images
While it might be tempting to use appealing images from the internet, downloading and using copyrighted images and photos can result in serious legal trouble. Here are some risks to bear in mind:
Legal Consequences
Using copyrighted images without permission can lead to copyright infringement, which may result in potential legal action against you. This may result in hefty fines, the removal of your post, or even the closure of your blog, not to mention damage to your reputation.
Image Attribution Challenges
Even when images are shared with the intention of being used by others, understanding the precise attribution requirements can be confusing. Each source may have different rules, and failing to follow them can put you at risk.
Quality Concerns
Some free or low-cost images can often be of lower quality, which can damage the professionalism of your blog. Conversely, high-quality images usually come at a price, highlighting the importance of responsible sourcing. However, they can eat into your media space unless you reduce the size, which may then affect the quality.
The Perils of Reblogging
If you reblog a post of another blogger that contains images and photos, don’t think you are safe from prosecution if any of those images or pictures are copyrighted. You, too, could be fined for resharing images or photos that are not free to use, even though all you did was reblog the post. If you are not absolutely certain where those images and photos originated and whether they are free to use, don’t reblog the post.
Availability of Alternatives
Fortunately, there are many alternatives to using copyrighted images. Consider the following options:
Stock Photo Websites: Sites like Unsplash, Pexels, and Pixabay offer free images that are often licensed for commercial use.
Creative Commons: Use images that offer a Creative Commons license, ensuring you follow any stipulations regarding attribution or modification.
Original Content: Creating your own images can be the most reliable way to ensure your visuals are unique and free of legal concerns.
AI: Make use of the AI image creator on WordPress. It’s easy to use, although it doesn’t always come up with something relevant, especially if you don’t provide a clear enough description of what you want it to create, but I’ve found it very useful.
Summary:
In conclusion, sourcing images for your blog posts is an essential aspect of content creation that warrants careful consideration. However, be aware and always check if images and photos that do not belong to you are free to use!
The simplest way to avoid copyright issues with images and photos is to always use your own.
I want to open up the conversation and hear from you. What resources do you rely on for images? Do you have any favourite stock photo sites, or do you prefer to create your own visuals? Have you tried the WordPress AI image creator? What did you think of the images it created? Let’s discuss the various avenues we can explore to source images, and perhaps you’ll discover new options along the way.
The featured image in this blog post is taken from Pixabay. AI checked spelling and grammar mistakes.
Click the buttons below to follow Hugh on Social Media
I recently began receiving emails from WordPress informing me that another blogger has recommended my blog.
Of course, there’s an easy way to recommend another blog simply by writing and publishing a post and linking to that blog, but this new way of recommending another blog was something I thought was much better.
After all, once you read a post recommending a blog, it isn’t long before that post gets pushed down your reader list, until it’s probably forgotten about. So, if you haven’t read the post or maybe thought you’d come back to it later, you probably won’t.
However, this new method of recommending a blog is better because the blogs you recommend appear on your Gravatar profile when using the WordPress Reader, which means that anyone checking your Gravatar will see a list of the blogs you recommend.
It’s easy to add the blogs you want to recommend. I’m using an Apple iMac desktop computer to demonstrate this. Here’s how to do it.
On the dashboard of your blog, click the ‘Reader‘ icon (represented by a pair of spectacles).
Click the ‘Reader’ icon.
On the Reader menu, open ‘Lists‘ and click on ‘Recommended Blogs.’
Click the Recommended Blogs link.
Click the ‘Edit‘ button and open the ‘Sites‘ tab. As you will see from the image below, I’ve already recommended some blogs.
Click the ‘Sites’ tab.
To remove a recommended blog, click on the ‘Remove‘ button.
To add a blog, start typing the name of the blog in the ‘Search or enter URL to follow‘ box, and a list of suggestions will appear.
Start typing to display a list of blogs.
Click the ‘Recommend‘ button to add a blog to your Recommended Blogs list. Note that if you are already following a blog, you’ll see ‘Subscribed‘ next to it.
The blog you recommended is now added to your Recommended Blogs list and will appear whenever anyone hovers their mouse over your Gravatar profile in the WordPress Reader. Click the ‘View All‘ link to see a list of all the blogs they recommend.
As you recommend blogs, they will appear on your Gravatar profile.
Whenever another blogger recommends your blog, you should receive a notification email from WordPress with the details of who has recommended your blog, provided you have not switched off notifications. However, I’ve not yet seen these notifications appear under the notification bell icon.
Based on my observations, after clicking on the Gravatars of many bloggers, few have recommended any blogs so far. Additionally, some bloggers haven’t included their blog details on their Gravatar, making it harder for others to find their blog. And remember that if you leave comments on other blogs, your Gravatar will appear next to your comment.
Have you seen this new feature on WordPress? Has anyone recommended your blog in this way? Will you start using the ‘Recommend Blog’ feature? Have you added your blog details to your Gravatar?
Layout, content, settings, and format might differ on self-hosted blogs.
The featured image in this blog post is taken from Pixabay. AI checked spelling and grammar mistakes.
Click the buttons below to follow Hugh on Social Media
What do you do to make it easy for your readers to contact you?
Most bloggers aim to connect with their audience. This is mainly achieved through the comments section of blog posts, but sometimes someone may wish to contact you privately, which may not be suitable for public view. For example, I receive messages asking for help with WordPress or requests to buy a signed copy of one of my books. Nobody wants to share their address, email, or contact number in the comments section.
A ‘Contact’ page is an important connection point between a blogger and their readers, offering a convenient way to get in touch privately. If you look at the menubar of my blog, you’ll see a ‘Contact Hugh‘ link. That’s where any visitor to my blog can contact me privately.
Here’s why you should prioritise having a Contact page on your blog and how to easily set one up.
Benefits of Having a Contact Page
1. Establishes Credibility
Having a dedicated Contact page gives your blog a welcome and friendly impression. It demonstrates that you’re open to communication and approachable, increasing your credibility with readers and new visitors.
2. Facilitates Communication
A Contact page offers a clear and straightforward way for visitors to get in touch with you. Whether they have questions, feedback, or collaboration ideas, this page acts as a direct link to you, preventing confusion about how to contact you.
3. Encourages Engagement
By encouraging readers to contact you, you’re promoting engagement with your audience. This can lead to meaningful discussions, valuable feedback, and even new ideas for content, further benefiting and enhancing your blog.
4. Supports Networking Opportunities
For the majority of bloggers, networking is essential. A Contact page makes it easy for other bloggers to reach out for collaborations, sponsorships, or guest posting opportunities, contributing to your blog’s growth and visibility.
5. Keeps Your Private Details Private
Having a contact form means you don’t need to share your personal details, like an email address, on your blog. After all, do you know everyone who visits your blog? Even if you provide an email address solely for your blog, advertising it will attract spam, spammers, and trolls.
Some bloggers might prefer not to engage with their audience, so a Contact page may not be essential. However, if you choose not to engage, ensure you turn comments off.
How to Install a Contact Page
Creating a Contact page is a simple process. Here’s how you can set one up on your blog. For this purpose, I’m using an Apple iMac desktop computer.
Go to the dashboard of your blog, click Pages and then Add Page.
Click ‘Add Page.’
Title your page ‘Contact’ or ‘Get in Touch’ or choose a title you prefer.
Add a Contact template. WordPress offers several ‘Contact’ templates. To find them, click the ‘+‘ symbol in the top-left corner of the page, then select Patterns and Contact.
Click ‘Contact’ to find the WordPress contact templates.
Choose the template you want to use and make any edits to it. For the contact form on my blog, I used Template Number One.
Preview your contact form before publishing it. Once you’re happy, click the publish button so it appears on your blog.
Tip: Yes, you’ll likely receive spam or spam bots trying to contact you. To quickly sort out those messages, add a line to your Contact form giving instructions on what to do. I added the following details to my Contact form –
Please complete and submit the form below to contact me securely. To verify that you are not a bot or spam, please start your message with ‘Dear Hugh.’ I will then get back to you as quickly as possible.
Messages that do not start ‘Dear Hugh’ will be marked as spam.
And guess what, it works!
You can also find additional Contact forms under Jetpack – Forms (select the ‘About‘ tab) on the dashboard of your blog.
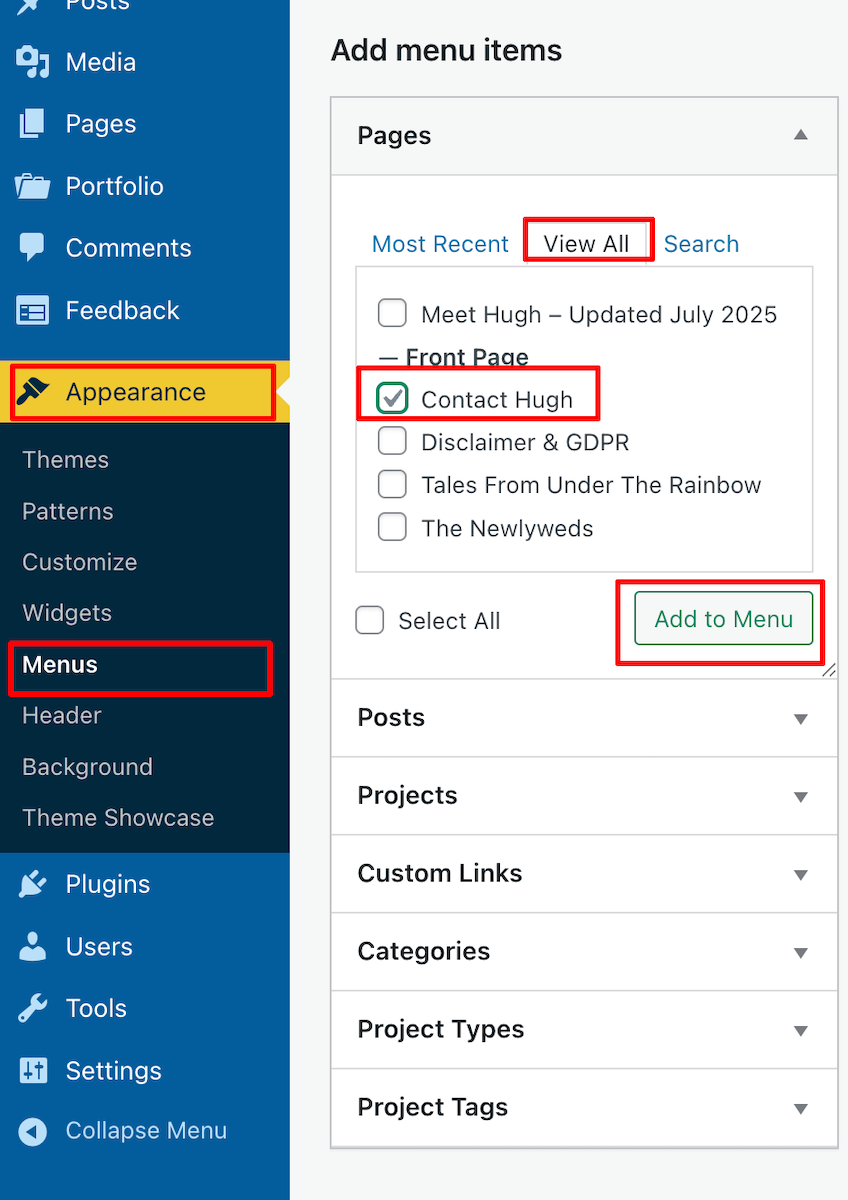
Next, to make it easy for readers to contact you, add your contact form to the menubar of your blog.
On the dashboard of your blog, go to Appearance – Menus.
Search for your Contact form by clicking View All, tick the box next to it, and click the ‘Add To Menu’ Button.
Add your Contact form to your blog’s menubar.
Click the Save Menu button at the bottom of the page.
To reposition the Contact form on the menubar, on the Menus page, click on it and drag it to the desired location. Remember to click the Save Menu button after any changes.
Click and drag the contact form button to move it on the menu bar.
Check the menubar of your blog to ensure the Contact form is visible and in the correct place.
WordPress also offers Contact forms plugins.
Contact Form 7:
Install and activate the plugin.
Go to Contact – Add New in the dashboard.
Customise your form fields as needed, then save.
Copy the shortcode provided and paste it into your Contact page.
Add the Contact form to your menubar.
WPForms:
Install and activate the plugin.
Create a new form using their drag-and-drop builder.
Save your form and copy the shortcode.
Paste the shortcode into your Contact page content.
Add the Contact form to your menubar.
How do I know when somebody has contacted me via my Contact form?
WordPress sends an email to you whenever anyone contacts you via the Contact form (except when they consider it as spam). Users will also see a notification under Jetpack – Forms on the dashboard of their blog.
Anything considered spam by WordPress goes straight to the spam folder. Spam is deleted automatically after 30 days, so there’s no need to worry about it.
Conclusion
Having a Contact page is essential for fostering communication and building relationships with your audience. By following these simple steps, you can easily set up a Contact page on your blog and start engaging with your visitors today!
Do you have a way that visitors to your blog can contact you directly? Any questions? Leave them in the comments section or contact me directly.
Layout, content, settings, and format might differ on self-hosted blogs.
The featured image in this blog post is taken from Pixabay. AI checked spelling and grammar mistakes.
Click the buttons below to follow Hugh on Social Media
Imagine turning on your computer, laptop, or phone and discovering that your blog had vanished without a trace. What a horrible nightmare, yes?
In the 12 years I’ve been blogging, it has never happened to me, although there was an occasion when the setup of my blog (and that of many others) changed completely overnight, all due to a bug that affected many WordPress blogs. Fortunately, it was fixed quickly, even though it caused many users a nightmare they never thought would happen.
If you’re a WordPress.com blogger, be assured that if your blog and all its content suddenly vanish, WordPress will have a backup. Regardless of your WordPress plan, WordPress backs up every blog and keeps a copy, just in case it is ever needed. All you need to do is contact WordPress and request the file. They will send you a file containing the most recent backup they made. However, as we will discuss later, backups do not include everything.
But there’s no need to contact WordPress
If you’ve ever had a bad experience contacting WordPress or don’t want to contact them, there is another step you can take to ensure you have a backup of your blog. I’m using an Apple iMac desktop computer for the following guide.
How to backup your WordPress blog.
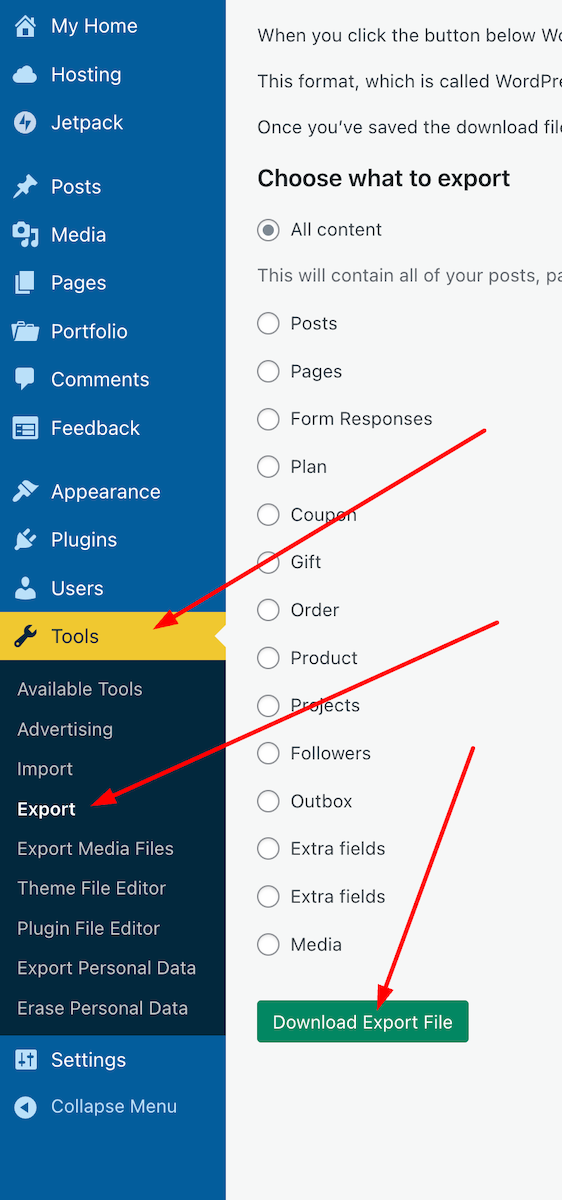
On the dashboard of your blog, go to Tools – Export.
Choose the items you wish to export (I recommend ‘All content‘) and click the ‘Download Export File‘ button.
Press these buttons to begin the process of backing up your WordPress blog.
You will see a message informing you that your export file is being processed, along with the email address where a download link will be sent once the process is complete.
Access your email account where the link is sent, locate the email, and open it. Click on the ‘Download‘ button within the email.
Click the ‘Download’ button in the email.
The file will be downloaded to your device. Ensure you remember its location and move it to another folder if necessary. I’ve created a file on my computer called ‘WordPress Backups’. Note that the file is only available for download for 7 days.
Remember to delete any previous WordPress backup files to free up memory on the device you are using.
The backup file you have downloaded does not include any media such as images, videos, or photographs. To back up media, follow the above instructions but select ‘Export Media Files‘ from the Tools menu – Tools – Export Media Files.
Do the backup files include everything?
It depends on which WordPress plan you have.
Users on a Free, Personal, or Premium plan can back up content and media. However, themes and plugins are not included in the backup. Therefore, if you ever need to download a backup file and have been using a retired theme that WordPress no longer supports, you will need to choose a new, current theme that is still supported. You’ll also need to download any plugins your blog uses.
Those with Business or Commerce plans have access to Jetpack Vault Backup, which allows them to view and restore backups at any time from their blog’s dashboard. This can be accessed at Jetpack – Backup. These backups include everything, including the theme and any plugins you use.
Click the Backup link to access the Jetpack Vault backup file.
Should I need to worry about backing up my blog?
Given that WordPress backs up your blog, no! However, for total peace of mind, and depending on how often you publish posts, you might consider backing up your blog at least once a month. If you publish posts daily or more frequently, I’d recommend backing up your blog at least once a week. However, after performing a backup, remember to delete the previous backup file.
Most likely, you’ll never need a backup copy of your blog, but I suggest you save a copy of this post in case you ever lose all the content of your blog.
All WordPress blogs also come with an ‘ActivityLog‘ feature where bloggers can reinstall posts they have deleted by mistake. However, this feature is limited by the extent to which you can recover posts, depending on the WordPress Plan you have.
Click the Activity Log button to see the most recent activity on WordPress.
Conclusion:
WordPress automatically backs up WordPress.com blogs, but it doesn’t include everything.
Users can contact WordPress and request a copy of the backup file.
Users can backup their blogs via the dashboard.
For backing up media files, remember to perform a backup by going to Tools – Export Media Files.
What is backed up depends on your WordPress plan.
Business or Commerce plan users have access to Jetpack Vault Backup, which includes everything (themes, plugins, etc.) and can be accessed at any time via the dashboard.
Backup links are only valid for 7 days.
Remember to delete previous backup files to free up space on your device.
While WordPress does back up your blog, regular manual backups (such as monthly or weekly) are recommended for added peace of mind.
The Activity Log feature allows recovery of accidentally deleted posts, with limitations based on your plan.
Keep a copy of this guide for future reference.
Have you ever lost content on your blog? If so, how did you handle it? What has been your experience with WordPress backups? Have you ever had to restore a backup? Are there any specific plugins or tools you recommend for backing up a self-hosted blog? Would you prefer to rely on WordPress’s automatic backups, or do you believe manual backups are essential? Join the discussion and leave your comments and answers.
Layout, content, settings, and format might differ on self-hosted blogs.
The featured image in this blog post is taken from Pixabay. AI checked spelling and grammar mistakes.
Click the buttons below to follow Hugh on Social Media
WordPress has introduced a useful new feature that benefits all users, including those with a ‘Free’ plan.
With just a few clicks, you can check whether the version of WordPress you are using is up to date, whether any plugins you have installed are current, and if the theme of your WordPress site is the latest release.
Here’s how to verify that all your WordPress installations are up to date. I am using an Apple iMac desktop computer for this guide.
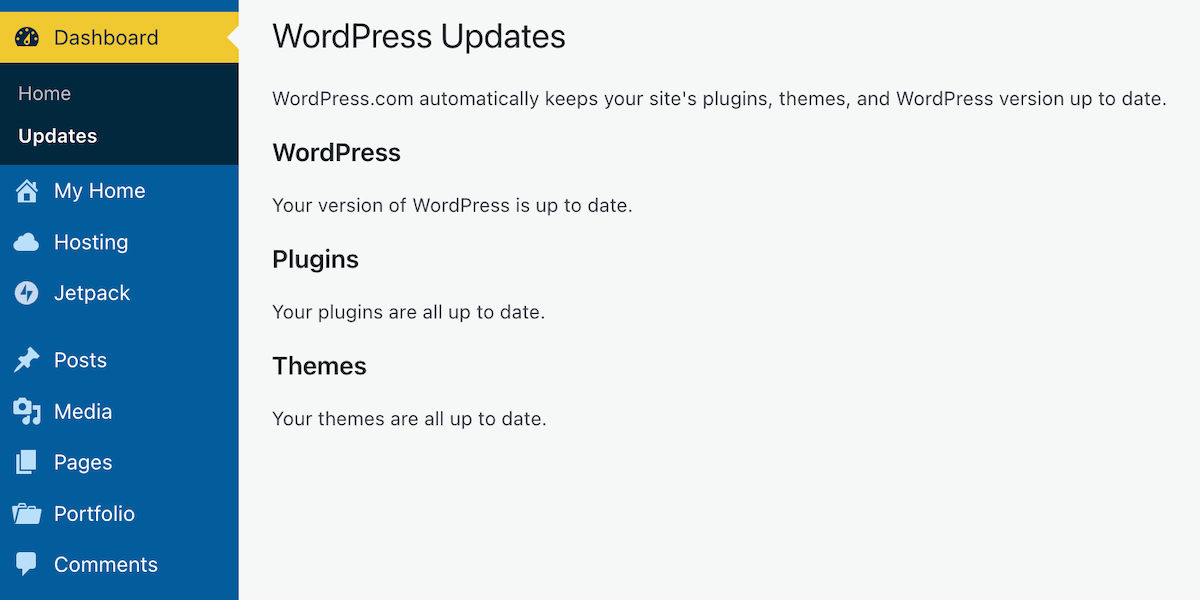
Go to the dashboard of your blog and click on Dashboard – Updates.
Click the ‘Update’ button.
After clicking on Updates, you will see a page that informs you whether you are using the latest version of WordPress, plugins, and the WordPress theme you have installed.
Is everything on your WordPress blog updated?
If, like me, you are a WordPress.com user, WordPress will keep all these items up to date for you. So, why am I then informing you of this feature? Well, it’s all about retired themes and plugins that cause problems.
If you are using any plugins or a theme that has been retired, even if it appears you have the latest versions, any bugs affecting the theme or plugin since the final update will no longer be fixed because WordPress has withdrawn support.
How do I find out if the WordPress theme I’m using is still supported?
To find out if the WordPress theme you are using is still supported (and receiving updates), visit your blog’s dashboard and click Appearance – Themes. You will see a message indicating your theme is retired if it is no longer supported by WordPress. As we all know, using outdated themes can cause numerous problems for users.
Although a retired theme might not cause problems now, it could in the future. Some users attempt to use a workaround to avoid issues, but this is not advised, as it may lead to further problems. Instead of a workaround, switch to a current theme fully supported by WordPress. You don’t have to move to a Block theme if you prefer not to, since many Classic themes remain supported by WordPress. I am still using a Classic theme (Toujours) on my blog, which is fully supported.
Using an outdated, unsupported theme can lead to several issues. Here are a few.
1. Security vulnerabilities: Without ongoing updates, the theme may become prone to security risks that could compromise your blog. 2. Compatibility issues: As plugins and WordPress itself update, an outdated theme may not function correctly with newer versions, causing layout glitches, functional problems such as not being able to leave comments and issues with WordPress believing you are not logged in. 3. Lack of support: You won’t have access to official support for troubleshooting any issues or queries that arise with the theme. WordPress will advise you to change to a supported theme. 4. Performance issues: Unsupported themes may not be optimised for speed and performance, leading to slower load times. 5. Missed features: Regular updates often include new features and improvements; sticking with an unsupported theme means missing out on these enhancements, which could benefit your blog’s features and user experience.
If you are using a retired theme and refuse to switch to a supported one, there’s no point in blaming WordPress for any problems with your blog. It’s not their fault if you continue to use something they no longer support.
The best approach is to find a new plugin that provides similar functionality. You can search the WordPress plugin repository or other trusted sources for alternatives.
Conclusion:
Many users often blame WordPress for blog-related issues, which are frequently due to user error or outdated software on their devices.
WordPress has introduced a new feature that allows users, even on the free plan, to check if their WordPress version, plugins, and theme are up to date.
To check for updates, navigate to Dashboard – Updates in your blog’s dashboard. If everything is updated, great!
However, if you’re using retired themes or plugins, you won’t receive support or fixes for any issues that arise.
Unsupported themes can lead to security vulnerabilities, compatibility issues with newer updates, a lack of support, performance problems, and the omission of key features.
To determine if your theme is still supported, navigate to Appearance – Themes in the dashboard.
If it’s retired, consider switching to a supported theme or plugin for better performance and security.
Have you ever faced issues with outdated themes or plugins on your WordPress blog? How did you go about resolving them? Which themes are you currently using, and have you checked if they are still supported? Do you have any WordPress tips to share with others?
Layout, content, settings, and format might differ on self-hosted blogs.
I’m getting tough with non-engaging comments. Comments such as ‘Nice post’ are marked as spam.
The featured image in this blog post is taken from Pixabay. AI checked spelling and grammar mistakes.
Click the buttons below to follow Hugh on Social Media
Have you ever found yourself lost in the rabbit hole of themes while setting up your WordPress blog? Are you an existing blogger who needs to change an outdated, unsupported theme? Many bloggers embark on this journey—one filled with excitement, anxiety, and the quest for the perfect layout.
As I look back on my blogging evolution, I can’t help but recall the days of choosing that first simple theme, a decision that would shape my entire online presence. Little did I know, this was just the beginning of an adventure that would change with every new theme and update!
How did it all begin?
The first theme I chose was straightforward. It featured a space to add a profile picture and little else. It targeted first-time bloggers who sought a simple layout and a quick start. It got me off to a great start.
As the years progressed, I became more confident in changing the theme of my blog. I wanted a side widget bar to add information, such as a follow button, links to my social media accounts, and a box with links to previous posts.
That first theme change took me a whole weekend to complete. It wasn’t particularly complicated, but it required much work to ensure everything was as I wanted. After all, my followers had increased, and more people were visiting my blog, and I didn’t want anyone to think I was stuck in 2014 or going backwards in the blogging world.
Other theme changes occurred; each time, I found it easier and took less time to change themes. Then it came to a grinding halt.
Full-Site editing themes
Fast-forward a few years, and I considered changing my blog’s theme from the Classic theme I had been using to a new Full-Site-Editing (Block) theme. However, it seemed too complicated, and I was reading posts from other bloggers detailing the difficult transition they had gone through and a list of problems they faced. It reminded me of stories I’d read when some bloggers switched from WordPress.com to self-hosting their blogs.
Today, I’m still using a supported WordPress Classic theme (Toujours), and even though I have thought long and hard about switching to a Block theme, I haven’t jumped ship.
Future themes are here, but there’s a catch!
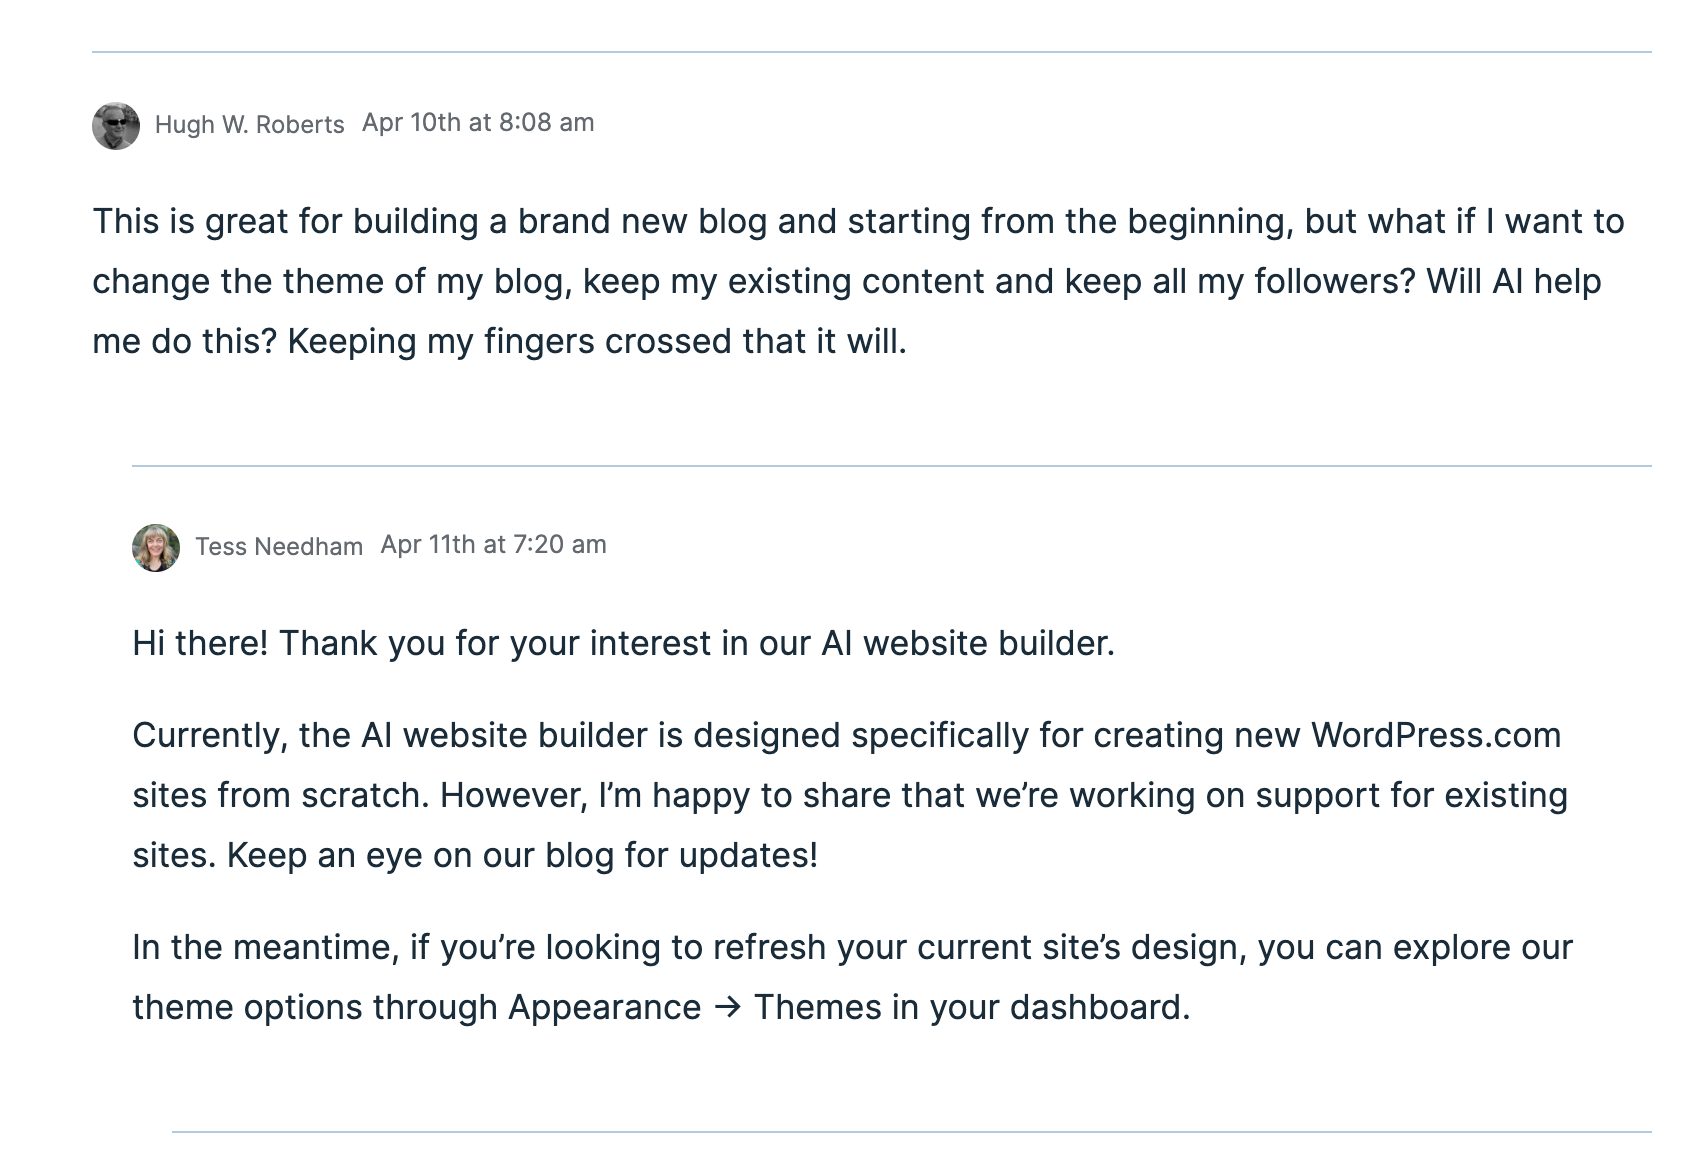
Last week, WordPress announced that anyone using WordPress could build a blog theme using AI for free. All you have to do is give AI some information about the type of layout you are looking for, and it’ll build the theme and do all the work for you.
Not only was I excited by this news, but it got me thinking about all those bloggers experiencing problems with their blogs because the theme they use is outdated and no longer supported by WordPress. These bloggers could let AI build a theme for their blog and eliminate all the problems they’re experiencing once and for all.
But what about those who won’t use AI? Would they rather continue using outdated, unsupported themes than allow AI to help them?
Using an outdated, unsupported theme can lead to several issues. Here are a few.
1. Security vulnerabilities: Without updates, the theme may become prone to security risks that could compromise your blog. 2. Compatibility issues: As plugins and WordPress itself update, an outdated theme may not function correctly with newer versions, causing layout glitches, functional problems such as not being able to leave comments and issues with WordPress believing you are not logged in. 3. Lack of support: You won’t have access to official support for troubleshooting any issues or queries that arise with the theme. WordPress will advise you to change to a supported theme. 4. Performance issues: Unsupported themes may not be optimised for speed and performance, leading to slower load times. 5. Missed features: Regular updates often include new features and improvements; sticking with an unsupported theme means missing out on these enhancements, which could benefit your blog’s features and user experience.
We’re not quite there yet!
Unfortunately, after a few messages exchanged between a member of WordPress staff and me, I discovered that this new service of AI creating a theme for your blog is only available to those who want to start afresh with a brand new blog. The AI software can not change themes for an existing blog. However, WordPress is working on this, and it will become available sometime in the future.
Would you allow AI to help you change the theme of your blog?
Given that I’m not confident about changing my blog’s theme from my current theme to a full-site-editing theme, I’m looking forward to AI doing the work for me. I just hope it’s something I’ll be able to do sooner rather than later.
Recommended reading about AI in blogging from other bloggers.
This post from Debbie at Deb’s World, “Reinventing Blogging: A Look into the Future,” dives into the controversial realm of AI in blogging, and trust me, it’s a must-read that has ignited plenty of debate. Are you ready to jump into the fray and add your voice to the discussion?
Would you use and trust AI to help change your blog’s theme? Are you still using an outdated, unsupported theme and experiencing problems? Are you someone who will never use AI, even if it means the problems you’re experiencing with your blog will continue? Drop your thoughts in the comments, and let’s chat!